
Validate ListBox and DropDown List using Required Field Validator

ASP.NET Core Course
Validate ListBox and DropDown List using Required Field Validator: An Overview
To validate ListBox and DropDown List using Required field validator is sometimes a need, while we are working in Asp.net. It is tricky and avoids the use of JavaScript function to validate ListBox and DropDown List. Through this Tutorial, we will learn How to validate DropDown List and ListBox with Example Program, Its Implementation Steps and much more. Get to explore more about other ASP.NET features and concepts through our ASP.NET Certification Training Program.
Read More: Top 50 ASP.NET Core Interview Questions and Answers for 2024
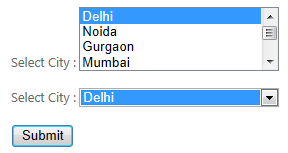
Validate DropDown List and ListBox
Here is an example to show how you can validate DropDown List and ListBox:
 <form id="form1" runat="server">
<div>
 <asp:ListBox ID="lstboxCity" runat="server" Width="200px" SelectionMode="Multiple">
 <asp:ListItem Value="1">Delhi</asp:ListItem>
 <asp:ListItem Value="2">Noida</asp:ListItem>
 <asp:ListItem Value="3">Gurgaon</asp:ListItem>
 <asp:ListItem Value="4">Mumbai</asp:ListItem>
 <asp:ListItem Value="5">Pune</asp:ListItem>
 <asp:ListItem Value="6">Banglore</asp:ListItem>
 <asp:ListItem Value="7">Lucknow</asp:ListItem>
 </asp:ListBox> <asp:RequiredFieldValidator ID="RequiredFieldValidator1" ControlToValidate="lstboxCity" InitialValue="" runat="server" ErrorMessage="Please select atleast one city"></asp:RequiredFieldValidator>
</div>
<br />
<div>
 <asp:DropDownList ID="ddlCity" runat="server" Width="200px">
 <asp:ListItem Value="0">--Select--</asp:ListItem>
 <asp:ListItem Value="1">Delhi</asp:ListItem>
 <asp:ListItem Value="2">Noida</asp:ListItem>
 <asp:ListItem Value="3">Gurgaon</asp:ListItem>
 <asp:ListItem Value="4">Mumbai</asp:ListItem>
 <asp:ListItem Value="5">Pune</asp:ListItem>
 <asp:ListItem Value="6">Banglore</asp:ListItem>
 <asp:ListItem Value="7">Lucknow</asp:ListItem>
</asp:DropDownList>
<asp:RequiredFieldValidator ID="RequiredFieldValidator2" ControlToValidate="ddlCity" InitialValue="0" runat="server" ErrorMessage="Please select city"></asp:RequiredFieldValidator>
 </div>
 <br />
 <asp:Button ID="btnSubmit" runat="server" Text="Submit" />
</form> 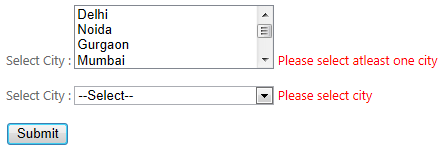
Note
For validating DropDown List, make sure you have "--Select--" option value 0 other wise validation on it will not work.
Read More: Why you need ASP.NET Core in your tech stack?
Implementation Steps
- Set up the Web Form-Create a new ASP.NET Web Form or if you have one, open it.
- Add ListBox and DropDownList controls-Add a ListBox and a DropDownList control where ever you want them in your form.
- Add RequiredFieldValidator controls-Next, you need to add a RequiredFieldValidator control to each control you want to validate and assign the 'ControlToValidate property to each of them.
- Set the error message-Set an error message with the help of 'ErrorMessage' property so if the validation fails, the message will appear. You can also customize the appearance of the message if you want to.
- Handle Form Submission-At last, you can handle form submission by subscribing to the click event of a submit button. Check the page if it is valid with the help of 'Page.IsValid' before processing the form.
Handling Validation Errors
- Display Error Messages- To each validated control, you can attach a error message using validation controls such as 'RequiredFieldValidator' or custom error messages with code-behind so that it displays whenever there is a validation error.
- Prevent Form Submission- You can also prevent the form from submitting if there is any validation errors. For doing that, you need to check if the page is valid using 'Page.IsValid' property before processing the form.
- Style Invalid Controls- Sometimes, what you can do is just style the invalid controls so that they stand out visually and you can do that using CSS or setting properties like 'ForeColor' and 'BackColor'.
Summary
In this article I try to explain how to validate DropDownList and ListBox using Required Field Validator. I hope after reading this article you will be able to use this trick in your code. I would like to have feedback from my blog readers. Please post your feedback, question, or comments about this article. Also, Consider enrolling in our ASP.NET Certification Course to delve deep into core concepts of ASP.NET with our comprehensive step by step guide.
FAQs
Q1. What is the purpose of the Required Field Validator in ASP.NET?
Q2. What types of validation errors can occur with ListBox and DropDown List inputs?
Q3. How do you add validation to a dropdown in HTML?
- Create the dropdown with the help of '<select>' element.
- Ensure that a selection is made before submitting the form by implementing client-side validation using JavaScript.
- You can, additionally, use HTML5 attributes such as 'required' on '<select>' element for built-in browser validation.
Q4. Are there any security risks associated with ListBox and DropDown List validation?
Take our free aspnet skill challenge to evaluate your skill

In less than 5 minutes, with our skill challenge, you can identify your knowledge gaps and strengths in a given skill.