
File upload with strongly typed view and model validation
01 Apr 2024
Intermediate
11.6K Views
4 min read
File upload: An Overview
Many times, we were required to upload files with a strongly typed view and also apply validation on uploading files using data annotation validators. In this MVC Tutorial, we will explore more about MVC which will include files using data annotation, uploading files in mvc4 in strongly typed view, and files validating using jQuery in mvc3 mvc4 in strongly typed view. Consider our ASP.NET MVC Course for a better understanding of all MVC core concepts.
How to do it.
Step 1: Designing model with data annotation validation
public class RegistrationModel
{
 [Required(ErrorMessage = "Please Enter Your Full Name")]
 [Display(Name = "Full Name")]
 public string Name { get; set; }

 [Required(ErrorMessage = "Please Enter Address")]
 [Display(Name = "Address")]
 [MaxLength(200)]
 public string Address { get; set; }

 [Required(ErrorMessage = "Please Upload File")]
 [Display(Name = "Upload File")]
 [ValidateFile]
 public HttpPostedFileBase file { get; set; }
}

//Customized data annotation validator for uploading file
public class ValidateFileAttribute : ValidationAttribute
{
 public override bool IsValid(object value)
 {
 int MaxContentLength = 1024 * 1024 * 3; //3 MB
 string[] AllowedFileExtensions = new string[] { ".jpg", ".gif", ".png", ".pdf" };

 var file = value as HttpPostedFileBase;

 if (file == null)
 return false;
 else if (!AllowedFileExtensions.Contains(file.FileName.Substring(file.FileName.LastIndexOf('.'))))
 {
 ErrorMessage = "Please upload Your Photo of type: " + string.Join(", ", AllowedFileExtensions);
 return false;
 }
 else if (file.ContentLength > MaxContentLength)
 {
 ErrorMessage = "Your Photo is too large, maximum allowed size is : " + (MaxContentLength / 1024).ToString() + "MB";
 return false;
 }
 else
 return true;
 }
}
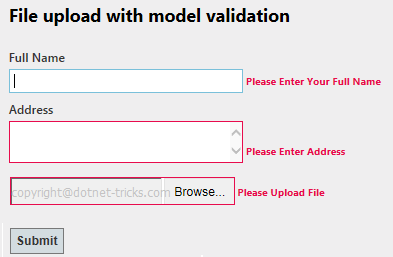
Step 2: Designing view based on the model
<h2>File upload with model validation</h2>
<h3 style="color: green">@ViewBag.Message</h3>

@using (Html.BeginForm("FileUpload", "Home", FormMethod.Post, new { enctype = "multipart/form-data" }))
{
 <fieldset>
 <legend></legend>
 <ol>
 <li>
 @Html.LabelFor(m => m.Name)
 @Html.TextBoxFor(m => m.Name, new { maxlength = 50 })
 @Html.ValidationMessageFor(m => m.Name)
 </li>
 <li>
 @Html.LabelFor(m => m.Address)
 @Html.TextAreaFor(m => m.Address, new { maxlength = 200 })
 @Html.ValidationMessageFor(m => m.Address)
 </li>
 <li class="lifile">
 @Html.TextBoxFor(m => m.file, new { type = "file" })
 @Html.ValidationMessageFor(m => m.file)
 </li>
 </ol>
 <input type="submit" value="Submit" />
 </fieldset>
}
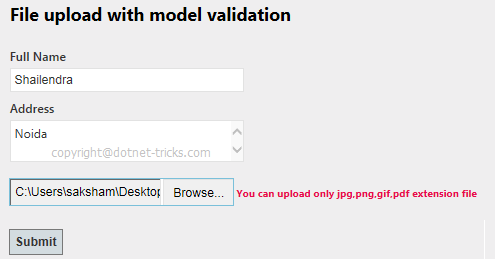
Step 3: Applying jQuery validation to validate the file
<script type="text/jscript">
//get file size
function GetFileSize(fileid) {
 try {
 var fileSize = 0;
 //for IE
 if ($.browser.msie) {
 //before making an object of ActiveXObject,
 //please make sure ActiveX is enabled in your IE browser
 var objFSO = new ActiveXObject("Scripting.FileSystemObject"); var filePath = $("#" + fileid)[0].value;
 var objFile = objFSO.getFile(filePath);
 var fileSize = objFile.size; //size in kb
 fileSize = fileSize / 1048576; //size in mb
 }
 //for FF, Safari, Opeara and Others
 else {
 fileSize = $("#" + fileid)[0].files[0].size //size in kb
 fileSize = fileSize / 1048576; //size in mb
 }

 return fileSize;
 }
 catch (e) {
 alert("Error is :" + e);
 }
}

//get file path from client system
function getNameFromPath(strFilepath) {
 var objRE = new RegExp(/([^\/\\]+)$/);
 var strName = objRE.exec(strFilepath);

 if (strName == null) {
 return null;
 }
 else {
 return strName[0];
 }
}

$(function () {
 $("#file").change(function () {
 var file = getNameFromPath($(this).val());
 if (file != null) {
 var extension = file.substr((file.lastIndexOf('.') + 1));
 switch (extension) {
 case 'jpg':
 case 'png':
 case 'gif':
 case 'pdf':
 flag = true;
 break;
 default:
 flag = false;
 }
 }
 if (flag == false) {
 $(".lifile > span").text("You can upload only jpg,png,gif,pdf extension file");
 return false;
 }
 else {
 var size = GetFileSize('file');
 if (size > 3) {
 $(".lifile > span").text("You can upload file up to 3 MB");
 }
 else {
 $(".lifile > span").text("");
 }
 }
 });
});
</script>
Step 4: Designing Controller
public ActionResult FileUpload()
{
return View();
}
[HttpPost]
public ActionResult FileUpload(RegistrationModel mRegister)
{
//Check server side validation using data annotation
if (ModelState.IsValid)
{
//TO:DO
var fileName = Path.GetFileName(mRegister.file.FileName);
var path = Path.Combine(Server.MapPath("~/Content/Upload"), fileName);
mRegister.file.SaveAs(path);
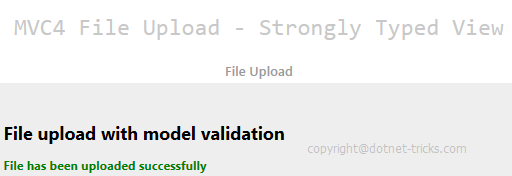
ViewBag.Message = "File has been uploaded successfully";
ModelState.Clear();
}
return View();
}
How it works...
Read More Articles Related to Design patterns
Conclusion
So in this article, we have learned about File upload with strongly typed view and model validation. I hope you enjoyed learning these concepts while programming with Asp.Net. Feel free to ask any questions from your side. Your valuable feedback or comments about this article are always welcome. Level up your career in MVC with our ASP.Net Core Certification.
FAQs
Q1. How to do validation for file upload?
To check the file content and extract the file signature.
Q2. What is file upload size limit validation in MVC?
The uploader control allows you to upload a minimum file size of 0 bytes and a maximum file size as 28.4 MB using the minFileSize and maxFileSize properties.
Q3. What does file validation mean?
It is the process of using an algorithm for verifying the integrity of a computer file, usually by checksum