
Dependency Injection in Angular

Angular Course
Dependency Injection in Angular: An Overview
Dependency injection is a core element of Angular, which includes both AngularJS and Angular. Google engineers expertly implemented this widely adopted software development concept into Angular. Essentially, dependency injection injects dependencies into Angular components. Enrolling in an Angular Tutorial or Angular Certification Course can provide you with a deeper understanding of dependency injection and other Angular concepts.
What is Dependency Injection in Angular?
Angular's Dependency Injection (DI) design simplifies component, class, and module connectivity while managing external dependencies within applications. This reduces the requirement for regular class or module modifications. Angular training improves comprehension of DI implementation by emphasizing the separation of service implementation and components in angular. This facilitates the testing and modification of injected services without affecting dependent components.

Goals
Learn Injectors.
DI Providers.
DI in action for example.
Specifications
If you have no idea what service is in Angular then I would suggest going and reading this article for 3 minutes Exploring Angular Services. It is a good explanation of services.
Why Dependency Injection is popular in Angular?
Because of Services
Angular Services is the concept that is meant to deal with HTTP data or any common data which supposed to be shared across a few components or in many components or multiple modules.
Because of Constructor Dependency Injection
If you don't know what is constructor dependency injection then don't worry, I will explain but just remember, dependency injection in Angular is popular because of the very easy way of constructor dependency injection in Angular. So here first let us understand these two important terms: Injectors and Providers, My earlier created service source code, let us watch it closely.
 import { Injectable } from '@angular/core';

 @Injectable({
 providedIn: 'root'
 })
 export class DateTimeService {

 constructor() { }
 }
The first thing you noticed Injectable has been imported from @angular/core and the second thing @injectable has been used default in service. So now we understand Injectable is the main ingredient of dependency injection. The class we have created provides a service. The @Injectable() decorator marks it as a service that can be injected, but Angular can't inject it anywhere until you configure an Angular dependency injector with a provider of that service.
A provider is an object that implements one of the Provider interfaces. A provider object defines how to obtain an injectable dependency associated with a DI token. An injector uses the provider to create a new instance of a dependency for a class that requires it. Angular registers its providers with every injector, for services that Angular defines. You can register your providers for services that your app needs. If you noticed In the above-created service then you can see the default implementation of the service is it is provided in the root. So now you might be having questions where all services can be as providers:
In Component as below
In Module (@NgModule)
In sub-module: So if you have different modules in the application if you want to use those services in a particular module then you can inject them in submodules.
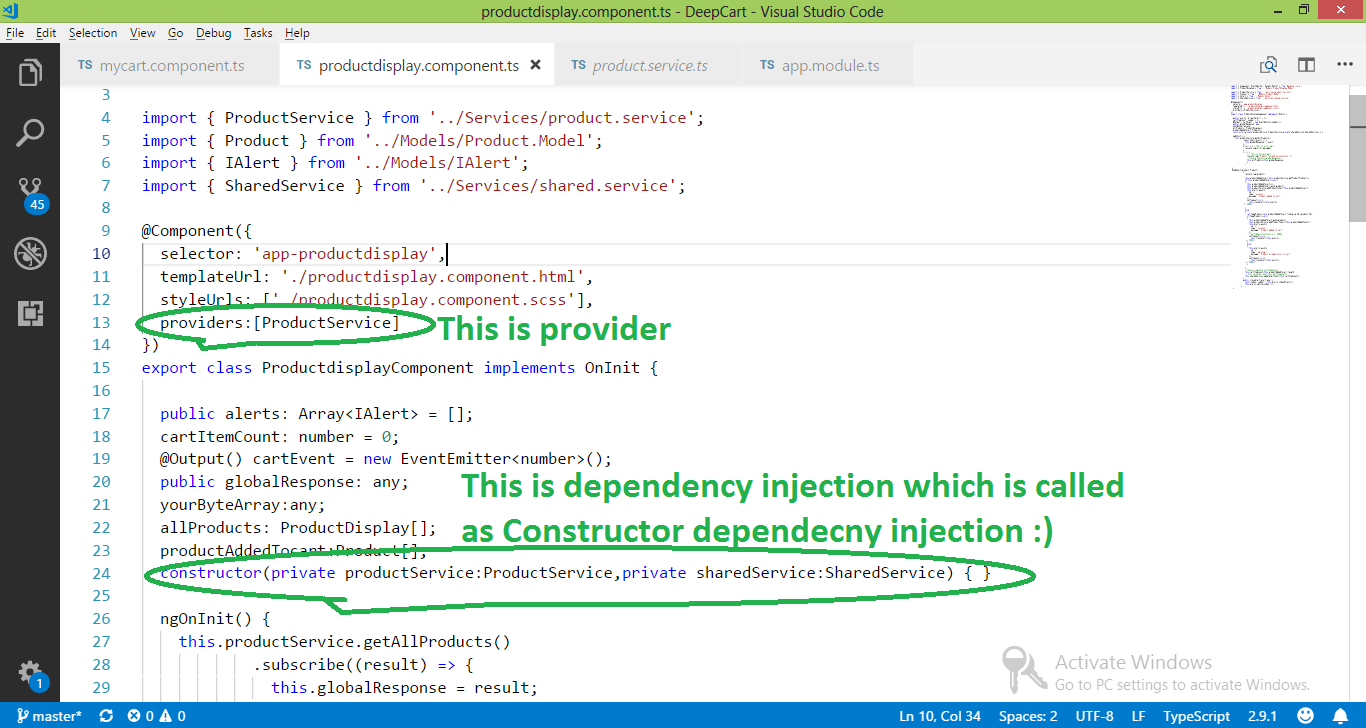
 @Component({
 selector: 'app-productdisplay',
 templateUrl: './productdisplay.component.html',
 styleUrls: ['./productdisplay.component.scss'],
 providers:[ProductService]
 })
 import { BrowserModule } from '@angular/platform-browser';
 import { NgModule } from '@angular/core';
 import {NgbModule} from '@ng-bootstrap/ng-bootstrap'
 import { HttpClient,HttpClientModule } from '@angular/common/http';
 import {FormsModule,ReactiveFormsModule,Validators,FormControl,FormGroup,FormBuilder} from '@angular/forms';

 import { AppRoutingModule } from './app-routing.module';
 import { AppComponent } from './app.component';
 import { ProfileComponent } from './profile/profile.component';
 import { AdminComponent } from './admin/admin.component';
 import { DashboardComponent } from './dashboard/dashboard.component';
 import { ProductdisplayComponent } from './productdisplay/productdisplay.component';
 import { MycartComponent } from './mycart/mycart.component';
 import { ProductService } from './Services/product.service';

 @NgModule({
 declarations: [
 AppComponent,
 ProfileComponent,
 AdminComponent,
 DashboardComponent,
 ProductdisplayComponent,
 MycartComponent,
 ],
 imports: [
 BrowserModule,NgbModule,FormsModule,ReactiveFormsModule,HttpClientModule,
 AppRoutingModule
 ],
 providers: [ProductService],
 bootstrap: [AppComponent]
 })
 export class AppModule { }
Dependency Injection in Action
First, you create a service, second, you assign a provider(it can be one of them out of the 3 mentioned above), third inject the service in the component using constructor dependency injection. Understanding the steps involved in service creation, provider assignment, and dependency injection is a fundamental aspect covered in Angular certification Training.
Let's say I have the below service:
 import { Injectable } from '@angular/core';
 import { HttpClient,HttpClientModule, HttpHeaders } from '@angular/common/http';
 import { Http, Response } from '@angular/http';
 import { Observable, of, throwError, pipe} from "rxjs"
 import { map, filter, catchError, mergeMap } from 'rxjs/operators';
 import { AuthenticationService } from './authentication.service';
 import { Product } from '../Models/Product.Model';

 @Injectable({
 providedIn: 'root'
 })
 export class ProductService {

 public apiURL:string="http://localhost:50148/api/Products";
 constructor(private httpClient:HttpClient, private authService:AuthenticationService) { }

 getAllProducts ()
 {
 return this.httpClient.get(this.apiURL)
 .pipe(
 map(res => res),
 catchError( this.errorHandler)
 );
 }
 addProductToCart(prodcuts: any) {
 localStorage.setItem("product", JSON.stringify(prodcuts));
 }
 getProductFromCart() {
 //return localStorage.getItem("product");
 return JSON.parse(localStorage.getItem('product'));
 }
 removeAllProductFromCart() {
 return localStorage.removeItem("product");
 }
 errorHandler(error: Response) {
 console.log(error);
 return throwError(error);
 }
 }
 import { Component, EventEmitter, Output,OnInit } from '@angular/core';
 import { ProductDisplay } from '../Models/ProductDisplay.Model';

 import { ProductService } from '../Services/product.service';
 import { Product } from '../Models/Product.Model';
 import { IAlert } from '../Models/IAlert';
 import { SharedService } from '../Services/shared.service';

 @Component({
 selector: 'app-productdisplay',
 templateUrl: './productdisplay.component.html',
 styleUrls: ['./productdisplay.component.scss'],
 providers:[ProductService]
 })
 export class ProductdisplayComponent implements OnInit {

 public alerts: Array<IAlert> = [];
 cartItemCount: number = 0;
 @Output() cartEvent = new EventEmitter<number>();
 allProducts: ProductDisplay[];
 productAddedTocart:Product[];
 constructor(private productService:ProductService,private sharedService:SharedService) { }

 ngOnInit() {
 this.productService.getAllProducts()
 .subscribe((result) => {
 this.globalResponse = result;
 },
 error => { //This is error part
 console.log(error.message);
 },
 () => {
 // This is Success part
 console.log("Product fetched sucssesfully.");
 //console.log(this.globalResponse);
 this.allProducts=this.globalResponse;
 }
 )

 }
Read More:
Summary
So dependency injection in angular is so simple and all we have done is create a class that has @injectable attribute and we have created a component in angular, assigned a provider, and injected the service in the component. Angular 2 to 13 training programs enable you to develop the front end with .net MVC and Node.js. Hope you like the concept, please comment on your question if any doubt or discussion is needed.
FAQs
Q1. Why use Dependency Injection in Angular?
- Component and service classes are more modular.
- Complex setup and mockups are unneeded; we can test in isolation, which is much easier.
- Because of its modularity, code may be reused with ease. The codebase is now easier to handle.
Q2. How do I use dependency injection in an Angular example?
Q3. How do I use dependency in Angular?
Take our free angular skill challenge to evaluate your skill

In less than 5 minutes, with our skill challenge, you can identify your knowledge gaps and strengths in a given skill.