
Angular Model-Driven (Reactive) Forms

Angular Course
Angular Model-Driven (Reactive) Forms: An Overview
Angular Model-Driven (Reactive) Forms are an effective tool for managing form state & validation in Angular applications by synchronizing form controls with model data. These forms take advantage of the capabilities of RxJS observables to provide dynamic updates, strong validation, and seamless integration with component functionality, hence improving the user experience and developer efficiency. This is essential information for anyone studying an Angular Tutorial or Angular Certification Course.
What are Model-Driven Forms in Angular?
Model-driven forms, also known as reactive forms in Angular, allow you to create forms where the data and validation logic are defined in Angular's component class rather than the template itself. This method provides more control, simplifies validation, and improves testability for complex forms.
Template Driven Forms
Template Driven Forms are used to bind the data to the component class using ngModel. We do not need to take the pain of writing code and most of the task is done by Angular itself. There is very less of effort required from the developer to pass information from the component class to the template.

Reactive forms
Reactive forms provide synchronous access to the data model, immutability through observable operators, and change tracking through observable streams. They maintain form-state integrity by returning a new state for each modification, using an explicit and immutable approach. Built on observable streams, they provide synchronous access to form inputs and values, which improves form state management.
Reactive vs. Template-Driven Forms

| Feature | Reactive Forms | Template-Driven Forms |
| Data Model | Defined in the component class. | Directives are used to define the template. |
| Form Control | FormControl, FormGroup, FormArray. | ngModel directive. |
| Data Flow | Synchronous. | Asynchronous. |
| Complexity | Simpler forms require more complexity. | Simpler for simple forms. |
| Control | Smooth control. | Less control. |
| Testability | Easier to test. | More difficult to test. |
Getting Started with Reactive Forms
We will create a Form, using FormGroup, FormControl, FormBuilder class, etc. The very first step is to import ReactiveFormsModule in the app.module.ts as listed below:
import { BrowserModule } from '@angular/platform-browser';
import { NgModule } from '@angular/core';
import {ReactiveFormsModule} from '@angular/forms';
import { AppComponent } from './app.component';

@NgModule({
 declarations: [
 AppComponent
 ],
 imports: [
 BrowserModule, ReactiveFormsModule
 ],
 providers: [],
 bootstrap: [AppComponent]
})
export class AppModule { }
Now some important classes need to be imported inside the component like FormControl, and FormArray listed below:
import { Component } from '@angular/core';
import {FormArray, FormControl, FormGroup} from '@angular/forms';

@Component({
 selector: 'app-root',
 template: ``
})
export class AppComponent {
 title = 'Reactive Forms';

}
Working with FORMCONTROL Class
The FormControl class takes three parameters as input :
Initial data value
Validators (synchronous)
Validators (Asynchronous)
We will focus on validations in the latter portion of this article.
export class AppComponent {
 title = 'Forms';
 email= new FormControl('');
}
On the template, we can use this FormControl using :
<input [FormControl] = "email" type ="text" placeholder="What is your email?">
Working with FormGroup Class
Form Controls comprise to become FormGroup. We can think of FormControl as a child property of FormGroup. The syntax used for FormGroup is as follows
export class AppComponent {
 title = 'Forms';
 SignIn = new FormGroup({
 email: new FormControl(''),
 pwd: new FormControl('')
})
}
 <form [formGroup]= "SignIn" novalidate class= "form">
 <input [formControl] = "email" type ="text" class="form-control" placeholder="What is your email?"/>
 <input [formControl] = "pwd" type ="text" class="form-control" placeholder="What is your password?"/>
 </form>
Working with FormBuilder Class
To simplify the syntax of FormGroup and FormControl, we use FormBuilder. This helps reduce the length of our code and optimize it.
constructor(private ff : FormBuilder){
this.SignIn= this.ff.group({
email: [null, [Validators.required, Validators.minLength(4)]],
pwd: [null, [Validators.required, Validators.maxLength(8)]]
})
}
Working with FormArray Class
If you want to add fields in the form dynamically with the help of an array, FormArray is used. Like other classes, it is imported in the component like this :
import {FormArray} from '@angular/forms';
this.SignIn = this.ff.group({
 email: '',
 pwd: ''
 items: this.ff.array([ this.crItem() ])
 });
 <div formArrayName="items"
 *ngFor="let item of SignIn.get('items').controls; let count = index;">
 <div [formGroupName]="count">
 <input formControlName="email" ">
 <input formControlName="password" >
 </div>
 List: {{ SignIn.controls.items.controls[count].controls.name.value }}
 </div>
Validations
Till now, we have not added any validation checks to our elements, however, we can do that using Validators in Angular Forms.
import { FormGroup, FormControl, Validators } from '@angular/forms';
Let us try adding validation to the email field that we created. Inside the component class
ngOnInit() {
 this.loginForm = new FormGroup({
 email: new FormControl(null, [Validators.required]),
 password: new FormControl(null, [Validators.required, Validators.maxLength(8)]),
 class: new FormControl(null)
 });
}
On the template
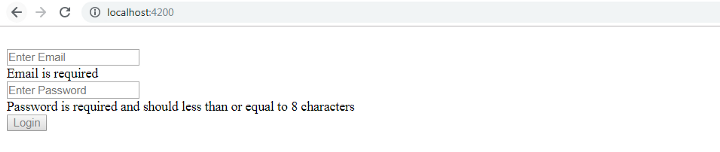
<input formControlName="email" type="text" class="form-control" placeholder="Enter Email" />
<div class="alert alert-danger" *ngIf="loginForm.get('email').hasError('required') && loginForm.get('email').touched">
 Email is required
</div>
 <input formControlName="password" type="password" class="form-control" placeholder="Enter Password" />
 <div class="alert alert-danger" *ngIf="!loginForm.get('password').valid && loginForm.get('email').touched">
 Password is required and should less than or equal to 8 characters
 </div>
Output

Creating a Reactive Form
Step 1:Import ReactiveFormsModule in the App Module
Step 2:Import FormControl, and FormGroup classes in the component class
Step 3: Create a FormGroup class with details like email, password
Step 4: On the template, create a Submit button with the function to implement submit in the class.
Putting together everything
import { Component, OnInit } from '@angular/core';
import { FormGroup, FormControl, FormArray, Validators } from '@angular/forms';
@Component({
 selector: 'app-root',
 template:`
 <div class="container">
 <br />
 <form (ngSubmit)='loginUser()' [formGroup]='loginForm' novalidate class="form">
 <input formControlName='email' type="text" class="form-control" placeholder="Enter Email" />
 <div class="alert alert-danger" *ngIf="loginForm.get('email').hasError('required') && loginForm.get('email').touched">
 Email is required
 </div>
 <input formControlName='password' type="password" class="form-control" placeholder="Enter Password" />
 <div class="alert alert-danger" *ngIf=" !loginForm.get('password').valid && loginForm.get('email').touched">
 Password is required and should less than or equal to 8 characters
 </div>
 <button [disabled]='loginForm.invalid' class="btn btn-default">Login</button>
 </form>
</div>
 `
})
export class AppComponent implements OnInit {
 loginForm: FormGroup;
 ngOnInit() {
 this.loginForm = new FormGroup({
 email: new FormControl(null, [Validators.required, Validators.minLength(4)]),
 password: new FormControl(null, [Validators.required, Validators.maxLength(8)])
 });
 }
 loginUser() {
 console.log(this.loginForm.status);
 console.log(this.loginForm.value);
 }
}
Creating Custom Validations for Angular Reactive Forms
Now that we have applied validation to email and password, for class, we want to create a validation for range such that the class should be from 1 to 12 only. In this case, we will have to write a custom validator as Angular doesn’t provide range validation. So for that, we need to create a function that takes one input parameter of type AbstractControl and returns an object of key-value pair in case the validation fails.
function classValidator(control: AbstractControl) : {[key : string] : boolean} | null {
 return null;
 }
Here we have created a custom validator named classValidator where the user will be able to enter a class only if it’s in the range that we have provided. In case of failure of validation, it will return an object that contains a key-value pair.
In the component class
class: new FormControl(null, [classValidator])
On the Template, it goes like this:
<input formControlName='Class' type="number" class="form-control" placeholder="Enter Class" />
 <div class="alert alert-danger" *ngIf="loginForm.get('class').dirty && loginForm.get('class').errors && loginForm.get('class’).errors.classRange ">
 Class should be in between 1 to 12
 </div>

This is how Custom validators help us put validation to our form controls.
Read More:
Summary
Reactive forms in Angular move the form structure definition from the template to the component file, resulting in a model-driven approach. This provides complete control over form components, controls, and validation setups. Understanding the distinction between reactive and template-driven forms is critical in Angular training. This article discusses the fundamentals of reactive forms, their benefits, and how to construct them using built-in and custom validations.
FAQs
Q1. Can we use ngModel for reactive forms?
Q2. Is the reactive form synchronous or asynchronous?
Q3. Why do reactive forms work better?
Q4. Is it impossible to change the reactive form?
Q5. What are the benefits of having reactive forms in Angular?
Take our free angular skill challenge to evaluate your skill

In less than 5 minutes, with our skill challenge, you can identify your knowledge gaps and strengths in a given skill.