
Routing in Angular

Angular Course
Routing in Angular: An Overview
Angular routing allows for the building of SPAs by defining navigation paths and assigning them to components. Using Angular's router module enables seamless navigation across views, improving the user experience. Take a look at the Angular Tutorial or enroll in an Angular Certification Coursetogain a deeper understanding of Angular routing and related concepts.
What is Angular Routing?
Routing is a way to serve web pages based on the requested URL. In Angular which is used to build SPA, URLs are not served from the server and never reload the page. The URLs are strictly local in the browser and serve the page(components) from local. Every time you request a URL, the Angular router navigates to the new component renders its template, and updates the history and URL.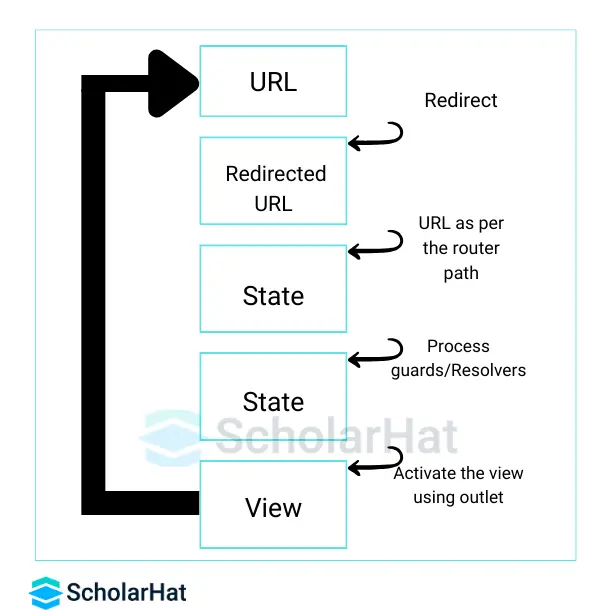
Purpose of Routing in Angular
The angular router can interpret a browser URL as an instruction to navigate from/to the specific view. One can pass the optional parameters along with the supporting view component that helps it decide what specific content to present. We can bind the router to the links on a page, and it will navigate to the defined application view when the user clicks a link. Understanding the functionalities and intricacies of the Angular router is a vital aspect covered in Angular certification Training.
Steps to Configure Angular Routing
The Angular router has its library package which is @angular/routerSo we need to import what we need from it as we would from any other Angular package. It is an optional service in angular that presents a particular component view.
There are following steps you have to follow to configure routing in Angular.
Step1: Define the routes
Angular application routes are recommended to be defined within a separate module using an array as given below:
import { NgModule } from '@angular/core';
const routes: Routes = [
 { path: "", component: HomeComponent },
 { path: "about", component: AboutComponent }
];
@NgModule({
 imports: [RouterModule.forRoot(routes)],
 exports: [RouterModule]
 })
 export class AppRoutingModule {}
Step 2: Define the container
RouterOutlet as the container where the router renders the component when the user requests a route.
 <div>
 <router-outlet></router-outlet>
 </div>
Step 3: Define the links
RouterLink directive is used to define links to a route name.
 <ul class="nav navbar-nav">
 <li>
 <a [routerLink]="['/']">Home</a>
 </li>
 <li>
 <a [routerLink]="['/about']">About</a>
 </li>
 </ul>
Step4: Define Route for 404
In Angular, you can define a route that will be served, if the requested URL doesn't match any paths in the route configuration. The ** characters are used to define the path for the route not found. You can define this path as given below:
 const routes: Routes = [
 { path: "", component: HomeComponent },
 { path: "about", component: AboutComponent },

 { path: "notfound", component: NotfoundComponent },
 { path: "**", redirectTo: "notfound" }
 ];
Note
In Angular routes configuration, the order of the routes matters. The angular router uses a first-match wins strategy when matching routes.
So more specific routes should be placed at the top level and less specific routes should be placed at the bottom in the routes configuration.
Location Strategies
Location Strategies in Angular defines how the URL/Request is being resolved and determines how your URL will look in the browser. Angular supports two types of Location Strategies
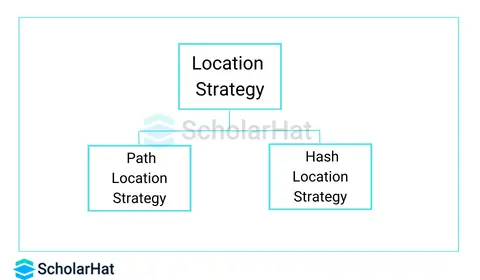
PathLocation Strategy
The PathLocation strategy is the default location strategy in Angular. In this strategy, the URL looks like the multi-page application as http://localhost:4200/product. This strategy can be configured as given below:
 //step1: src/index.html
 <base href="/"> Use at main page i.e. index.html page

 //step2: src/app/app.routing.ts
 RouterModule.forRoot(appRoutes) in routing module
Advantages and Disadvantages of PathLocation Strategy
- Supports Server-Side Rendering
- SEO Friendly
- Older browsers don’t support
HashLocation Strategy
The hashLocation strategy you have to configure in Angular. In this strategy, the URL contains a hash character as http://localhost:4200/#/product. This strategy can be configured as given below:
 //step1: src/index.html
 <base href="/"> Use at main page i.e. index.html page

 //step2: src/app/app.routing.ts
 RouterModule.forRoot(appRoutes, {useHash: true}) in routing module
Advantages and Disadvantages of HashLocation Strategy
- Supported by all browsers
- Doesn't Support Server-Side Rendering
- Not SEO Friendly because of special character Hash
Child/Nested Routes
Sometimes you need to render one or more components on request on a component. In that case, child/nested routing helps us. This is a powerful feature in Angular router to render child/nested components in Angular using the route.
Configuring Child/Nested Routes
To define a child/nested route a Children option is used in the routes array as given below:
 const routes: Routes = [
 { path: "", component: HomeComponent },
 { path: "about", component: AboutComponent,
 children: [
 { path: "profile", component: ProfileComponent },
 { path: "changepassword", component: ChangepasswordComponent }
 ]
 }
 ];
 <h2>About Us</h2>
 <hr>
 <p>This is about us page for the company!</p>

 Activating the Child Routes
 <a [routerLink]="['profile']">Profile</a>
 <a [routerLink]="['changepassword']">Change Password</a>
 <router-outlet></router-outlet>
Read More:
Summary
This article is meant to be a getting started with the concept of Routing in Angular. It's meant to show the most common uses, not all of them. Exploring an Angular certification course can provide a more comprehensive understanding of routing within Angular applications. For any application, navigation is one of the important features that one can ask for. Even though a single-page application (SPA) does not have a multiple-page concept, it does move from one view to another view. Providing clear and understandable navigation elements decides the success of an application pretty loudly.FAQs
Q1. What is the routing strategy in Angular?
Q2. How do I enable Angular routing?
Q3. Is routing necessary in Angular?
Q4. What are the benefits of Angular routing?
- Enhanced User Experience: Navigate between views with ease, just like in desktop apps, without having to reload the entire page.
- Faster Page Transitions: Load only the necessary components, resulting in faster transitions and improved performance.
- Modularity and Maintainability: Organise code effectively by associating components with specific routes, hence increasing reusability.
- SEO-Friendly URLs: Improve discoverability by using URLs that represent view content, which helps with search engine optimization.
- Advanced Navigation: Handle complex scenarios with support for route parameters, child routes, and route guards to improve security.
Take our free angular skill challenge to evaluate your skill

In less than 5 minutes, with our skill challenge, you can identify your knowledge gaps and strengths in a given skill.