
Token-based Authentication in Angular 6 with ASP.NET Core 2.1

Angular Course
Token-Based Authentication in Angular 6 with ASP.NET Core 2.1: An Overview
Hello there! Have you ever wondered how Angular 6 and ASP.NET Core 2.1 work together utilizing Token-based Authentication? In this Angular tutorial, we'll look at how to secure user authentication with ASP.NET Core 2.1. With our Angular certification training, make your online applications more resilient and user-friendly.
Read More: Top 50+ Angular Interview Questions & Answers
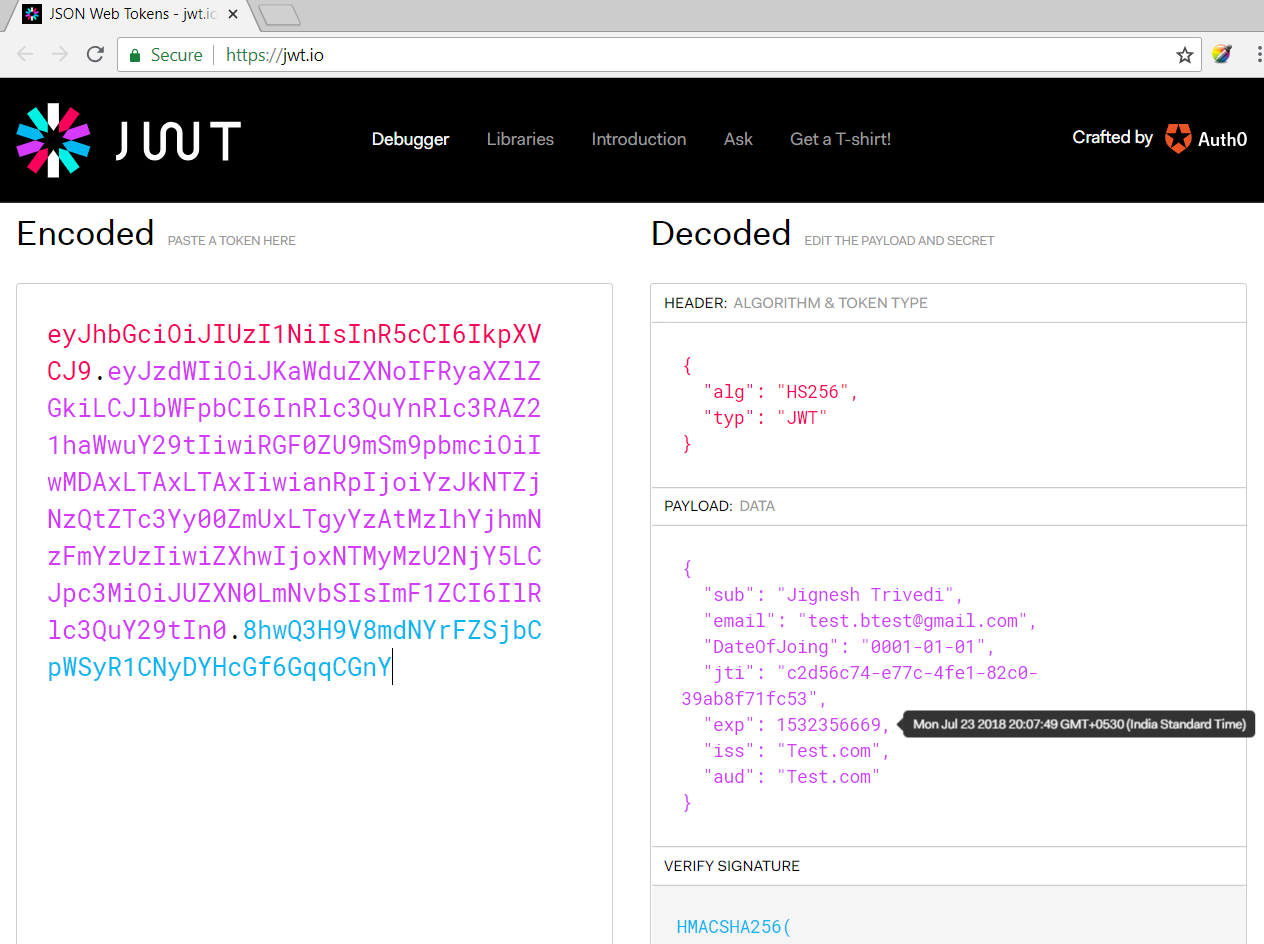
What are JWTs?
JWTs are signed tokens that contain user data and claims. They are small, tamper-proof, or stateless, making them suitable for secure client-server communication.The jwt.io debugger (https://jwt.io/) enables us to decode the JWT (not decode the signature part) and we can verify or generate a new token.
Why Use JWT (JSON Web Token)?
- Securely store user information without requiring server-side sessions.
- Separate the front-end and back-end for greater flexibility.
- Enable cross-application single sign-on.
- Small and tamper-resistant for effective communication.
- Modern online applications require scalability and dependability.
Softwares
The following software must be installed in our system before starting the work.
- ASP.NET Core 2.1 or above
- TypeScript 2.5 or above
- The latest version of Node.JS and npm (node package manager)
- Editor (e.g., VS 2017, VS Code)
ASP.NET Core comes with many built-in templates such as Angular, React, etc. I am using the Angular template to demonstrate the concept. We can create an application by using the Angular template of Visual Studio (2017 or higher) or using CLI (Command Line Interface).
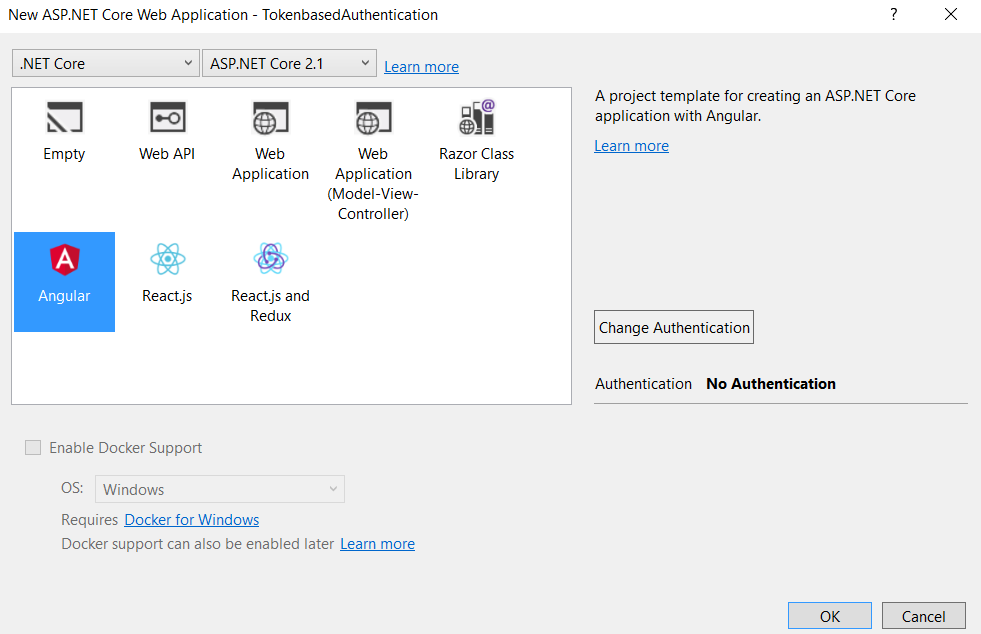
Following the .Net Core CLI command will create an ASP.NET Web API project with Angular with the project name "TokenbasedAuthentication" in the current folder.
<dotnet new angular –n TokenbasedAuthentication
In this template, the Angular client App and Web API are shipped together in one project, however, we can create two separate projects:
- Angular
- Web API
Configure JWT Token-based Authentication
Setting up a secure authentication system in which users log in to your Angular 6 application and then get a JSON Web Token (JWT) from your ASP.NET Core 2.1 backend is required. This token is then used in future requests to access restricted resources.
Configure JWT Authentication in Startup.cs
- AddAuthentication: Use AddAuthentication to register the JWT authentication scheme.
- Configure JwtBearer: Use AddJwtBearer to specify options such as issuer, audience, and signing key.
- Authorization: In AddAuthorization, define authorization policies based on claims or responsibilities.
Example of Configure JWT Authentication in Startup.cs
services.AddAuthentication(JwtBearerDefaults.AuthenticationScheme)
  .AddJwtBearer(options =>
  {
    options.TokenValidationParameters = new TokenValidationParameters
    {
      ValidateIssuer = true,
      ValidIssuer = "YourIssuerName",
      ValidateAudience = true,
      ValidAudience = "YourAudienceName",
      ValidateLifetime = true,
      IssuerSigningKey = new SymmetricSecurityKey(Encoding.UTF8.GetBytes("YourSecretKey"))
    };
  });

services.AddAuthorization(options =>
{
  options.AddPolicy("Authenticated", policy =>
    policy.RequireClaim("UserId"));
This code ensures that only users who possess valid JWT tokens issued by "YourIssuerName" & containing the "UserId" claim can access restricted sections of your application.
Create Login Controller
Create a controller endpoint to receive and validate user credentials. Generate a JWT token using the configured values after successful login.
Example of Create Login Controller
[HttpPost("/login")]
public async Task<IActionResult> Login([FromBody] LoginModel login)
{
  // Validate user credentials
  if (isValidLogin(login))
  {
    var claims = new Claim[]
    {
      new Claim(JwtRegisteredClaimNames.Sub, login.Username),
      new Claim("UserId", "12345") // Replace with actual user ID
    };

    var token = GenerateJwtToken(claims);
    return Ok(new { token });
  }
  else
  {
    return Unauthorized();
  }
This code defines a logging API endpoint. It gets user credentials in the request body and validates them first. If it is genuine, it generates a JSON Web Token (JWT) with user information such as a username and a placeholder user ID. Finally, it responds successfully with the generated token. If the request is invalid, it returns an unauthorized answer.
Secure API Endpoints
To API endpoints that require access control, use the "Authenticated" authorization policy.
Example of Secure API Endpoints
[HttpGet("/protected-data")]
[Authorize(Policy = "Authenticated")]
public IActionResult GetProtectedData()
{
    // Access and return protected data based on user claims

}
This code defines an API endpoint that is only accessible to authorized users. It initially looks for a valid JWT token with the "Authenticated" policy by using the Authorise property. Based on the claims provided within the token, the code can access and return protected data (unique to the authorized user) if authorized. These claims frequently include user information such as a username or ID.
Install Dependencies
Using npm, install required packages such as @angular/common/http and jwt-decode.
Create Auth Service
Create a service that handles user authentication, token storage, and request authorization. Send login requests with HttpClient and save the obtained token in local storage. Intercept HTTP requests and insert the token into the Authorization header.
Example of Create Auth Service
@Injectable({ providedIn: 'root' })
exportclassAuthService{
  constructor(private http: HttpClient) {}  login(username: string, password: string): Observable<any> {
    returnthis.http.post('/login', { username, password });
  }  setToken(token: string) {
    localStorage.setItem('token', token);
  }  getToken() {
    returnlocalStorage.getItem('token');
  }  isAuthenticated() {
    const token = this.getToken();
    return !!token && jwtDecode(token).exp > Date.now() / 1000;
  }  intercept(req: HttpRequest<any>, next: HttpHandler): Observable<HttpResponse<any>> {
    const token = this.getToken();
    if (token) {
      req = req.clone({ setHeaders: { Authorization: `Bearer ${token}` } });
    }
    return next.handle(req);
  }
}
This code defines a service used in an application to manage user authentication. It injects the HttpClient service, which is used to make API calls. It includes methods for signing in with a username and password, saving the received token, and determining whether or not the user is currently authenticated. It intercepts outbound HTTP requests and, if present, automatically adds the saved token as an authorization header, guaranteeing that protected API calls use the user's identity.
Use Auth Service in Components
Insert the AuthService into the components. To authenticate and store the token, use the login method. Based on the login state and authorization, call protected API endpoints.
Example of using Auth Service in Components
@Component({
    selector: 'app-protected-data',
    templateUrl: './protected-data.component.html',
})
export class ProtectedDataComponent implements OnInit {
    constructor(private authService: AuthService) {}
    ngOnInit(): void {
        if (!this.authService.isAuthenticated()) {
            // Redirect to login page
        } else {
            // Call protected API endpoint and display data
        }
    }
}
This code defines the ProtectedDataComponent component, which shows protected data. On initialization, it checks to see if the user is authenticated. If they do not, they are redirected to the login page. It assumes access to a protected API endpoint and calls it to retrieve data, which it subsequently shows on the page if authorized.
Generate JWT
- The process of establishing a JSON Web Token (JWT) on the server side in ASP.NET Core 2.1, which is used for token-based authentication in Angular 6 apps, is referred to as Generate JWT.
- This token is used to securely store and transfer user identity information between the client and server without the need to send credentials again.
Example of Generating JWT
[Route("api/login")]
public class LoginController : Controller
{
    [HttpPost]
    public IActionResult Login([FromBody] LoginModel model)
    {
        // Validate user credentials
        if (model.Username == "validUser" && model.Password == "validPassword")
        {
            // Create claims for user roles
            var claims = new[]
            {
                new Claim(ClaimTypes.Name, model.Username),
                new Claim(ClaimTypes.Role, "Admin")
            };

            // Create JWT token using claims and secret key
            var token = new JwtSecurityToken(
                issuer: "YourIssuer",
                audience: "YourAudience",
                claims: claims,
                expires: DateTime.UtcNow.AddMinutes(30), // Set expiry time
                signingCredentials: new SigningCredentials(
                    new SymmetricSecurityKey(Encoding.UTF8.GetBytes("YourSecretString")),
                    SecurityAlgorithms.HmacSha256
                )
            );

            return Ok(new { token = new JwtSecurityTokenHandler().WriteToken(token) });
        }
        return Unauthorized();
    }
}
This code defines a web API login endpoint. When it receives credentials, it compares them to a pre-defined "validUser" and password combination. If it is genuine, it generates a JWT token with claims such as a username and a hardcoded "Admin" role. The token is valid for 30 minutes and is signed with a secret key. Finally, it responds successfully with the generated token for further authentication.
Client App in Angular 6
The "Client App" refers to the single-page application (SPA) produced with Angular 6 that interacts with the API server to access protected resources when using token-based authentication in Angular 6 with ASP.NET Core 2.1.
Example of Client App in Angular 6
Startup.cs
public void Configure(IApplicationBuilder app, IHostingEnvironment env)
{
…..
…..
app.UseMvc(routes =>
{
routes.MapRoute(
name: "default",
template: "{controller}/{action=Index}/{id?}");
});

app.UseSpa(spa =>
{
// To learn more about options for serving an Angular SPA from ASP.NET Core,
// see https://go.microsoft.com/fwlink/?linkid=864501

spa.Options.SourcePath = "ClientApp";

if (env.IsDevelopment())
{
spa.UseAngularCliServer(npmScript: "start");
}
});
}
This code sets up an ASP.NET Core project to provide server-side MVC routes as well as a client-side Angular SPA. It creates a default MVC route before launching the SPA, naming the ClientApp folder as the source and employing the npm start script for development builds.
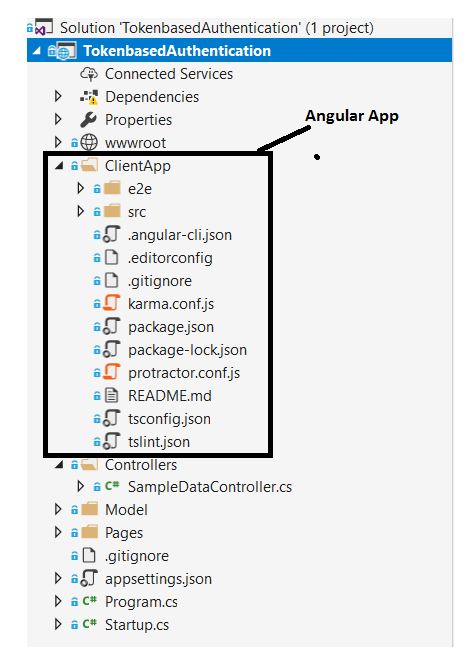
I have created the following code structure for the Angular application. Here, I have created all client code under the “scr\app” folder. I have created a Login component that takes user credentials and with the help of the authorization service, it stores JWT in HTML 5 local storage.

Authentication Service
- The Authentication Service manages user login, token creation, and API interaction in token-based authentication using Angular 6 and ASP.NET Core 2.1
- It serves as a link between the user interface & the backend API, managing authentication and securing access to protected resources.
Example of Authentication Service
import { Injectable } from '@angular/core';
import { HttpClient } from '@angular/common/http';
import { map } from 'rxjs/operators';

@Injectable()
export class AuthenticationService {
 constructor(private http: HttpClient) { }

 login(username: string, password: string) {
 return this.http.post<any>('/api/login', { username, password })
 .pipe(map(user => {
 // login successful if there's a jwt token in the response
 if (user && user.token) {
 // store user details and jwt token in local storage to keep user logged in between page refreshes
 localStorage.setItem('TokenInfo', JSON.stringify(user));
 }

 return user;
 }));
 }

 logout() {
 // remove user from local storage to log user out
 localStorage.removeItem('TokenInfo');
 }
}
This code defines an Angular service for token-based user login and logout. It transmits login credentials to the API, parses the response for a token, and if successful, stores it in local storage. To log the user out, the logout procedure removes the stored token.
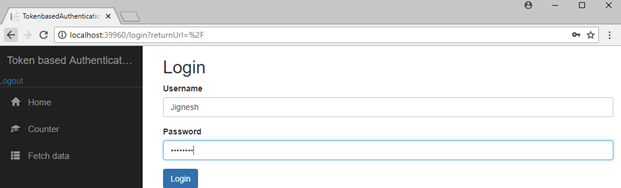
Login Template and component
- The login component template contains username and password fields.
- It also shows the validation for invalid fields when you click the submit button.
- The submit event of the form is bound to the "OnLogin" method of the login component.
- The "OnLogin" method uses the authentication service’s “login” method to validate user credentials and generate tokens.
Example of Login Template
 <h2>Login</h2>
 <form [formGroup]="loginForm" (ngSubmit)="onLogin()">
 <div class="form-group">
 <label for="username">Username</label>
 <input type="text" formControlName="username" class="form-control" [ngClass]="{ 'is-invalid': submitted && formData.username.errors }" />
 <div *ngIf="submitted && formData.username.errors" class="invalid-feedback">
 <div *ngIf="formData.username.errors.required">Username is required</div>
 </div>
 </div>
 <div class="form-group">
 <label for="password">Password</label>
 <input type="password" formControlName="password" class="form-control" [ngClass]="{ 'is-invalid': submitted && formData.password.errors }" />
 <div *ngIf="submitted && formData.password.errors" class="invalid-feedback">
 <div *ngIf="formData.password.errors.required">Password is required</div>
 </div>
 </div>
 <div class="form-group">
 <button [disabled]="submitClick" class="btn btn-primary">Login</button>
 </div>
 <div *ngIf="error" class="alert alert-danger">{{error}}</div>
 </form>
This code example shows a login form with fields for username and password. When submitted, it validates inputs and displays error messages for required fields using Angular's reactive forms. When the disabled submit button (based on submitClick) is clicked, the onLogin() function is called to handle the login logic. Any mistakes are shown beneath the form.
Example of Login Component
import { Component, OnInit } from '@angular/core';
import { Router, ActivatedRoute } from '@angular/router';
import { FormBuilder, FormGroup, Validators } from '@angular/forms';
import { first } from 'rxjs/operators';

import { AuthenticationService } from '../Services/authentication.service';

@Component({
 templateUrl: 'login.html'
})
export class LoginComponent implements OnInit {

 loginForm: FormGroup;
 submitClick = false;
 submitted = false;
 returnUrl: string;
 error = '';

 constructor(
 private formBuilder: FormBuilder,
 private route: ActivatedRoute,
 private router: Router,
 private authenticationService: AuthenticationService) { }

 ngOnInit() {
 this.loginForm = this.formBuilder.group({
 username: ['', Validators.required],
 password: ['', Validators.required]
 });

 // reset login status
 this.authenticationService.logout();

 // get return url from route parameters or default to '/'
 this.returnUrl = this.route.snapshot.queryParams['returnUrl'] || '/';
 }

 // convenience getter for easy access to form fields
 get formData() { return this.loginForm.controls; }

 onLogin() {
 this.submitted = true;

 // stop here if form is invalid
 if (this.loginForm.invalid) {
 return;
 }

 this.submitClick = true;
 this.authenticationService.login(this.formData.username.value, this.formData.password.value)
 .pipe(first())
 .subscribe(
 data => {
 this.router.navigate([this.returnUrl]);
 },
 error => {
 this.error = error;
 this.submitClick = false;
 });
 }
}
This Angular component defines a login form, performs login logic, and redirects based on success or failure. It uses reactive forms, tracks form submission clicks and states, and shows any error notifications. It redirects the user to the appropriate destination after successful login.
Restrict Unauthenticated Users to Access the Application
- Securing your app from unauthorized access in Angular 6 and ASP.NET Core 2.1 token-based authentication requires an approach that involves two steps.
- Validate incoming tokens with JWT middleware on the server side (ASP.NET Core), granting access only to genuine ones.
- Use route guards on the client side (Angular 6) to check for the presence of a valid token before granting access to restricted pages.
- This ensures that only authenticated users with a valid token can access protected sections, preventing unauthorized people from entering.
Example of Restrict Unauthenticated Users to Access the Application
import { Injectable } from '@angular/core';
import { Router, CanActivate, ActivatedRouteSnapshot, RouterStateSnapshot } from '@angular/router';

@Injectable()
export class AuthorizationCheck implements CanActivate {

 constructor(private router: Router) { }

 canActivate(route: ActivatedRouteSnapshot, state: RouterStateSnapshot) {
 //If token data exist, user may login to application
 if (localStorage.getItem('TokenInfo')) {
 return true;
 }

 // otherwise redirect to login page with the return url
 this.router.navigate(['/login'], { queryParams: { returnUrl: state.url } });
 return false;
 }
}
This code defines an Angular service called "AuthorizationCheck" that searches localStorage for a user's token. If it exists, they are authorized to use the route. If not, they are sent to log in, with the intended page remembered after successful login.
HTTP Interceptor
- Token-based authentication in Angular 6 and ASP.NET Core 2.1 relies on Http Interceptors to securely pass the user's JWT token with each request.
- Consider a secret agent (Interceptor) intercepting all outgoing communications (requests), attaching the hidden access key (token) to each, and forwarding them on.
- The server recognizes the key and grants access, and the agent responds.
- This guarantees that only authorized users have access to protected resources, keeping your data safe.
Example of HTTP Interceptor
import { Injectable } from '@angular/core';
import { HttpRequest, HttpHandler, HttpEvent, HttpInterceptor } from '@angular/common/http';
import { Observable } from 'rxjs';

@Injectable()
export class httpInterceptor implements HttpInterceptor {
 intercept(request: HttpRequest<any>, newRequest: HttpHandler): Observable<HttpEvent<any>> {
 // add authorization header to request

 //Get Token data from local storage
 let tokenInfo = JSON.parse(localStorage.getItem('TokenInfo'));

 if (tokenInfo && tokenInfo.token) {
 request = request.clone({
 setHeaders: {
 Authorization: `Bearer ${tokenInfo.token}`,
 'Content-Type': 'application/x-www-form-urlencoded;charset=utf-8'
 }
 });
 }

 return newRequest.handle(request);
 }
}
If a valid token exists, this code inserts an authorization header with the user's token from localStorage to every HTTP request. It simply injects the "Bearer" token into requests, guaranteeing that only authorized users have access to protected server resources.
Error Interceptor
- Error Interceptor serves as a consistent guard in Angular 6 and ASP.NET Core 2.1 token-based authentication.
- It intercepts all incoming answers and looks for problems in unauthorized access (401).
- If it detects unauthorized behavior, it immediately revokes the user's token and redirects them to the login page, protecting your app from unauthorized activity and guaranteeing a secure user experience.
Example of Error Interceptor
import { Injectable } from '@angular/core';
import { HttpRequest, HttpHandler, HttpEvent, HttpInterceptor } from '@angular/common/http';
import { Observable } from 'rxjs/Rx';
import { catchError } from 'rxjs/operators';

import { AuthenticationService } from '../Services/authentication.service';
import { Router } from '@angular/router';

@Injectable()
export class ErrorInterceptor implements HttpInterceptor {
 constructor(private authenticationService: AuthenticationService, private router: Router) { }

 intercept(request: HttpRequest<any>, newRequest: HttpHandler): Observable<HttpEvent<any>> {

 return newRequest.handle(request).pipe(catchError(err =>{
 if (err.status === 401) {
 //if 401 response returned from api, logout from application & redirect to login page.
 this.authenticationService.logout();
 }

 const error = err.error.message || err.statusText;
 return Observable.throw(error);
 }));
 }
}
This code intercepts HTTP errors, notably 401 (unauthorized access). If it is discovered, it initiates an automatic logout via the AuthenticationService and redirects the user to the login page. Deleting unauthorized access and forcing users to re-authenticate, ensures a secure experience.
App Module and Routing
- The App Module serves as the control center for token-based authentication in Angular 6 & ASP.NET Core 2.1.
- It registers all authentication components, services, and interceptors, including the routing logic.
- The paths for protected and public areas are defined via routing, which ensures that only authorized users have access to sensitive data.
Example of App Module and Routing
import { BrowserModule } from '@angular/platform-browser';
import { NgModule } from '@angular/core';
import { FormsModule, ReactiveFormsModule } from '@angular/forms';
import { HttpClientModule, HTTP_INTERCEPTORS } from '@angular/common/http';
import { RouterModule } from '@angular/router';

import { AppComponent } from './app.component';
import { NavMenuComponent } from './nav-menu/nav-menu.component';
import { HomeComponent } from './home/home.component';
import { CounterComponent } from './counter/counter.component';
import { FetchDataComponent } from './fetch-data/fetch-data.component';

import { LoginComponent } from './Login/login.component'

import { httpInterceptor } from './Interceptor/httpInterceptor';
import { ErrorInterceptor } from './Interceptor/errorInterceptor';

import { AuthorizationCheck } from './Services/authorizationCheck'
import { AuthenticationService } from './Services/authentication.service'

@NgModule({
 declarations: [
 AppComponent,
 NavMenuComponent,
 HomeComponent,
 CounterComponent,
 FetchDataComponent,
 LoginComponent
 ],
 imports: [
 BrowserModule.withServerTransition({ appId: 'ng-cli-universal' }),
 HttpClientModule,
 FormsModule,
 ReactiveFormsModule,
 RouterModule.forRoot([
 { path: '', component: HomeComponent, pathMatch: 'full', canActivate: [AuthorizationCheck] },
 { path: 'counter', component: CounterComponent, canActivate: [AuthorizationCheck] },
 { path: 'fetch-data', component: FetchDataComponent, canActivate: [AuthorizationCheck] },
 { path: 'login', component: LoginComponent }
 ])
 ],
 providers: [
 { provide: HTTP_INTERCEPTORS, useClass: httpInterceptor, multi: true },
 { provide: HTTP_INTERCEPTORS, useClass: ErrorInterceptor, multi: true },
 AuthorizationCheck, AuthenticationService],
 bootstrap: [AppComponent]
})
export class AppModule { }
This code creates the authentication core for your Angular project. It establishes routes, and components (login, navigation), and protects regions. It also adds tokens to requests and controls unauthorized access by logging users out. Tokens and access are managed by services to ensure a smooth authentication flow.
Read More:
- Angular Developer Salary In India
- Angular Developer Skills
- Angular Roadmap to Become an Angular Developer
Summary
Token-based authentication is a safe and efficient method of managing user access in current web applications. You may ensure a safe and seamless user experience while protecting sensitive data by applying this method in your Angular 6 and ASP.NET Core 2.1 projects.
Do you Know?
.NET is gaining popularity day by day, especially after the release of .NET 8. .NET 8 is not only a framework version but much more than that. It redefines the way software applications are built and deployed, enabling developers to meet the evolving demands of modern computing.
Therefore, if you want to upskill yourselves and stand out from others consider our following training programs on .NET.
- .NET Developer Training With Certification
- ASP.NET Core Certification Training
- ASP.NET Core Course
- .NET Solution Architect Certification Training
- Full-Stack .NET Developer Certification Training Program
- Advanced Full-Stack .NET Developer Certification Training
FAQs
Q1. How does token-based authentication work in Net core?
Q2. How does token-based authentication work in Angular?
Q3. What's the distinction between OAuth 2.0 & JWT?
Q4. In Angular, what is JWT token authentication?
Q5. What is token-based authentication?
Take our free angular skill challenge to evaluate your skill

In less than 5 minutes, with our skill challenge, you can identify your knowledge gaps and strengths in a given skill.