


25
AprTop 50+ Angular Interview Question & Answers
10 Apr 2024
4.25K Views
116 min read

Learn via Video Course & by Doing Hands-on Labs
Angular Course
Angular Interview Questions and Answers: An Overview
Do you like to play with various front-end frameworks like Angular? Do you dream of a career as an Angular Developer? Is having a good Angular Developer Salary your desired wish? If all these questions are in your mind, just upgrade your Angular Developer Skills and delve into our frequently asked Angular Interview Questions to crack your deserved interview. This Angular tutorial will take you on a guided tour of these questions and enhance your understanding level. You can also consider our Angular Certification.
Most Asked Angular Interview Questions
We'll now start with the most fundamental conceptual questions. It will delve into your interests and make you move ahead with full vigor and confidence.
Fundamentals Questions
1. What is Angular and its key features?
Angular is a TypeScript-based front-end web application framework. It follows the MVC (Model-View-Controller) architecture. It is used to build front-end and single-page applications that run on JavaScript. It targets both the browser and the server. Angular is a full-fledged framework, i.e., it takes care of many aspects of front–end web applications such as HTTP requests, routing, layout, forms, reactivity, validation, etc.
Key features of Angular are:
- Component-based architecture – applications are written as a set of independent components.
- Parts can be created, tested, and integrated using Angular CLI.
- Great support for complex animations without writing much code.
- Because of the component router, Angular supports automatic code-splitting. Hence only the code required to render a particular view is loaded.
- Cross-platform application development.
- Template syntax for creating UI views.
2. Explain the difference between Angular and AngularJS.
| Features | Angular | AngularJS |
| Architecture | It makes use of directives and components | Supports Model-View-Controller design |
| Language | TypeScript | JavaScript |
| Mobile Support | Angular offers mobile support. | Unlike Angular, AngularJS does not offer mobile support |
| Routing | @Route configuration is used to define routing information | @routeProvider is used to provide routing information |
| Dependency Injection | It supports hierarchical dependency injection, along with a unidirectional tree-based change direction | It does not support dependency injection |
| Structure | Its simplified structure makes it easy for professionals to develop and maintain large applications easily | It is comparatively less manageable |
| Expression Syntax | Angular uses () to bind an event while [] to bind a property | It requires professionals to use the correct ng directive to bind a property or an event |
3. What are the different types of data binding in Angular?
There are two types of data binding in Angular:
- One-Way Data Binding: Here, the data flows in a single direction, either from the component to the view (interpolation or property binding) or from the view to the component (event binding).
- Two-Way Data Binding: Here, the immediate changes to the view & component will be reflected automatically, i.e. when the changes are made to the component or model then the view will render the changes simultaneously.
Components Questions
4. What are the different ways to pass data between components?
In Angular, there are several ways to pass data between components:
- Input Properties (Parent to Child)
With this, you can pass data from a parent component to a child component. In the child component, you declare an input property using the @Input() decorator and the parent component binds to this property using property binding syntax ([property]="value").
- Output Properties with Event Emitters (Child to Parent)
Output properties combined with event emitters allow child components to send data to parent components. The child component emits events using an EventEmitter and the @Output() decorator. The parent component listens for these events using event binding syntax eventEmitterName.subscribe().
- Services (Unrelated Components)
Services act as singletons within an Angular application and can be used to share data between unrelated components. Components can inject the same service instance and use it to share data across the application.
- ViewChild and ContentChild (Parent to Child)
ViewChild and ContentChild decorators allow a parent component to access its child components directly. These decorators can be used to reference child component instances and access their properties and methods.
- NgRx (State Management)
NgRx is a state management library for Angular applications based on the Redux pattern. It allows components to share data by managing the application state centrally. Components can dispatch actions to update the state and subscribe to changes in the state to react accordingly.
- Route Parameters (Routing)
Route parameters can be used to pass data between components in different routes. Components can retrieve route parameters from the ActivatedRoute service and use them to fetch data or configure component behavior.
5. How do you handle events in Angular components?
In Angular components, we can handle events using event binding, event handlers, and event emitters. Let's look at them:
- Event Binding: This allows the view to communicate changes back to the component when an event occurs, such as a button click or input change. Event binding is denoted by parentheses, like (event)="handler()".
Example
<button (click)="onClick()">Click Me</button> - Event Handlers: In the component class, define the event handler method that will be called when the event occurs. This method can take parameters to capture event data passed by the event object.
Example
// Component class (TypeScript file) export class MyComponent { onClick() { console.log('Button clicked!'); } } - Event Emitters: They allow child components to communicate with parent components by emitting custom events.
Example
Child Component// Child component class (TypeScript file) import { EventEmitter, Output } from '@angular/core'; export class ChildComponent { @Output() myEvent = new EventEmitter(); onClick() { this.myEvent.emit('Event data'); } }Parent Component<button (click)="onClick()">Click Me</button><app-child (myEvent)="onChildEvent($event)"></app-child>// Parent component class (TypeScript file) export class ParentComponent { onChildEvent(data: string) { console.log('Event data:', data); } }
Directives & Pipes Questions
6. What are directives and their types in Angular?
Angular Directives are attributes that allow the user to write new HTML syntax specific to their applications. They execute whenever the Angular compiler finds them in the DOM. Angular supports three types of directives:
- Component Directives: These are the directives that come with a template and are the most common type of directives.
- Attribute Directives: These are the directives that can change the appearance of a component, page, or even other directives.
The following command is used to create an attribute directive:
ng g directive YellowBackground - Structural Directives: These directives are responsible for changing the DOM layout either by adding or removing the DOM elements. Every structural directive has a ‘*’ sign before it.
7. How do you create custom directives?
- Create Directive Class
- Create a TypeScript class for your custom directive. This class should be decorated with the @Directive decorator.
- Use the selector property of the decorator to specify the CSS selector that identifies where the directive should be applied.
Example
import { Directive, ElementRef } from '@angular/core'; @Directive({ selector: '[appCustomDirective]' }) export class CustomDirective { constructor(private el: ElementRef) { el.nativeElement.style.backgroundColor = 'yellow'; } } - Inject ElementRef
- Inject the ElementRef service into the constructor of your directive class. This service provides access to the host element to which the directive is applied.
- Use ElementRef.nativeElement to access the DOM element and apply custom functionality.
constructor(private el: ElementRef) { el.nativeElement.style.backgroundColor = 'yellow'; } - Register Directive
- To use the custom directive, you need to declare it in the declarations array of the Angular module where it will be used.
- If the directive is used in multiple modules, you can create a shared module and import it into the modules where the directive is needed.
import { NgModule } from '@angular/core'; import { CustomDirective } from './custom.directive'; @NgModule({ declarations: [ CustomDirective ], exports: [ CustomDirective ] }) export class SharedModule { } - Use Directive in HTML
- To apply the custom directive to an HTML element, use the selector specified in the @Directive decorator.
<div appCustomDirective>
  This div will have a yellow background.
</div>
Services & Dependency Injection Questions
8. What are services and their benefits in Angular?
Objects classified as services are those that are only instantiated once in the course of an application. A service's primary goal is to exchange functions and data with various Angular application components. To define a service, use the @Injectable decorator. Any component or directive can call a function specified inside a service.

Here are some key benefits of Angular services:
- Code Reusability: By separating your business logic into services, you can reuse the same code in different parts of your application, promoting code modularity and reducing code duplication.
- Dependency Injection: It allows you to define dependencies for your components and have them injected automatically by the framework.
- Single Responsibility Principle (SRP): Services help enforce the Single Responsibility Principle (SRP) by providing a dedicated place to put your business logic and data manipulation code.
- State Management: You can use services to store and manipulate data, allowing components to access and update it as needed.
- Scalability: By structuring your application's functionality into services, you can easily add new features or modify existing ones without impacting other parts of your codebase.
9. Describe best practices for using services in Angular.
Below are some of the best practices for using services in Angular:
- Don't include business logic in your services: Services should be used for providing functionality, not for implementing business logic. Business logic should be implemented in components or other classes that are specific to your application domain.
- Make sure your services are testable: Services should be designed in a way that makes them easy to test. This means avoiding using global state or other external dependencies, and instead relying on dependency injection to provide any necessary functionality.
- Use interfaces to define your services: It can help to make your code more modular and maintainable. It also makes it easier to use other libraries and tools that rely on interfaces.
- Keep your services small: Services should be designed to provide specific functionality, rather than attempting to handle everything at once. If a service starts to become too large, consider breaking it up into smaller, more specific services.
- Avoid using services to handle view logic: Services should be used to provide functionality that can be shared across multiple components. They should not be used to handle view-related logic, which should be implemented in the components themselves.
Routing & Navigation Questions
10. What are the different types of routing in Angular?
There are four main types of routing in Angular:
- Component Routing: Component routing is used to navigate between different pages or components within an Angular application. The URL for each page or component is defined in a routing configuration, and when the user navigates to that URL, the corresponding component is displayed.
const appRoutes: Routes = [ { path: 'home', component: HomeComponent }, { path: 'about', component: AboutComponent }, { path: 'contact', component: ContactComponent }, { path: '', redirectTo: '/home', pathMatch: 'full' } ];@NgModule({ imports: [ RouterModule.forRoot(appRoutes) ], exports: [ RouterModule ] }) export class AppRoutingModule { } - Child Routing: Child routing is used to navigate between child components within a parent component. The parent component serves as a container for the child components, and the URL for each child component is defined as a child route of the parent component.
const routes: Routes = [ { path: 'home', component: HomeComponent, children: [ { path: 'about', component: AboutComponent }, { path: 'contact', component: ContactComponent } ] } ];@NgModule({ imports: [ RouterModule.forChild(routes) ], exports: [ RouterModule ] }) export class HomeRoutingModule { } - Lazy Loading: Lazy loading is a technique in which a module is loaded only when it’s needed, rather than loading all modules at the start of the application. This can help reduce the initial load time of your application, especially if it has many modules.
const routes: Routes = [ { path: 'home', loadChildren: () => import('./home/home.module').then(m => m.HomeModule) }, { path: 'about', loadChildren: () => import('./about/about.module').then(m => m.AboutModule) }, { path: 'contact', loadChildren: () => import('./contact/contact.module').then(m => m.ContactModule) } ];@NgModule({ imports: [ RouterModule.forRoot(routes) ], exports: [ RouterModule ] }) export class AppRoutingModule { - Dynamic Routing: Dynamic routing is a technique in which the routing configuration is generated dynamically, based on the data that’s available at runtime.
const routes: Routes = [ { path: ':id', component: DynamicComponent, resolve: { data: DynamicDataResolver } } ];@NgModule({ imports: [ RouterModule.forRoot(routes) ], exports: [ RouterModule ] }) export class AppRoutingModule { }
11. Explain how to configure routing in an Angular application.
- Install Angular Router
- Install Angular Router in your project by running the following command in your terminal
npm install @angular/router - Define Routes
- In your Angular application, define the routes for different views/pages in the app-routing.module.ts file.
- Define an array of route objects, where each object specifies the path, component to render, and any additional configuration.
Example
import { NgModule } from '@angular/core'; import { RouterModule, Routes } from '@angular/router'; import { HomeComponent } from './home/home.component'; import { AboutComponent } from './about/about.component'; import { ContactComponent } from './contact/contact.component'; const routes: Routes = [ { path: '', component: HomeComponent }, { path: 'about', component: AboutComponent }, { path: 'contact', component: ContactComponent } ]; @NgModule({ imports: [RouterModule.forRoot(routes)], exports: [RouterModule] }) export class AppRoutingModule { } - Configure Router Outlet
- In your root component's template file (usually app.component.html), add an element. This is where Angular will render the component associated with the current route.
Example
<router-outlet></router-outlet> - Configure Navigation
- Use the routerLink directive in your HTML templates to navigate between different routes. The routerLink directive generates a link based on the specified route path.
Example
<a routerlink="/">Home</a> <a routerlink="/about">About</a> <a routerlink="/contact">Contact</a> - Handle Route Parameters
- You can define routes with parameters to pass data between components or to specify dynamic paths.
Example
const routes: Routes = [ { path: 'products/:id', component: ProductDetailComponent } ]; - Import AppRoutingModule
- Finally, import the AppRoutingModule in your root module (usually app.module.ts) to enable routing in your Angular application.
Example
import { BrowserModule } from '@angular/platform-browser';
import { NgModule } from '@angular/core';
import { AppRoutingModule } from './app-routing.module';
import { AppComponent } from './app.component';

@NgModule({
  declarations: [
    AppComponent
  ],
  imports: [
    BrowserModule,
    AppRoutingModule
  ],
  providers: [],
  bootstrap: [AppComponent]
})
export class AppModule { }
Angular Interview Questions for Freshers
12. How does an Angular application work?
- Every Angular app consists of a file named angular.json. This file will contain all the configurations of the app. While building the app, the builder looks at this file to find the entry point of the application.
"build": { "builder": "@angular-devkit/build-angular:browser", "options": { "outputPath": "dist/angular-starter", "index": "src/index.html", "main": "src/main.ts", "polyfills": "src/polyfills.ts", "tsConfig": "tsconfig.app.json", "aot": false, "assets": [ "src/favicon.ico", "src/assets" ], "styles": [ "./node_modules/@angular/material/prebuilt-themes/deeppurple-amber.css", "src/style.css" ] } } - Inside the build section, the main property of the options object defines the entry point of the application which in this case is main.ts.
- The main.ts file creates a browser environment for the application to run, and, along with this, it also calls a function called bootstrapModule, which bootstraps the application. These two steps are performed in the following order inside the main.ts file:
-
import { platformBrowserDynamic } from '@angular/platform-browser-dynamic'; -
platformBrowserDynamic().bootstrapModule(AppModule)
-
- The AppModule is declared in the app.module.ts file. This module contains declarations of all the components.
  import { BrowserModule } from '@angular/platform-browser';
      import { NgModule } from '@angular/core';
      import { AppComponent } from './app.component';

      @NgModule({
        declarations: [
          AppComponent
        ],
        imports: [
          BrowserModule
        ],
        providers: [],
        entryComponents: [],
        bootstrap: [AppComponent]
      })
      export class AppModule { }
Here, the AppComponent is getting bootstrapped.
- This component is defined in theapp.component.ts file. This file interacts with the webpage and serves data to it.
import { Component } from '@angular/core'; @Component({ selector: 'app-root', templateUrl: './app.component.html', styleUrls: ['./app.component.css'] }) export class AppComponent { title = 'angular'; } - Each component is declared with three properties:
- Selector:used for accessing the component
- Template/TemplateURL: contains HTML of the component
- StylesURL: contains component-specific stylesheets
- After this, Angular calls the index.html file. This file consequently calls the root component that is app-root. The root component is defined in app.component.ts.
<!doctype html> <html lang="en"> <head> <meta charset="utf-8"> <title>Angular</title> <base href="/"> <meta name="viewport" content="width=device-width, initial-scale=1"> </head> <body> <app-root></app-root> </body> </html> - The HTML template of the root component is displayed inside the
tags.
13. What are the benefits of using Angular?
The top benefits of utilizing the Angular framework are listed below:
- Angular facilitates bidirectional data coupling.
- Its architecture adheres to the MVC pattern.
- Both Angular and static templates are supported.
- It makes adding a custom directive easier.
- RESTfull services are also supported.
- Angular provides functionality for validations.
- Client and server communication is enabled by Angular.
- Support for dependency injection is offered.
- It has strong features like animation and event handlers, among others.
14. What is the purpose of TypeScript in Angular development?
- Static Typing: There is a feature of static typing in TypeScript, through which you can define and enforce the types of variables, function parameters, and return values. This helps in error detection at compile-time.
- Enhanced Tooling: TypeScript provides a rich set of tooling features like code navigation, autocompletion, and refactoring support. These features improve developer productivity and make it easier to work with larger codebases.
- Better Code Organization: TypeScript supports object-oriented programming features like classes, interfaces, and modules. These features help organize code into reusable and maintainable components, making the development process more structured and efficient.
- Improved Readability: With the help of TypeScript, developers can write self-documented code by providing type annotations. This improves code readability and makes it easier for other developers to understand and collaborate on the project.
- Compatibility with Existing JavaScript Code: Being a superset of JavaScript, TypeScript can seamlessly integrate with existing JavaScript projects. This allows developers to gradually introduce TypeScript into their codebase without needing a complete rewrite.
15. Explain the concept of data binding in Angular and its different types.
Data binding is a mechanism that allows synchronization of data between the model and the view, making it easier to manage and update user interfaces efficiently.
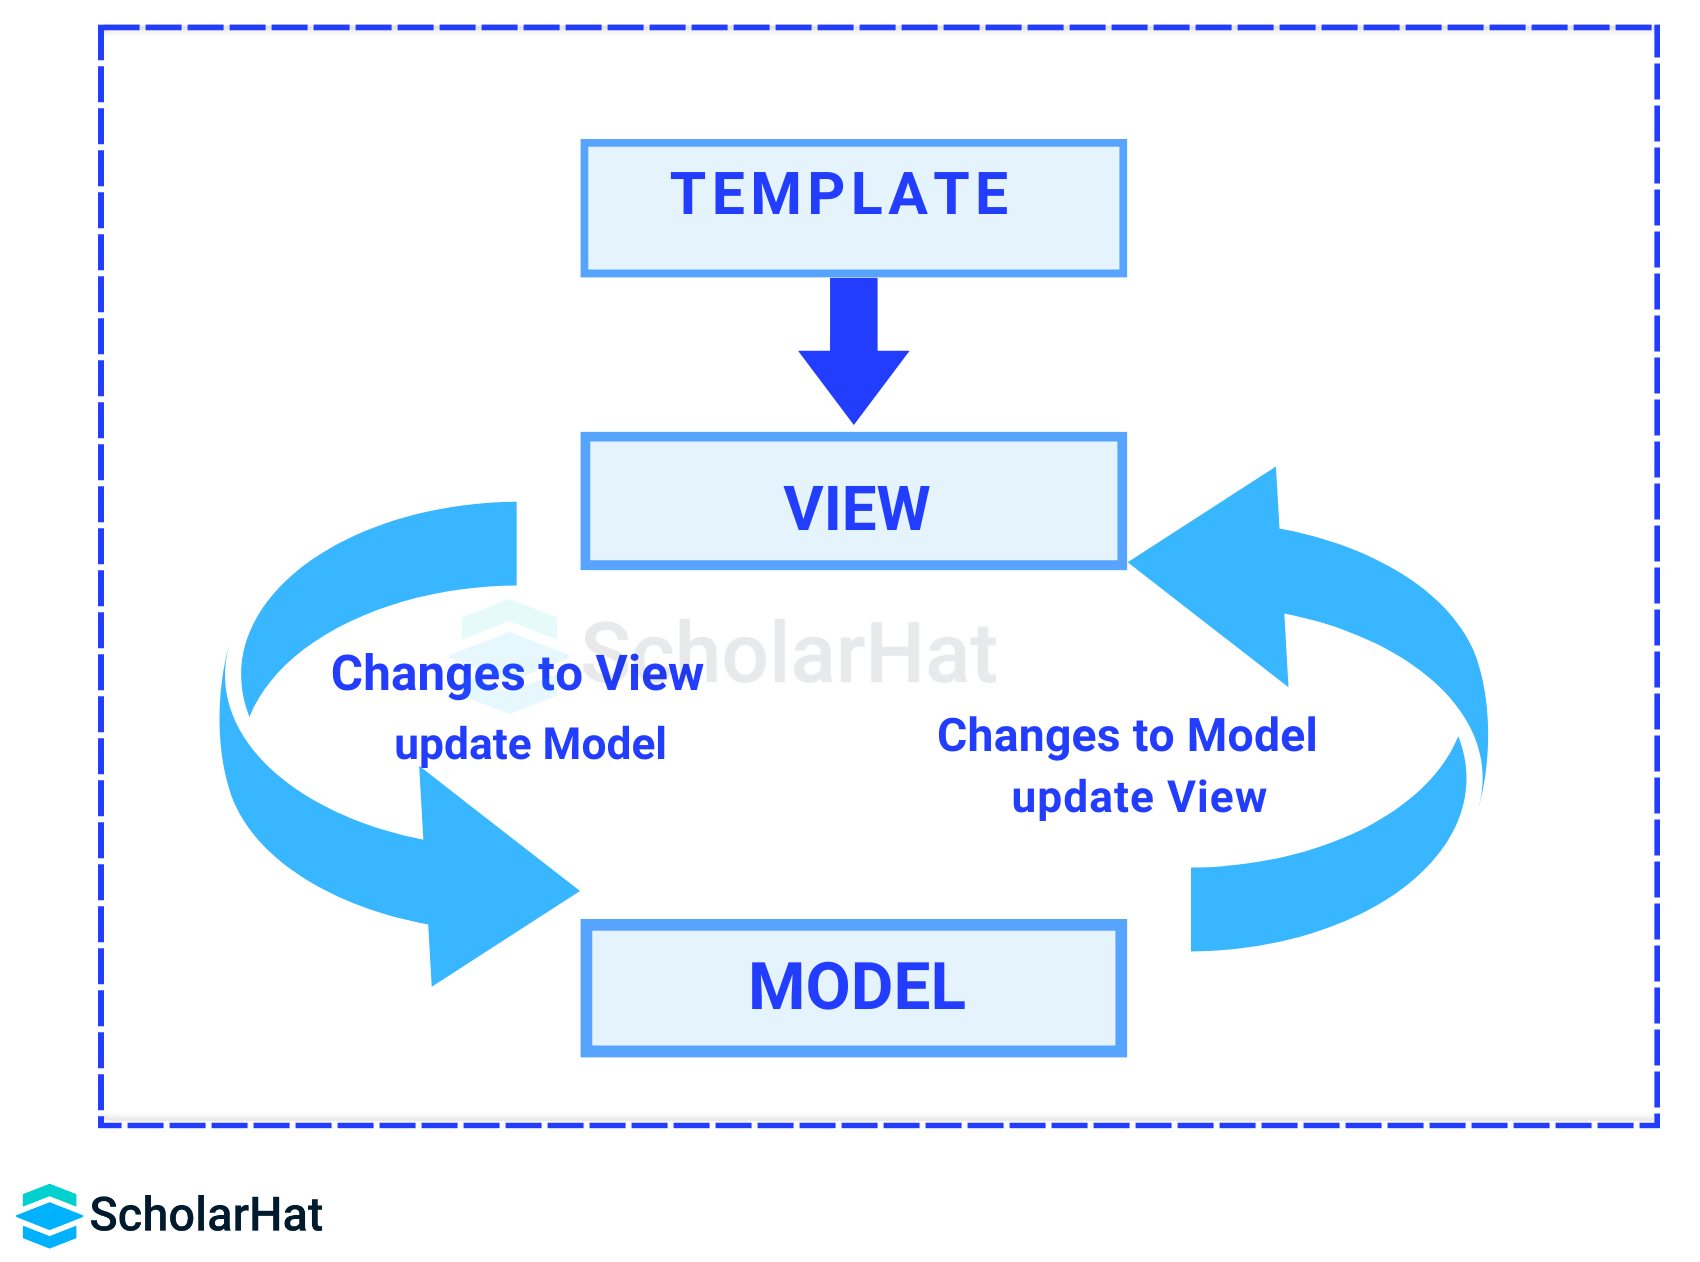
There are four types of Data binding in Angular:
- Property Binding: This is achieved by using square brackets to bind a property of an HTML element to a component property. For instance, [property]="data" binds the value of the component's "data" property to the HTML element's property.
Syntax
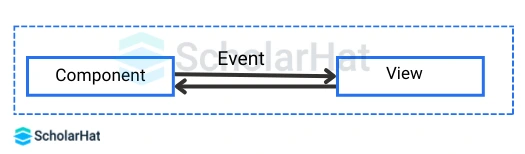
[class]="variable_name" - Event Binding: This allows the view to communicate changes back to the component when an event occurs, such as a button click or input change. Event binding is denoted by parentheses, like (event)="handler()".

Syntax
<button class="btn btn-block" (click)=showevent($event)> Event </button> showevent(event) { alert("Welcome to ScholarHat"); } - String Interpolation: This involves displaying component data in the view by enclosing the property or expression in double curly braces, like {{ data }}. Angular automatically updates the view whenever the underlying data changes.
Syntax
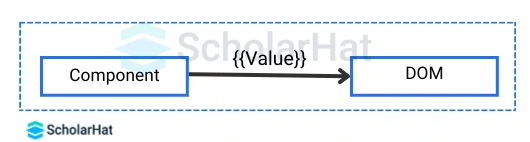
class="{{variable_name}}" - Two-way Data Binding: Here, the immediate changes to the view & component will be reflected automatically, i.e. when the changes are made to the component or model then the view will render the changes simultaneously. Similarly, when the data is altered or modified in the view then the model or component will be updated accordingly.
Read More: Data Binding in Angular
16. Explain the concept of single-page applications (SPAs).
A single-page application is a website that loads a single document and overwrites the existing one with new data from a web server instead of reloading pages individually from the beginning. Due to this ability, the page content updates in real-time based on user actions with quick transitions and without refreshing.
The ability to provide new content seamlessly based on user actions, such as button clicks makes single-page applications stand out from their counterparts. Instead of refreshing an entire page, the application updates or alters components based on the user’s actions and needs, making it quick to respond and easy to interact with in real-time.
17. What is new in Angular 17?
- New, declarative control flow
- Deferred loading blocks
- View Transitions API support
- Support for passing in @Component.styles as a string
- Angular’s animation code is lazy-loadable
- TypeScript 5.2 support
- The core Signal API is now stable (PR)
- Signal-based components are not ready yet, they won’t be a part of Angular 17
- Node.js v16 support has been removed and the minimum support version is v18.13.0 (PR)
- We expect that Esbuild will be the default builder and the default dev server will use Vite
Read More: What's new in Angular 17: A Developer Guide to Angular 17 New Features
18. What are decorators in Angular?
Decorators are design patterns or functions that define how Angular features work. They are employed to alter a class, service, or filter beforehand. Angular supports four types of decorators, they are:
- Class Decorators
- Property Decorators
- Method Decorators
- Parameter Decorators
19. What are Angular Templates?
Angular templates are written in HTML and feature Angular-specific elements and properties. These templates are merged with information from the model and controller, which is then rendered to present the user with a dynamic view. In an Angular component, there are two ways to construct a template:
- Linked Template: A component may include an HTML template in a separate HTML file. As illustrated below, the templateUrl option is used to indicate the path of the HTML template file.
Example
@Component({ selector: "app-greet", templateUrl: "./component.html" }) - Inline Template: The component decorator's template config is used to specify an inline HTML template for a component. The Template will be wrapped inside the single or double quotes.
Example
@Component({
    selector: "app-greet",
    template: `
         Hello {{name}} how are you ?
         Welcome to interviewbit !
    `
})
20. What are Angular Annotations?
Angular Annotations are hard-coded language features. Annotations are merely metadata that is set on a class to reflect the metadata library. When a user annotates a class, the compiler adds an annotations property to the class, saves an annotation array in it, and then attempts to instantiate an object with the same name as the annotation, providing the metadata into the constructor. Annotations in AngularJs are not predefined, therefore we can name them ourselves.
21. What are Angular Directives?
A directive is a class in Angular that is declared with a @Directive decorator. Every directive has its own behavior and can be imported into various components of an application. When Angular begins compiling the TypeScript, CSS, and HTML files into a single JavaScript file, it scans through the entire code and looks for a directive that has been registered.
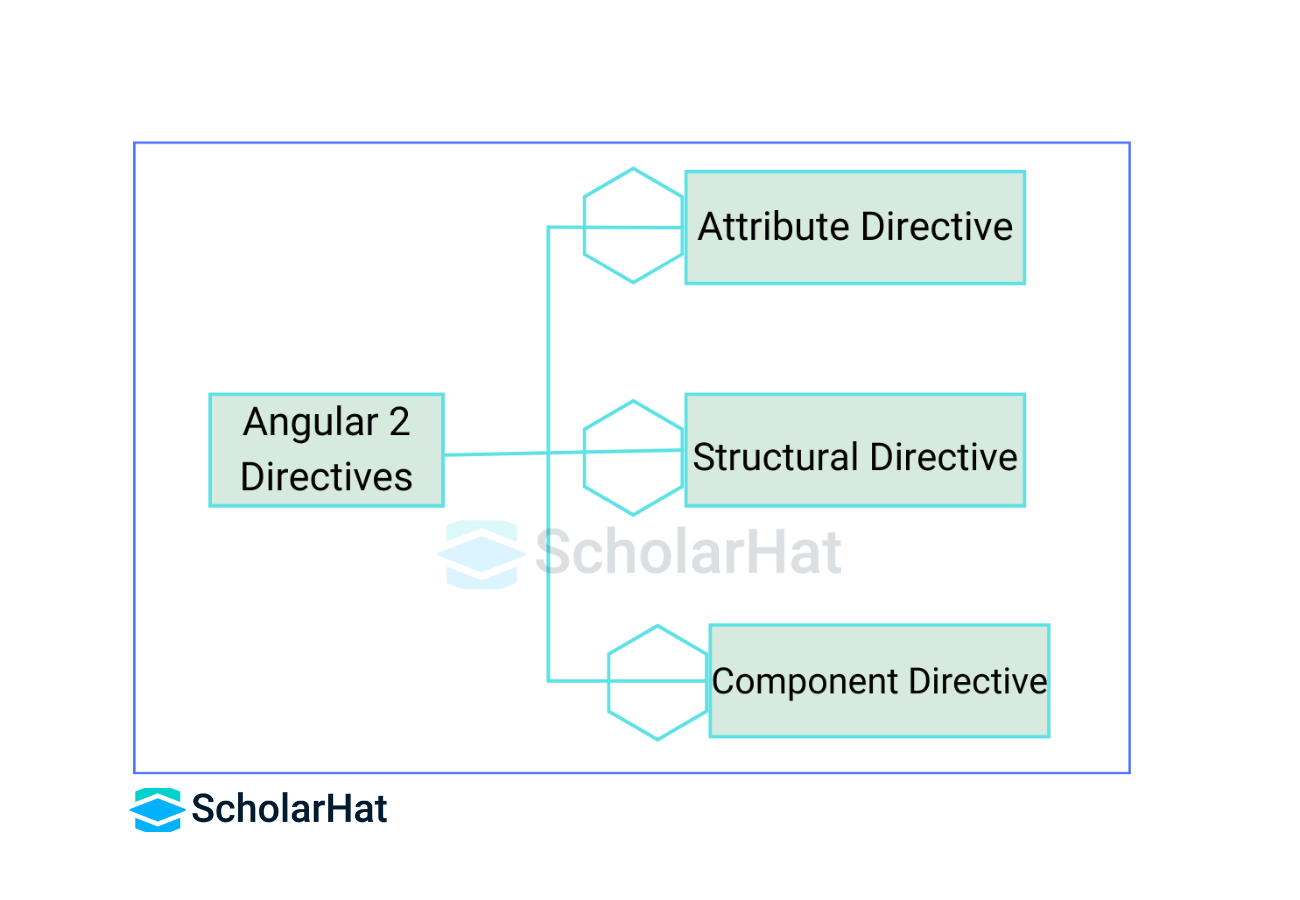
There are three types of directives in Angular:
- Component Directives
- Structural Directives
- Attribute Directives
22. What are Angular Components?
Components are the core building pieces in Angular that manage a portion of the UI for any application. The @Component decorator is used to define a component. Every component comprises three parts: a template that loads the component's view, a stylesheet that specifies the component's look and feel, and a class that includes the component's business logic.

Angular Interview Questions for Experienced Professionals
After getting conceptual clarity on the fundamental topics, let's step a level further towards the questions for a little trained and experienced frontend or Angular developer.
23. Explain the differences between AOT (Ahead-of-Time) and JIT (Just-in-Time) compilation and their pros and cons.
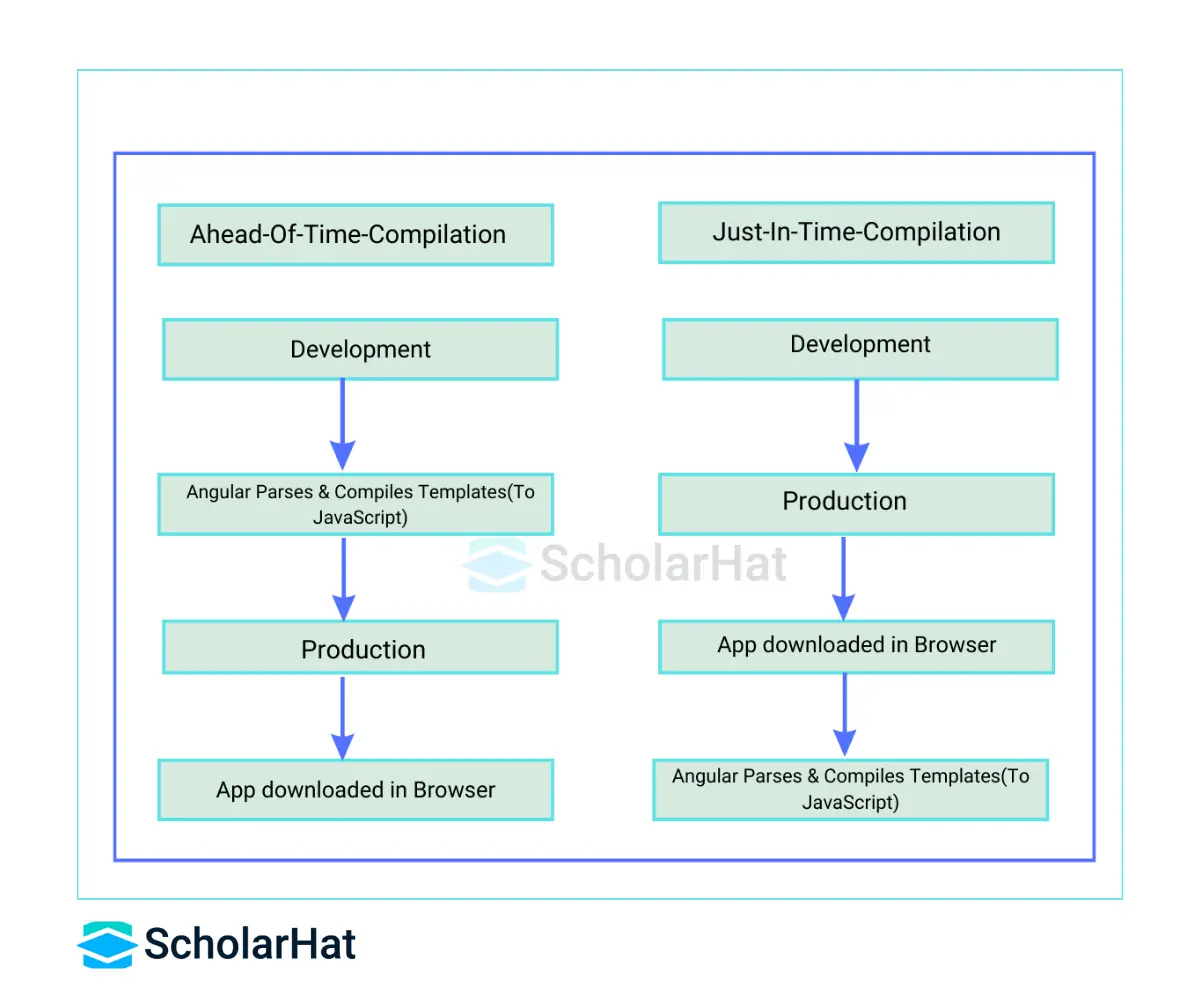
| AOT (Ahead-of-Time) | JIT (Just-in-Time) |
| Compiles code before the Angular application is loaded in the browser | Compiles Code during runtime when the Angular app is launched in the client’s browser. |
| Generates a production-ready output with optimizations, ready for deployment without additional build steps. | Requires an additional build for production, potentially adding extra time to the deployment process |
| AOT produces smaller bundle sizes, which means faster downloads for users | Produces larger bundle sizes due to in-browser compilation, potentially impacting loading speed |
| AOT catches and reports template errors during the compilation phase, ensuring more reliable applications with fewer runtime issues. | Identifies errors during runtime, which may lead to issues being discovered after the application is already in use |
| Does not allow dynamic updates in production, requiring a rebuild for any changes | Allows dynamic updates during development, making it easier to see immediate results |
| Better compatibility with older browsers, ensuring wider accessibility | Slightly less compatible with older browsers compared to AOT |
Advantages of AOT Compilation
- Faster rendering
- Fewer asynchronous requests
- Smaller Angular framework download size
- Quick detection of template errors
- Better security
Advantages of JIT Compilation
- Faster Development Cycle
- Dynamic Compilation
- Optimized Bundle Sizes
- Runtime Error Reporting
- Dynamic Template Compilation
Disadvantages of AOT Compilation
- Increased Build Time
- Complexity of Configuration
- Increased Bundle Size
- Debugging Challenges
Disadvantages of JIT Compilation
- Browser Compatibility
- Debugging Complexity
- Potential Performance Overhead
24. Describe lazy loading and its benefits for optimizing application performance.
Lazy loading refers to the technique of loading webpage elements only when they are required. Instead of loading all media at once, which would use a lot of bandwidth and bog down page views, those elements are loaded when their location on the page is about to scroll into view.
Implementing Lazy Loading in Angular
- Set Up Your Project: Install the CLI using npm by running the command
npm install -g @angular/cli - Create a project, for example, Lazy Loading Demo
ng new lazy-loading-demo --routingNow, you’ll be working exclusively in the src/app folder, which contains the code for your app. This folder contains your main routing file, app-routing.module.ts.
- Create Feature Modules
Create separate modules for each feature of your application. Each feature module should contain its components, services, and other related files.
Example
products.module.ts
import { NgModule } from '@angular/core'; import { CommonModule } from '@angular/common'; import { RouterModule } from '@angular/router'; import { ProductsListComponent } from './products-list/products-list.component'; import { ProductDetailComponent } from './product-detail/product-detail.component'; @NgModule({ declarations: [ ProductsListComponent, ProductDetailComponent ], imports: [ CommonModule, RouterModule.forChild([ { path: '', component: ProductsListComponent }, { path: ':id', component: ProductDetailComponent } ]) ] }) export class ProductsModule { } - Configure Routes for Lazy Loading: Define routes for each feature module in your app-routing.module.ts file.
const routes: Routes = [ { path: 'dashboard', component: DashboardComponent }, { path: 'products', loadChildren: () => import('./products/products.module').then(m => m.ProductsModule) }, // Other routes... ]; - Load Feature Modules Lazily: Use the loadChildren property in the route configuration to specify the path to the feature module file and load it dynamically using the import() function.
Example
loadChildren: () => import('./products/products.module').then(m => m.ProductsModule) - Update AppModule: Remove references to feature modules from the imports array of the AppModule since they are now loaded lazily.
- Test Lazy Loading: Test your application to ensure that feature modules are loaded only when their routes are accessed.
25. What are Pure Pipes?
These are pipelines that only employ pure functions. As a result, a pure pipe does not use any internal state, and the output remains constant as long as the parameters provided remain constant. Angular calls the pipe only when the parameters being provided change. Throughout all components, a single instance of the pure pipe is used.
26. What do you understand by impure pipes?
Angular calls an impure pipe for each change detection cycle, independent of the change in the input fields. For each of these pipes, several pipe instances are produced. These pipes' inputs can be altered.
By default, all pipes are pure. However, you can specify impure pipes using the pure property as specified below:
@Pipe({
    name: 'impurePipe',
    pure: false/true
})
export class ImpurePipe {}
27. What is Bootstrap? How is it embedded into Angular?
Bootstrap is a popular open-source CSS framework used for building responsive and mobile-first websites and web applications. It provides a set of pre-styled components, such as buttons, forms, navigation bars, and grid layouts, as well as CSS utilities for styling and layout management.
The bootstrap library can be integrated into your program in two different methods:
- Angular Bootstrap through CDN:
You can include Bootstrap CSS and JavaScript files directly from a content delivery network (CDN) in your Angular application's index.html file.
Example
<!DOCTYPE html> <html lang="en"> <head> <meta charset="utf-8"> <title>Angular App</title> <base href="/"> <meta name="viewport" content="width=device-width, initial-scale=1"> <link rel="stylesheet" href="https://maxcdn.bootstrapcdn.com/bootstrap/4.5.2/css/bootstrap.min.css"> </head> <body> <app-root></app-root> <script src="https://code.jquery.com/jquery-3.5.1.slim.min.js"></script> <script src="https://cdn.jsdelivr.net/npm/@popperjs/core@2.9.1/dist/umd/popper.min.js"></script> <script src="https://maxcdn.bootstrapcdn.com/bootstrap/4.5.2/js/bootstrap.min.js"></script> </body> </html> - Using npm Package: You can install Bootstrap as an npm package and import its CSS files directly into your Angular components or stylesheets.
- Install Bootstrap using npm
npm install bootstrap - Import Bootstrap CSS in your styles.scss or styles.css file
@import '~bootstrap/dist/css/bootstrap.min.css';
- Install Bootstrap using npm
Angular Interview Questions for Experienced Professionals ( 2 to 3 years)
If you have spent more than two years in the frontend or Angular development, you are now in the position to understand the little bit advanced level of questions mentioned below:
28. What do Angular filters do? List a few of them.
Filters are used to format an expression and present it to the user. They can be used in view templates, controllers, or services.
| Filter name | Description |
| Uppercase | Convert string to uppercase |
| Lowercase | Convert string to lowercase |
| Date | Convert the date to the specified format |
| Currency | Convert the number to currency format |
| Number | Format the number into a string |
| Orderby | Orders an array by specific expression |
| limitTo | Limits array into the specified number of elements; string to specified number of characters |
| JSON | Format object to JSON string |
| Filter | Select a subset of items from the array |
29. In Angular, what is the scope?
The scope in Angular binds the HTML, i.e., the view, and the JavaScript, i.e., the controller. It as expected is an object with the available methods and properties. The scope is available for both the view and the controller. When you make a controller in Angular, you pass the $scope object as an argument.
How to Use the Scope in Angular?
<!DOCTYPE html>
<html>
<script src="https://ajax.googleapis.com/ajax/libs/angularjs/1.6.9/angular.min.js"></script>
<body>

<div ng-app="myApp" ng-controller="myCtrl">

<h1>{{websitename}}</h1>

</div>

<script>
var app = angular.module('myApp', []);
app.controller('myCtrl', function($scope) {
    $scope.websitename = "ScholarHat";
});
</script>
<p>The property "websitename" was made in the controller, and can be referred to in the view by using the {{ }} brackets.</p>
</body>
</html>
30. What are lifecycle hooks in Angular? Explain a few lifecycle hooks.
Every component in Angular has a lifecycle. Angular creates and renders these components and also destroys them before removing them from the DOM. This is achieved with the help of lifecycle hooks. Throughout the entire process, Angular Lifecycle hooks are used to monitor the phases and initiate modifications at particular points.

The following are the eight lifecycle hooks in Angular
| Lifecycle hooks | Functions |
| ngOnChanges( ) | Called when the input properties of the component are changed. |
| ngOnInit( ) | Called after the ngOnChanges hook, to initialize the component and set the input properties |
| ngDoCheck( ) | Called to detect and act on changes |
| ngAfterContentInit( ) | Called after the first ngDoCheck hook, to respond after the content is projected inside the component |
| ngAfterContentChecked( ) | Called after ngAfterContentInit (and every subsequent ngDoCheck) to respond after the projected content is checked |
| ngAfterViewInit( ) | Called after a component’s view, or after initializing a child component’s view |
| ngAfterViewChecked( ) | Called after ngAfterViewInit, to respond when the component’s view or child component’s view is checked |
| ngOnDestroy( ) | Called immediately before destroying the component, to clean up the code and detach the event handlers |
31. What is Eager and Lazy Loading?
- Eager Loading: It is the default module-loading strategy. Eager-loading feature modules are loaded before the program begins. This is primarily utilized for small-scale applications.
- Lazy Loading: Lazy loading loads the feature modules dynamically as needed. This speeds up the application. It is utilized for larger projects where all of the modules are not required at the start.
32. How can I utilize an Angular template with ngFor?
- Component Class: First of all you need to have a component class with a property that holds the collection of items you want to iterate over.
import { Component } from '@angular/core';
Example
@Component({ selector: 'app-my-component', templateUrl: './my-component.component.html', styleUrls: ['./my-component.component.css'] }) export class MyComponent { items: string[] = ['Item 1', 'Item 2', 'Item 3']; } - Template: In your template file (my-component.component.html), use the ngFor directive to iterate over the items array and render elements dynamically for each item
<div *ngFor="let item of items">
  {{ item }}
</div>
Here, *ngFor="let item of items" iterates over the items array and assigns each item to the local variable item. The content inside the
tag is repeated for each item in the array, and {{ item }} displays the value of each item. - Result: When you render the MyComponent component, Angular will dynamically generate HTML elements for each item in the items array, resulting in
<div>Item 1</div>
<div>Item 2</div>
<div>Item 3</div>
The number of <div> elements rendered will be equal to the number of items in the items array, and the content of each <div> will display the corresponding item.
33. What do Angular's Template-driven and Reactive forms mean?
Angular 17 continues to support both Template-Driven and Reactive forms. Choosing between Template-Driven and Reactive forms largely depends on the specific requirements of your project and your personal or team’s familiarity with Angular.
- Template-driven Forms: They are the Angular way of leveraging HTML and its form elements to manage form data. Here, most of the form logic is handled by directives in the template itself. The FormsModule is essential here, enabling two-way data binding using ngModel to link domain model values to form input fields.
Example
/// Import FormsModule to enable template-driven forms
import { FormsModule } from '@angular/forms';

@NgModule({
  imports: [
    FormsModule
    // other imports...
  ],
  // other module properties...
})
export class AppModule { }
<!-- your-component.html --> <form #userForm="ngForm"> <input type="text" name="username" [(ngModel)]="user.username" required> <input type="email" name="email" [(ngModel)]="user.email" required> <button type="submit" [disabled]="!userForm.valid">Submit</button> </form>Here, ngModel binds the input fields to the user.username and user.email properties.
- Reactive Forms: Here, the ReactiveFormsModule is used, and form controls are explicitly created in the component class. This approach leverages the FormControl, FormGroup, and FormArray classes to manage form data.
Example
// app.module.ts
// Import ReactiveFormsModule for reactive forms
import { ReactiveFormsModule } from '@angular/forms';

@NgModule({
  imports: [
    ReactiveFormsModule
    // other imports...
  ],
  // other module properties...
})
export class AppModule { }

// your-component.ts
import { FormGroup, FormControl, Validators } from '@angular/forms';

export class YourComponent {
  userForm = new FormGroup({
    username: new FormControl('', Validators.required),
    email: new FormControl('', [Validators.required, Validators.email])
  });

  onSubmit() {
    console.log(this.userForm.value);
  }
}
<!-- your-component.html --> <form [formGroup]="userForm" (ngSubmit)="onSubmit()"> <input type="text" formControlName="username"> <input type="email" formControlName="email"> <button type="submit" [disabled]="!userForm.valid">Submit</button> </form>
34. What kind of DOM is implemented by Angular?
Angular implements a dynamic and extensible Document Object Model (DOM) that is based on the standard DOM provided by the browser. This dynamic DOM is known as the Angular-specific DOM. This updates the entire tree structure of HTML tags until it reaches the data to be updated.
Below are some properties of this Angular-specific DOM:
- Virtual DOM: Angular uses a virtual representation of the DOM.
- Template Syntax: Angular templates are written using a declarative and expressive syntax that defines the structure and behavior of the user interface.
- Data Binding: Angular implements two-way data binding.
- Directives and Components: Angular extends HTML with custom directives and components that encapsulate behavior and presentation logic.
- Change Detection: Angular performs change detection to detect and propagate changes to the view.
- Cross-Browser Compatibility: Angular's DOM abstraction layer ensures cross-browser compatibility and consistency by providing a unified API.
Angular Interview Questions for Experienced Professionals ( 4 to 6 years)
After working with Angular for at least five years, you need to go to a high level where you need to work with Dependency Injection, state management libraries, etc.
35. Discuss your understanding of server-side rendering (SSR) and when you would consider using Angular Universal.
Server-side rendering (SSR) is a process that involves rendering pages on the server, resulting in initial HTML content that contains the initial page state. Once the HTML content is delivered to a browser, Angular initializes the application and utilizes the data contained within the HTML.
Working of SSR
- An HTTP request is made to the server.
- The server receives the request and processes all (or most of) the necessary code immediately.
- The result is a fully formed and easily consumed HTML page that can be sent to the client’s browser via the server’s response.
Angular Universal
Angular Universal is a server-side rendering solution. It allows rendering the angular applications on the server before sending them to the client. The content of the application is available to first-time users instantly.
Here, are the scenarios for using Angular Universal:
- Improved SEO: By using Angular Universal to pre-render your application on the server side, you can ensure that search engines can crawl and index your content more effectively, improving your site's search engine optimization (SEO) and visibility.
- Better Performance: Rendering pages on the server side can lead to faster initial page loads and improved perceived performance for users, especially on devices with slower network connections or limited processing power.
- Optimized Social Sharing: Server-side rendering with Angular Universal ensures that the shared links include meaningful content and metadata, improving the appearance and usability of shared links on social media.
- Accessibility and Progressive Enhancement: Server-rendered pages provide a solid foundation for progressive enhancement, allowing you to enhance the user experience with client-side interactivity while ensuring a baseline level of functionality for all users.
- Optimized Time to Interactive (TTI): Server-side rendering can help reduce the time to interactive (TTI) for your application by pre-rendering the initial view on the server side and sending it to the client.
- Improved Performance on Mobile Devices: Mobile devices, especially those with limited processing power and network bandwidth, can benefit from server-side rendering to reduce the time and resources required to render pages.
36. Explain RxJS Observables and their advantages over Promises for asynchronous operations.
RxJS is a framework for reactive programming that makes use of Observables, making it easy to write asynchronous code. This project is a kind of reactive extension to JavaScript with better performance, modularity, and debuggable call stacks while staying mostly backward-compatible, with some changes that reduce the API surface. RxJS is the official library used by Angular to handle reactivity, converting pull operations for call-backs into Observables.
Advantages of RxJS over promises for asynchronous operations:
- Functional Reactive Programming (FRP): RxJS follows the Functional Reactive Programming paradigm, which allows developers to work with streams of data over time.
- Powerful Operators: RxJS provides a wide range of operators that allow developers to manipulate, transform, and combine streams of data. These operators enable powerful data processing and manipulation workflows, making it easier to handle complex asynchronous scenarios.
- Handling Complex Scenarios: With RxJS, developers can handle complex asynchronous scenarios such as debounce, throttle, retry, and timeout with ease.
- Lazy Evaluation: RxJS uses lazy evaluation, i.e. operators are only executed when the observable is subscribed to.
- Cancellation and Resource Management: RxJS provides mechanisms for cancellation and resource management, which allows developers to clean up resources and cancel ongoing operations when they're no longer needed.
- Integration with Angular: RxJS is deeply integrated with Angular and is used extensively throughout the framework, especially in features like reactive forms, HTTP requests, and event handling.
- Error Handling: RxJS provides robust mechanisms, including operators for catching and handling errors within observables. This makes it easier to handle errors in asynchronous operations and recover gracefully from failures.
37. Describe your experience with state management libraries like NgRx or NgXS, highlighting their strengths and weaknesses in different contexts.
- NgRx
NgRx is a powerful state management library for Angular, inspired by Redux. It follows a unidirectional data flow pattern and provides a centralized store to manage the application state.
Example
// Actions export enum CounterActionTypes { Increment = '[Counter] Increment', Decrement = '[Counter] Decrement', } export class Increment implements Action { readonly type = CounterActionTypes.Increment; } export class Decrement implements Action { readonly type = CounterActionTypes.Decrement; } // Reducer export function counterReducer(state: number = 0, action: CounterActions): number { switch (action.type) { case CounterActionTypes.Increment: return state + 1; case CounterActionTypes.Decrement: return state - 1; default: return state; } } // Store Setup @NgModule({ imports: [ StoreModule.forRoot({ counter: counterReducer }), ], }) export class AppModule { } // Component @Component({ selector: 'app-counter', template: ` <div> <button (click)="increment()">Increment</button> <span>{{ counter$ | async }}</span> <button (click)="decrement()">Decrement</button> </div> `, }) export class CounterComponent { counter$: Observable<number>; constructor(private store: Store<{ counter: number }>) { this.counter$ = this.store.select('counter'); } increment() { this.store.dispatch(new Increment()); } decrement() { this.store.dispatch(new Decrement()); } } - NgXs
NgXs is a lightweight and developer-friendly state management library for Angular applications. It offers a straightforward setup and intuitive syntax.
Example
// State
@State<number>({
  name: 'counter',
  defaults: 0,
})
export class CounterState {}

// Actions
export class Increment {
  static readonly type = '[Counter] Increment';
}

export class Decrement {
  static readonly type = '[Counter] Decrement';
}

// Component
@Component({
  selector: 'app-counter',
  template: `
    <div>
      <button (click)="increment()">Increment</button>
      <span>{{ counter$ | async }}</span>
      <button (click)="decrement()">Decrement</button>
    </div>
  `,
})
export class CounterComponent {
  counter$: Observable<<number>;

  constructor(private store: Store) {
    this.counter$ = this.store.select(state => state.counter);
  }

  increment() {
    this.store.dispatch(new Increment());
  }

  decrement() {
    this.store.dispatch(new Decrement());
  }
}
Strengths and Weaknesses of Ngrx in different contexts:
Strengths:
- Predictable State Management: NgRx follows the Redux pattern, providing a predictable state management approach.
- Single Source of Truth: NgRx stores application state in a single immutable store, making it easier to maintain and debug complex applications.
- Middleware Support: NgRx supports middleware, allowing developers to intercept actions and perform asynchronous operations such as API calls or logging.
- Integration with Angular: NgRx is specifically designed for Angular applications, providing seamless integration with Angular's reactive programming model and dependency injection system.
- Time-travel Debugging: NgRx DevTools enables time-travel debugging, allowing developers to replay actions and inspect state changes at different points in time.
Weaknesses:
- Boilerplate Code: Implementing NgRx can lead to a significant amount of boilerplate code, especially for simple applications or features.
- Learning Curve: NgRx has a steep learning curve, especially for developers new to reactive programming concepts and the Redux pattern.
- Complexity: As applications grow in size and complexity, managing NgRx stores and actions can become challenging, leading to potential performance issues and codebase maintenance overhead.
Strengths and Weaknesses of NgXS in different contexts:
Strengths:
- Simplicity: NgXS aims to simplify state management in Angular applications by providing a lightweight and intuitive API for managing state.
- Minimal Boilerplate: NgXS reduces the amount of boilerplate code required compared to NgRx, making it easier to get started with state management.
- Angular Integration: Similar to NgRx, NgXS integrates well with Angular and leverages Angular's reactive programming model.
- DevTools Support: NgXS supports DevTools extensions, enabling developers to inspect state changes and debug applications more effectively.
Weaknesses:
- Limited Middleware Support: As compared to NgRx, NgXS has limited support for middleware, which may limit its capabilities for handling complex asynchronous operations.
- Community and Ecosystem: NgXS has a smaller community and ecosystem compared to NgRx, which may result in fewer third-party extensions, tools, and resources available for developers.
- Scalability: While NgXS is suitable for managing state in smaller to medium-sized applications, it may face scalability challenges in larger and more complex applications compared to NgRx.
38. Describe the Angular modules, services, and components.
- Angular modules
An Angular module is a deployment sub-set of your whole Angular application. It's useful for splitting up an application into smaller parts and lazy load each separately, and to create libraries of components that can be easily imported into other applications. Modules are defined using the @NgModule decorator and typically contain declarations, imports, providers, and export arrays.
Example
import { BrowserModule } from '@angular/platform-browser';
import { NgModule } from '@angular/core';
import { AppComponent } from './app.component';
...

@NgModule({
  declarations: [AppComponent, MyComboboxComponent,
                    CollapsibleDirective, CustomCurrencyPipe],
  imports: [BrowserModule],
  providers: [UserService, LessonsService]
})
export class ExampleModule {

}
In the above code,
- the @NgModule annotation is what defines the module
- The components, directives, and pipes that are part of the module are listed in the declarations array
- We can import other modules by listing them in the imports array
- We can list the services that are part of the module in the providers' array
- Angular Components
Components are the core building pieces in Angular that manage a portion of the UI for any application. The @Component decorator is used to define a component. Every component comprises three parts:
- a template that loads the component's view
- a stylesheet that specifies the component's look and feel
- a class that includes the component's business logic
- Angular Services
Objects classified as services are those that are only instantiated once in the course of an application. A service's primary goal is to exchange functions and data with various Angular application components. To define a service, use the @Injectable decorator. Any component or directive can call a function specified inside a service.
39. What distinguishes JavaScript expressions from Angular expressions?
- Context: In Angular, the expressions are evaluated against a scope object, while the Javascript expressions are evaluated against the global window.
- Forgiving: In Angular expression evaluation is forgiving to null and undefined, while in Javascript undefined properties generate TypeError or ReferenceError.
- No Control Flow Statements: Loops, conditionals, or exceptions cannot be used in an angular expression
- Security Restrictions: Angular expressions have security restrictions to prevent code injection and execution of potentially harmful JavaScript code. This makes Angular expressions safer to use in templates.
- Scope of Evaluation: Angular expressions are evaluated within the context of Angular's templating engine, whereas JavaScript expressions are evaluated within the broader JavaScript runtime environment.
- Syntax Differences: While Angular expressions use similar syntax to JavaScript, there are some differences, such as the use of filters, template variables, and special Angular directives like ngIf and ngFor.
40. Describe Angular's dependency injection concept.
Dependency Injection is a design pattern that promotes the separation of concerns by decoupling components and their dependencies. In Angular, dependencies are typically services, but they also can be values, such as strings or functions. DI is used to inject instances of services, components, and other objects into classes that depend on them, promoting modularity, reusability, and testability within the application.

Implementing Angular Dependency Injection involves the following steps to set up and use services within your components.
- Create a Service
First, create a service that will provide functionality or data to other components. You can use Angular CLI to generate a service:
ng generate service my-serviceThis will create a my-service.service.ts file. Open the file and define your service:import { Injectable } from '@angular/core'; @Injectable({ providedIn: 'root', // Provides the service at the root level }) export class MyService { // Implement your service logic here } - Inject the Service into a Component
Now, you can inject the service into a component that needs to use its functionality. Open the component file (e.g., app.component.ts) and inject the service through the constructor:
import { Component } from '@angular/core'; import { MyService } from './my-service.service'; @Component({ selector: 'app-root', templateUrl: './app.component.html', styleUrls: ['./app.component.css'], }) export class AppComponent { constructor(private myService: MyService) { // Use myService in the component } } - Register the Service in a ModuleAngular needs to know about the service and how to create an instance of it. Register the service in the providers array of an Angular module. If you want the service to be available throughout the entire application, use the root module (app.module.ts):
import { NgModule } from '@angular/core'; import { BrowserModule } from '@angular/platform-browser'; import { AppComponent } from './app.component'; import { MyService } from './my-service.service'; @NgModule({ declarations: [AppComponent], imports: [BrowserModule], providers: [MyService], // Register the service here bootstrap: [AppComponent], }) export class AppModule {} - Use the Service in the ComponentNow that the service is injected into the component, you can use its methods and properties within the component:
import { Component } from '@angular/core';
import { MyService } from './my-service.service';

@Component({
  selector: 'app-root',
  templateUrl: './app.component.html',
  styleUrls: ['./app.component.css'],
})
export class AppComponent {
  constructor(private myService: MyService) {
    // Use myService in the component
    const data = this.myService.getData();
    console.log(data);
  }
}
In this example, assume that MyService has a method called getData().
Read More: Angular Dependency Injection
41. Describe MVVM architecture concerning Angular.
MVVM is a variation of the traditional MVC (Model-View-Controller) software design pattern. Model-View-ViewModel (MVVM) architecture allows developers to divide their work into two categories: the development of the graphical user interface (the View) and the development of the business logic or back-end logic (the Model). This architecture eliminates the view's reliance on any one model platform. There are three components to the Angular MVVM architecture:

- Model: It represents the business logic and data of a particular application. It consists of an entity structure. The model has the business logic, including model classes, remote and local data sources, and the repository.
- View: the view embodies the visual layer of the application. Its primary role involves presenting the data sourced from the component and managing user interactions. Constructed through HTML templates, the view dynamically renders and adjusts its content according to the component’s data and the application’s logic.
- ViewModel: It is an abstract layer of the application. A viewmodel handles the logic of the application. It manages the data of a model and displays it in the view. View and ViewModel are connected with two-way data binding. Hence, the ViewModel takes note of all the changes in the view and changes the appropriate data inside the model.
42. What is Change Detection, and how does the Change Detection Mechanism work?
Change Detection is the process of synchronizing a model with a view. It determines when and how to update the user interface based on changes in the application's data model.
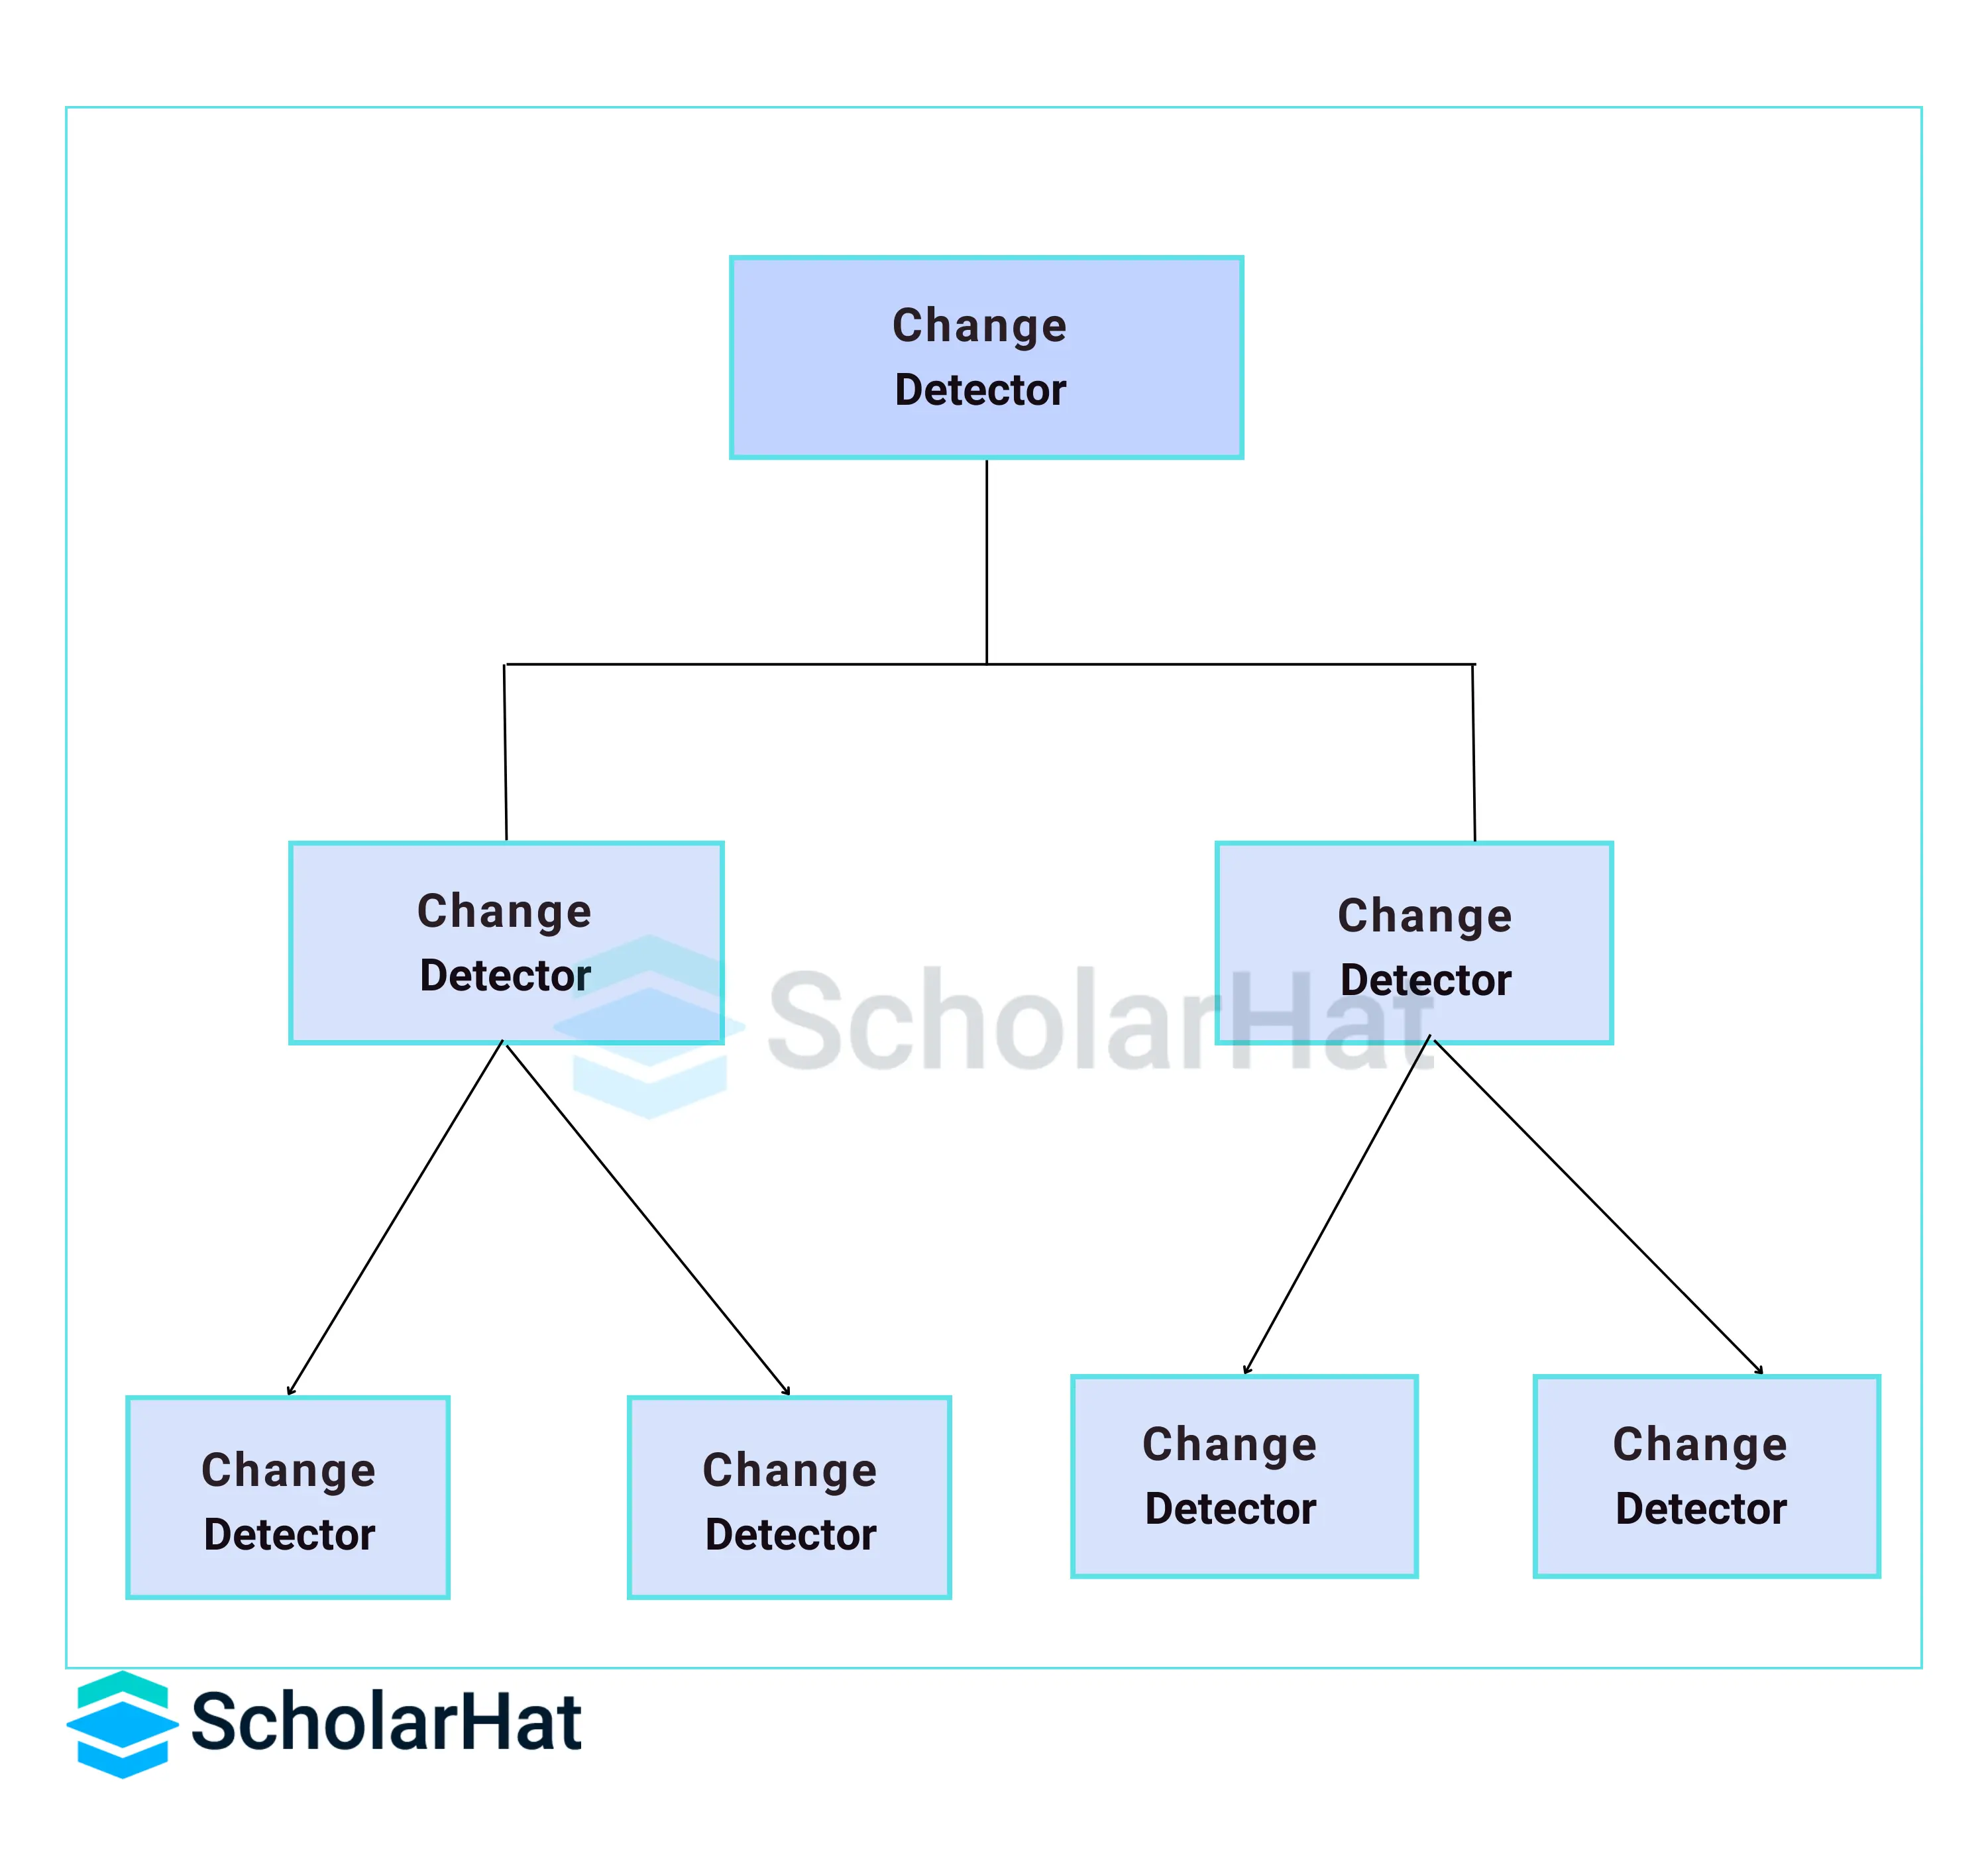
For this, Angular uses a tree of change detectors to track changes in component properties and update the DOM accordingly. When a change occurs, Angular performs change detection, which involves checking each component's properties for changes and updating the DOM if necessary. The change detection mechanism is responsible for keeping the UI in sync with the application's data.
The mechanism moves only ahead and never backward, beginning with the root component and ending with the last component. Each component is a child, but the child is not a parent.
43. What are observables in Angular?
An observable is a declarative way to perform asynchronous tasks. One can imagine it as streams of data flowing from a publisher to a subscriber. An observable is a unique object just like a promise that is used to manage async requests. However, observables are considered to be a better alternative to promises as the former comes with a lot of operators that allow developers to better deal with asynchronous requests, especially if there is more than one request at a time.
Observables are not part of the JavaScript language so the developers have to rely on a popular Observable library called RxJS. The observables are created using the new keyword. They are only executed when subscribed to them using the subscribe() method. They emit multiple values over a while. They help perform operations like forEach, filter, and retry, among others. They deliver errors to the subscribers. When the unsubscribe() method is called, the listener stops receiving further values.
Example
import { Observable } from 'rxjs';
const observable = new Observable(observer => {
  setTimeout(() => {
    observer.next('This is a message from Observable!');
  }, 1000);
});
44. What does Angular Material mean?
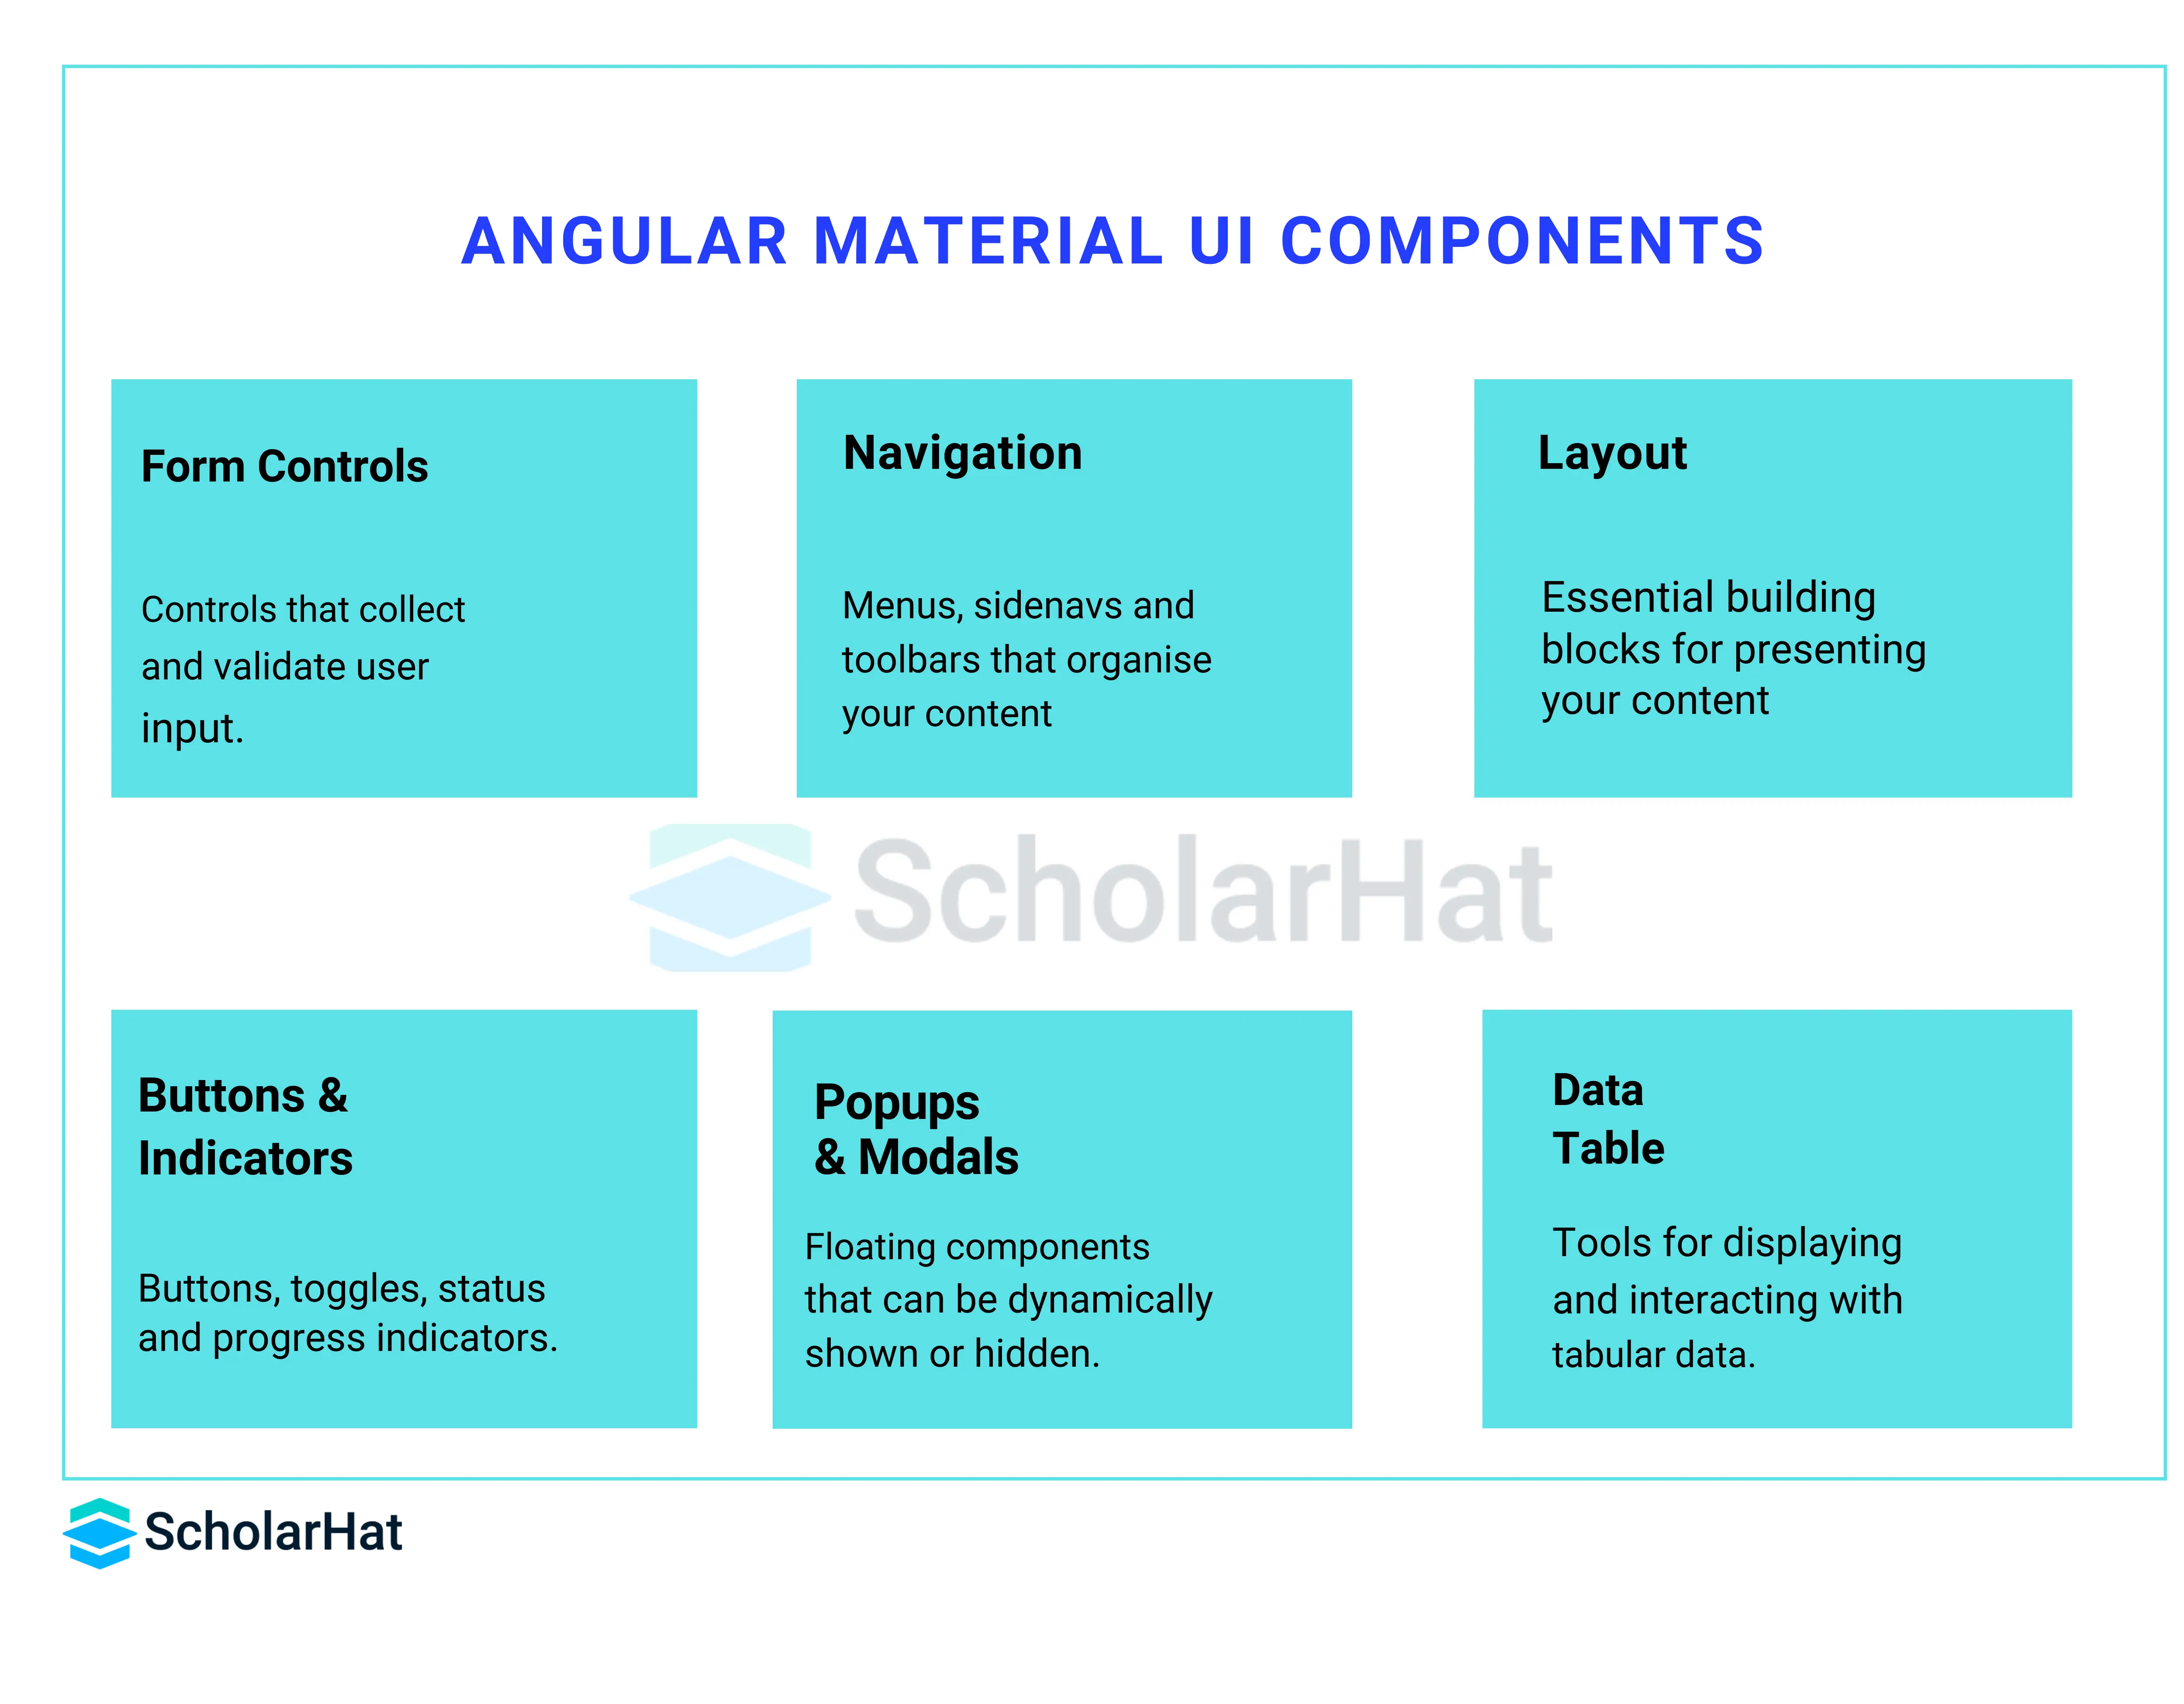
Angular Material is a UI component library for Angular applications. It provides a set of pre-built and customizable UI components in the form of buttons, forms, navigation menus, and dialog boxes, that follow the Material Design guidelines. Angular Material simplifies the process of building consistent and visually appealing user interfaces in Angular. It offers a range of features and styles that can be easily integrated into Angular projects.
45. How can one create a service in Angular?
To create a service in Angular, go through the below steps:
- Generate a Service
- Run the following command in your Angular CLI.
ng generate service my-serviceThis command will create a new service file (my-service.service.ts) and a corresponding test file (my-service.service.spec.ts) in your Angular project.
- Define Service Logic
- Open the newly created service file (my-service.service.ts) in your code editor.
- Define the logic and functionality of your service within the TypeScript class.
Example
import { Injectable } from '@angular/core'; @Injectable({ providedIn: 'root' }) export class MyService { constructor() { } // Define methods and properties for your service greet(): string { return 'Hello, Angular!'; } } - Inject the Service
- After the service definition, you can inject it into Angular components, directives, or other services.
- To inject the service, add it as a constructor parameter in the component where you want to use it.
Example
import { Injectable } from '@angular/core'; @Injectable({ providedIn: 'root' }) export class MyService { constructor() { } // Define methods and properties for your service greet(): string { return 'Hello, Angular!'; } } - Provide the Service
- You can provide the service at a specific module level or component level instead of its default availability throughout the application by specifying the module or component name in the providedIn property of the @Injectable decorator.
Example
@Injectable({
  providedIn: 'root' // or 'any specific module or component'
})
Advanced Angular Interview Questions for Senior Developers (6 to 10 Years)
46. Discuss your experience with continuous integration and continuous delivery (CI/CD) pipelines for Angular projects and best practices.
I'll share my experiences in the form of step by step process you need to follow for continuous integration and continuous delivery (CI/CD) pipelines for Angular projects.
- Setup Automation: Automate the build, test, and deployment processes for Angular projects using CI/CD tools like GitHub Actions.
- Version Control Integration: Integrate CI/CD pipelines with version control systems like Git to trigger builds automatically whenever changes are pushed to the repository.
- Build Process: Configure the CI pipeline to build the Angular application from the source code. Use tools like Angular CLI for building and packaging the application artifacts.
- Testing: Incorporate unit tests, integration tests, and end-to-end tests into the CI pipeline to ensure code quality and reliability.
- Static Code Analysis: Include static code analysis tools like ESLint, TSLint, or SonarQube in the CI pipeline to identify code quality issues, coding standards violations, and potential bugs.
- Artifact Management: Publish build artifacts and dependencies to artifact repositories like Nexus or Artifactory for versioning and dependency management.
- Deployment Strategies: Implement different deployment strategies such as blue-green deployments, canary releases, or rolling deployments to minimize downtime and mitigate risks during deployment.
- Environment Configuration: Manage environment-specific configurations using environment variables or configuration files.
- Monitoring and Logging: Integrate monitoring and logging solutions into CI/CD pipelines to track build and deployment status, monitor application health, and troubleshoot issues.
- Security Scans: Include security scanning tools like OWASP Dependency-Check or Snyk in the CI pipeline to identify and remediate security vulnerabilities in third-party dependencies.
Best Practices
- Pipeline as Code: Define CI/CD pipelines using infrastructure as code (IaC) principles to version control pipeline configurations and ensure reproducibility.
- Incremental Builds: Optimize build times by implementing incremental builds and caching dependencies to avoid rebuilding unchanged code.
- Feedback Loop: Establish a feedback loop by integrating automated notifications and alerts to notify developers of build failures, test errors, or deployment issues.
- Immutable Infrastructure: Treat infrastructure components and deployment artifacts as immutable to ensure consistency and repeatability across environments.
- Continuous Improvement: Continuously monitor and optimize CI/CD pipelines by analyzing build metrics, identifying bottlenecks, and implementing performance improvements.
- Documentation: Document CI/CD pipeline configurations, deployment processes, and best practices.
47. What are Angular router links?
Router links in Angular are used for navigation within an application. They are defined using the routerLink directive and allow us to navigate to different routes or components. Router links can be used in HTML templates and are generally placed on anchor <a> tags or other clickable elements. By specifying the destination route or component, router links allow users to navigate between different parts of an Angular application.
Example
<nav>
  <a routerLink="/home" >Home Page of our website</a>
  <a routerLink="/about-us" >About us</a>
</nav>
<router-outlet></router-outlet>
48. How do you create directives using CLI?
For creating directives in Angular using CLI, follow the below step-by-step procedure:
- Open Terminal or Command Prompt
- Navigate to your Angular project directory: Use the cd command to navigate to your Angular project directory where you want to create the directive.
- Run the Angular CLI command: Use the ng generate directive command followed by the name of your directive to generate the directive files.
ng generate directive directive-nameor
ng g d directive-name - Verify the directive creation: After running the command, the Angular CLI will generate the necessary files for your directive, including the directive class file, and the directive test file, and it will update the appropriate module file to import the directive.
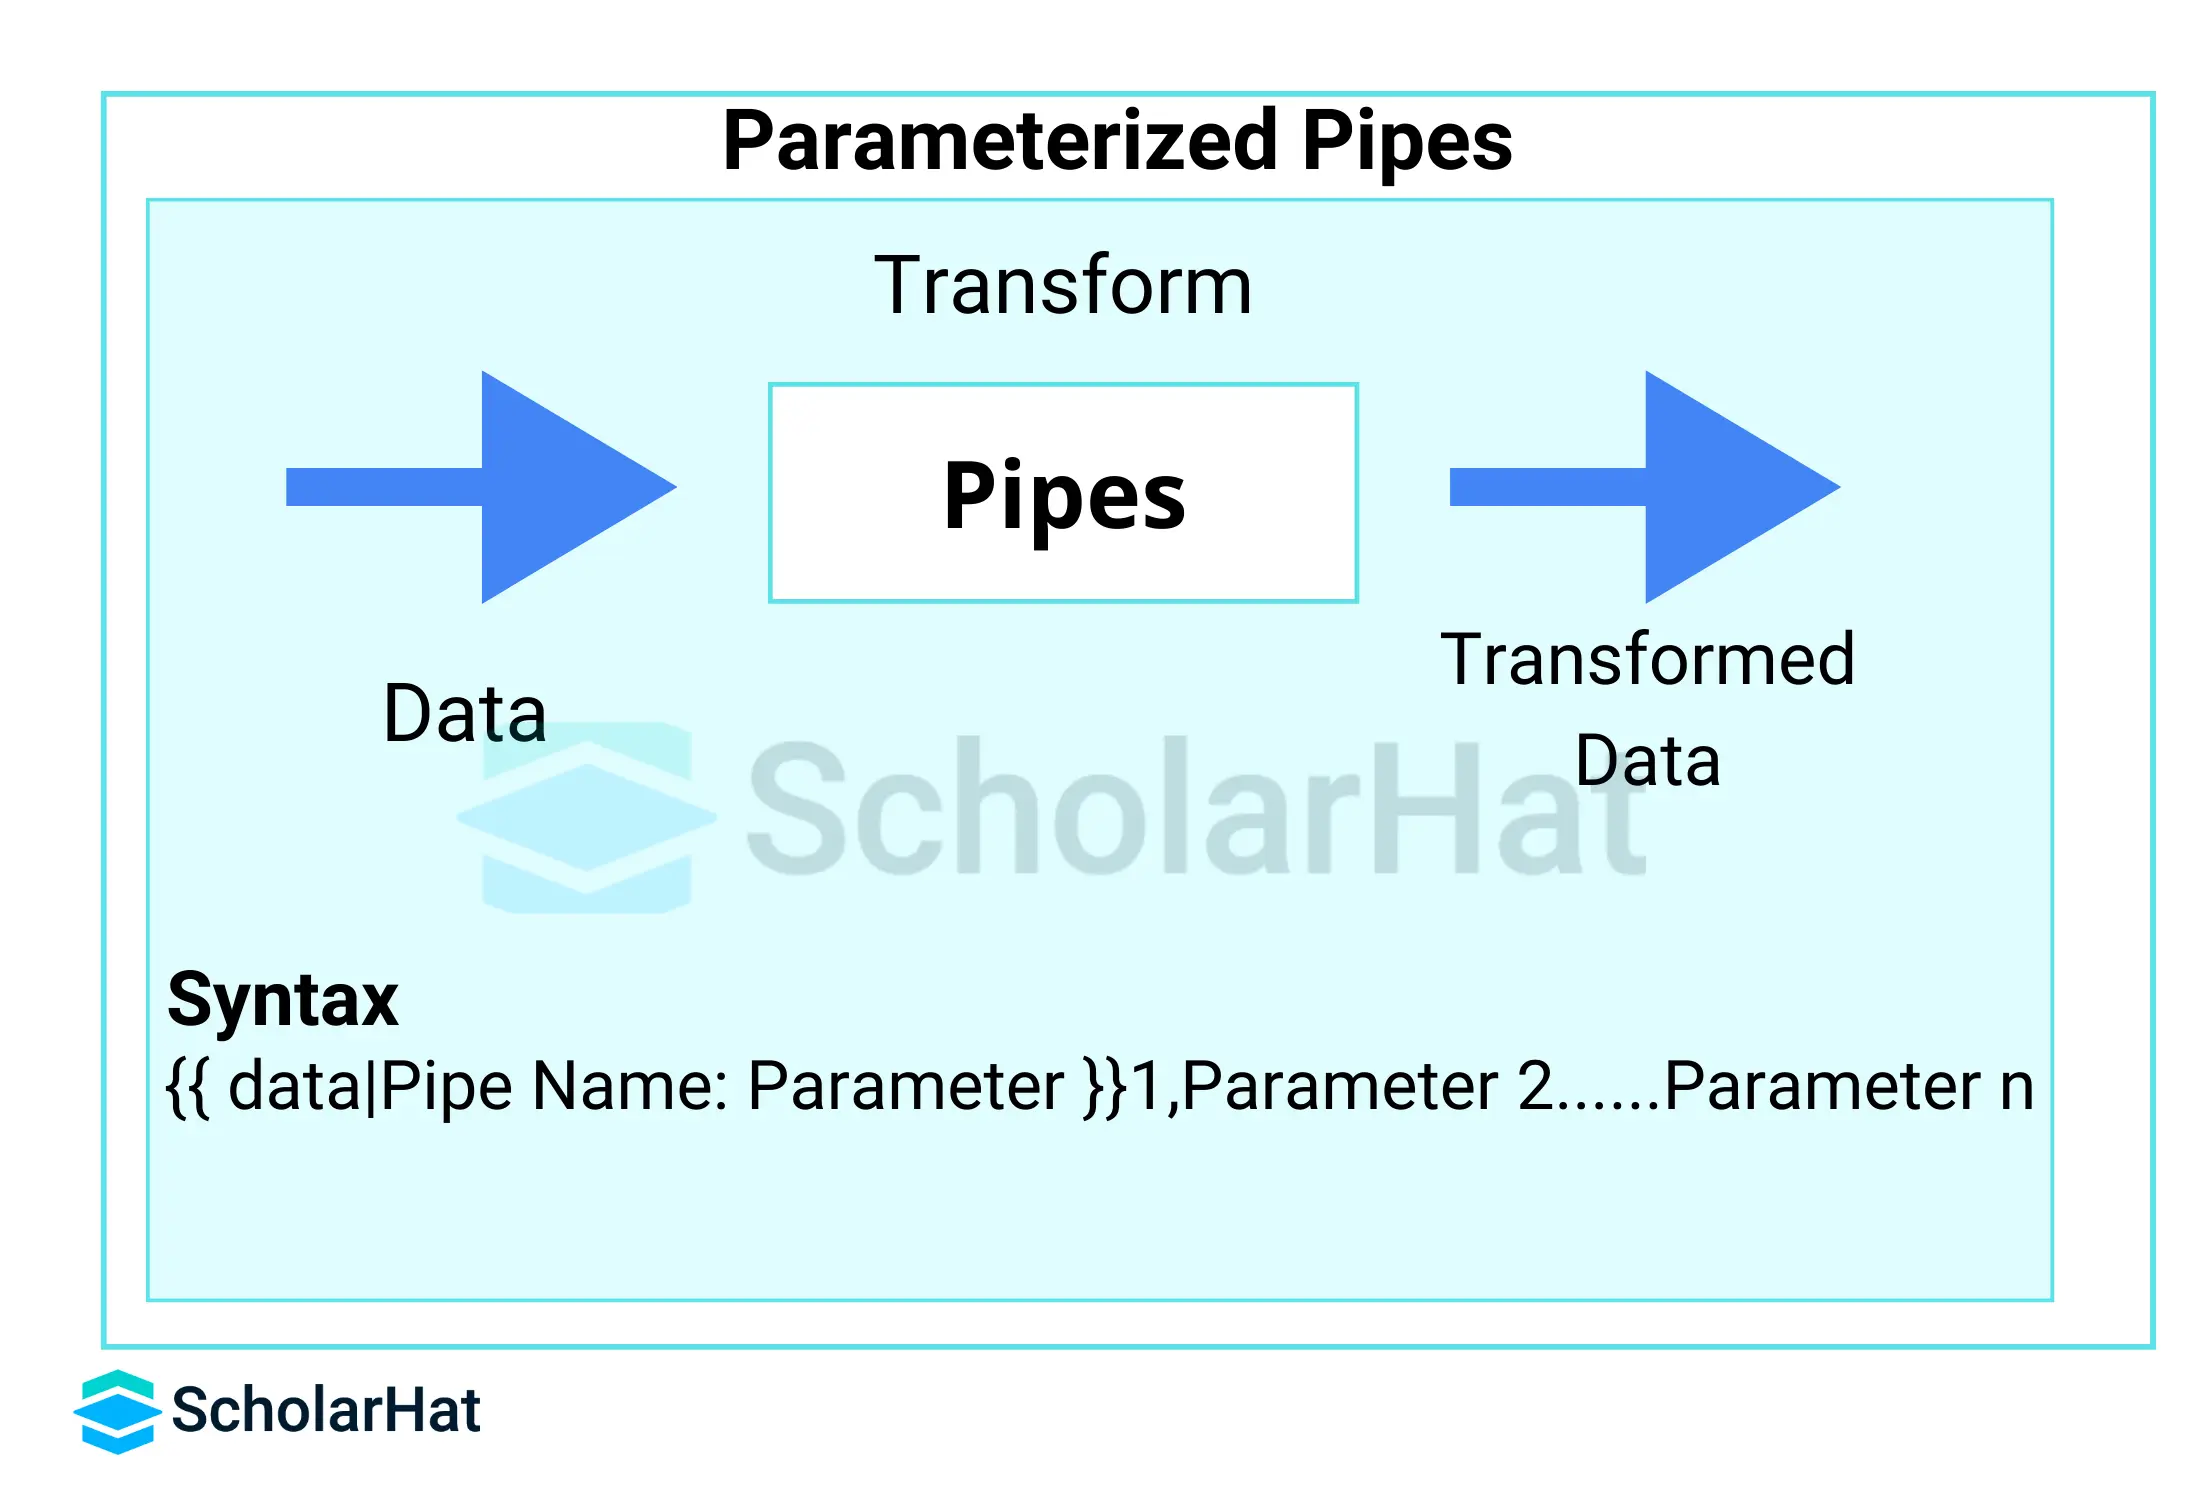
49. What exactly is a parameterized pipe?
In Angular, a parameterized pipe is a pipe that takes one or more parameters, which are also referred to as arguments. Pipes are used in Angular templates to change data; parameterized pipes let you adjust the transformation according to certain needs. A pipe's behavior can be changed and various data transformations can be applied by handling its parameters.
50. What is multicasting in Angular?
Multicasting or Multi-casting is the practice of broadcasting to a list of multiple subscribers in a single execution. It is specifically useful when we have multiple parts of our applications waiting for some data. To use multicasting, we need to use an RxJS subject.
Example
var source = Rx.Observable.from([7, 8, 9]);
var subject = new Rx.Subject();
var multicasted = source.multicast(subject);
// These are, under the hood, `subject.subscribe({...})`:
multicasted.subscribe({
  next: (v) => console.log('observerA: ' + v)
});
multicasted.subscribe({
  next: (v) => console.log('observerB: ' + v)
});
51. What will happen if you do not supply a handler for an observer?
If you don't supply a handler for a notification type, the observer just ignores notifications of that type. Angular components or services subscribing to the observable without a handler won't be affected by the lack of handling logic. The subscription will still be established, but no action will be taken when the observable emits values or completes.
If you subscribe to an observable in Angular without providing a handler for the observer and you don't unsubscribe from the observable, it can potentially lead to memory leaks. This is because the subscription will keep a reference to the observable, preventing it from being garbage-collected.
52. Share your knowledge of upcoming Angular features and how you would utilize them in your projects.
- Ivy Renderer Improvements: Ivy is Angular's next-generation renderer, which brings significant performance improvements, smaller bundle sizes, and better debugging capabilities. As Ivy continues to evolve, leveraging its features can lead to faster rendering times, improved application performance, and easier debugging in Angular projects.
- Strict Mode: Angular's strict mode aims to provide stricter type checking and improved developer experience. It enforces more rigorous typing rules, eliminates certain runtime errors, and encourages better coding practices. Adopting a strict mode can enhance code quality, reduce bugs, and make Angular applications more maintainable and scalable.
- Component Test Harnesses: Angular Component Test Harnesses provide a set of utilities for testing Angular components in isolation. These harnesses offer standardized APIs for interacting with Angular components in unit tests, simplifying the testing process and improving test reliability. Utilizing component test harnesses can streamline the testing workflow and enhance the overall test coverage of Angular applications.
- Improved CLI Features: The Angular CLI (Command Line Interface) continues to receive updates and new features aimed at improving developer productivity and project maintainability. Features such as enhanced code generation, better build optimizations, and improved project scaffolding can help developers streamline their workflow and build more robust Angular applications.
- Official State Management Solutions: These solutions could provide standardized patterns and best practices for managing complex application states in Angular projects.
- Integration with Web Components: As the adoption of Web Components grows, Angular is likely to continue improving its support for integrating with Web Components. This includes features such as seamless interoperability between Angular components and Web Components, improved encapsulation, and better performance optimizations.
53. Explain your approach to implementing and managing state in large Angular applications. Discuss the advantages and disadvantages of different state management libraries.
Approaches to implement and manage state in large Angular applications:
- Component State Management: Here, each Angular component manages its state using component properties and two-way data binding.
- Service-Based State Management: Angular services can be used to manage application-wide state by storing and providing access to shared data and stateful logic.
- RxJS Observables and Subjects: Observables and subjects can be used to create streams of data that represent the application state and propagate changes throughout the application. Reactive programming enables declarative and composable state management.
- State Management Libraries: They offer centralized and predictable state management solutions based on well-established patterns like Redux. These libraries provide patterns and utilities for managing complex application states, including features like actions, reducers, selectors, and effects.
Advantages and Disadvantages of State Management Libraries
| State Management Libraries | Advantages | Disadvantages |
| NgRx | Robust architecture, extensive tooling, scalability, support for complex scenarios, and a large community | Steeper learning curve, higher boilerplate code, and potentially increased complexity for smaller projects. |
| NgXs | Lightweight, developer-friendly, shallow learning curve, seamless integration with Angular, and suitability for smaller to medium-sized projects. | Fewer advanced features compared to NgRx and a smaller community compared to NgRx |
| Akita | Simplicity, flexibility, built-in entity management, ease of use, and suitability for small to medium-sized projects. | Relatively smaller community compared to NgRx, and fewer advanced features compared to NgRx |
54. What is the state() function in Angular?
Angular's state() function is used to define different states to call at the end of each transition. The state() function takes two arguments:
- a unique name like open or closed
- style() function
Example
state('open', style({
  height: '100px',
  opacity: 0.8,
  backgroundColor: 'yellow'
})),
55. What are macros in Angular?
In Angular, the AOT compiler supports macros in the form of functions or static methods that return an expression in a single return expression.
Example
export function wrapInArray(value: T): T[] {
  return [value];
}
- You can use it inside metadata as an expression
@NgModule({ declarations: wrapInArray(TypicalComponent), }) export class TypicalModule {} - The compiler treats the macro expression as it is written directly
@NgModule({
  declarations: [TypicalComponent],
})
export class TypicalModule {}
Scenario Based Angular Interview Questions
56. How do you deal with errors in observables?
Below are some of the best practices to deal with errors in observables:
- Use the catchError Operator: An Observable stream’s failures may be detected and handled with the catchError operator.
Example
import { catchError } from 'rxjs/operators'; this.httpClient.get('/api/data') .pipe( catchError((error: any) => { // Handle the error here console.error('An error occurred:', error); // Optionally, re-throw the error or return a default value return throwError('Something went wrong'); }) ) .subscribe( (response) => { // Handle the successful response }, (error) => { // This block will only execute if catchError is used console.error('Error handler:', error); } ); - Centralize Error Handling: Make a universal error-handling service that can be injected into other services and components.
Example
import { Injectable } from '@angular/core'; import { throwError } from 'rxjs'; @Injectable({ providedIn: 'root' }) export class ErrorHandlerService { handle(error: any): void { // Log the error, send it to a remote service, or perform other actions console.error('An error occurred:', error); // Optionally, re-throw the error or return a default value throwError('Something went wrong'); } } - Provide Meaningful Error Messages: Avoid exposing sensitive information and use descriptive error messages that guide developers and users in understanding the issue.
- Logging Errors: Angular provides a logging mechanism, and you can use libraries like ngx-logger for more advanced logging features.
Example
import { Injectable } from '@angular/core';

@Injectable({
  providedIn: 'root'
})
export class LoggerService {
  logError(message: string, error: any) {
    console.error(message, error);
  }
}
57. Your Angular application is experiencing slow loading times. You need to identify the bottleneck and optimize performance. How would you approach this?
The following is a systematic approach for addressing slow loading times and optimizing the performance of the Angular application:
- Performance Profiling:
- Use browser developer tools (e.g., Chrome DevTools) to profile the application's loading time, network requests, rendering performance, and memory usage.
- Look for long-running tasks, excessive network requests, large asset sizes, and inefficient JavaScript execution.
- Network Optimization:
- Minimize the number of HTTP requests by combining and compressing CSS and JavaScript files.
- Enable server-side compression (e.g., gzip) to reduce the size of transferred data.
- Leverage HTTP/2 for multiplexing and parallelism of requests to improve loading times.
- Bundle Optimization:
- Use Angular CLI's production build mode (ng build --prod) to enable optimizations like code minification, tree-shaking, and dead code elimination.
- Analyze bundle sizes using tools like Webpack Bundle Analyzer to identify large dependencies and optimize imports.
- Consider code splitting to create smaller bundles and load only necessary code chunks on demand.
- Rendering Performance:
- Optimize Angular templates by minimizing DOM manipulations, avoiding excessive ngFor loops, and reducing the number of bindings.
- Use trackBy function with ngFor to improve rendering performance by providing a unique identifier for each item in the iterable.
- Implement OnPush change detection strategy for components to reduce change detection cycles and improve rendering performance.
- Caching and Prefetching:
- Implement caching strategies using HTTP caching headers (e.g., Cache-Control) to cache static assets and API responses.
- Use service workers to enable client-side caching and offline capabilities for static assets and API requests.
- Prefetch critical resources using the tag to reduce perceived loading times for subsequent navigations.
- Third-Party Libraries and Plugins:
- Evaluate the performance impact of third-party libraries and plugins used in the application.
- Consider replacing or optimizing heavy dependencies with lighter alternatives or custom solutions where applicable.
- Monitoring and Continuous Improvement:
- Implement performance monitoring and analytics tools (e.g., Google Analytics, New Relic) to track key performance metrics and identify performance regressions over time.
- Set up automated performance tests and benchmarks to detect performance regressions during development and deployment.
58. You're building a complex data-driven application with multiple components needing access to a shared state. How would you choose and implement an effective state management strategy?
My approach to implementing a solid state management strategy for an application with multiple components needing access to a shared state will be:
- Analyze Requirements:
- Understand the complexity and scale of the application.
- Identify the types of data and states that need to be managed.
- Determine how state changes propagate across components and modules.
- Evaluate State Management Options and Choose a Suitable One:
- Service-based State: Angular services can be used to manage shared state across components by storing data and providing methods to access and update state.
- RxJS Observables and Subjects: Leverage RxJS for reactive programming and use observables and subjects to create streams of data representing the application state.
- State Management Libraries: Consider third-party state management libraries like NgRx, Akita, or Ngxs for managing complex application state using patterns like Redux.
- Implement the Chosen Approach:
- Design stateful services to encapsulate shared state and provide methods for reading and updating state.
- Use observables and subjects to propagate state changes and trigger updates across components.
- Leverage Angular's dependency injection mechanism to inject stateful services into components and modules.
- Implement patterns like actions, reducers, selectors, and effects if using a state management library like NgRx.
- Follow best practices for organizing state logic, separating concerns, and optimizing performance.
- Test and Iterate:
- Write comprehensive unit and integration tests to validate the correctness and reliability of state management implementations.
- Monitor application performance and behavior using browser developer tools and performance profiling tools.
- Gather feedback from users and stakeholders to identify pain points and areas for improvement.
- Continuously iterate and refactor state management logic based on evolving requirements and performance metrics.
59. You need to integrate a complex third-party library with your Angular application. How would you ensure seamless integration and maintainability?
- Research and Evaluation:
- Thoroughly research the third-party library's documentation, features, compatibility with Angular, and community support.
- Evaluate the library's suitability for your project based on its capabilities, performance, licensing, and support.
- Dependency Management:
- Use a package manager like npm or yarn to install the third-party library and manage its dependencies.
- Ensure that the library's version is compatible with your Angular project's version and other dependencies.
- Angular Component Wrapper:
- Whenever possible, create Angular component wrappers around the third-party library's components to encapsulate functionality and ensure Angular compatibility.
- Implement Angular lifecycle hooks, input and output properties, and event handling to seamlessly integrate third-party components into your Angular application.
- Modularization and Lazy Loading:
- Consider modularizing the integration by creating feature modules dedicated to the third-party library's functionality.
- Implement lazy loading for modules containing the third-party library's components to improve initial loading times and reduce bundle sizes.
- Error Handling and Debugging:
- Implement robust error-handling mechanisms to gracefully handle errors and edge cases arising from the integration.
- Use browser developer tools and logging frameworks to debug integration issues and troubleshoot runtime errors effectively.
- Documentation:
- Document the integration process, including setup instructions, configuration options, usage examples, and troubleshooting tips.
- Version Control and Updates:
- Regularly update the third-party library to newer versions to leverage bug fixes, performance improvements, and new features.
- Use version control systems like Git to track changes and updates to the integration codebase and revert changes if necessary.
- Testing and Quality Assurance:
- Implement comprehensive unit tests, integration tests, and end-to-end tests to validate the functionality and behavior of the integrated components.
60. What happens when we use the script tag within a template?
Angular recognizes the value as unsafe and automatically sanitizes it, which removes the script tag but keeps safe content such as the text content of the script tag. This way it eliminates the risk of script injection attacks. If you still use it then it will be ignored and a warning appears in the browser console.
Summary
Angular interview questions and answers are covered in detail in this article, which is divided into three sections: beginner, intermediate, and expert. Numerous subjects are covered, such as the foundations of Angular, data binding, directives, components, pipelines, modules, services, routing, and more. Anyone getting ready for an Angular interview may find this article to be a useful resource.
Take our free angular skill challenge to evaluate your skill

In less than 5 minutes, with our skill challenge, you can identify your knowledge gaps and strengths in a given skill.