
MEAN Stack CRUD Operations Using Angular Material Datatable

Angular Course
In this tutorial, you will learn how to create a MEAN Stack CRUD application from absolute scratch and we will share how to create an Angular CRUD application. To build the Angular MEAN CRUD app, we will use Angular Material, Node.js, Express.js, MongoDB, and Angular web applications.
For the demo purpose, we will learn the CRUD operations by creating an employee management system using the Angular MEAN stack and I will try to cover the essential configuration and features used in CRUD web application development.
In this part of the article, we are going to learn the CRUD operations step-by-step process to build an Angular app using the MEAN stack with the Angular Material Data table component from the scratch. Let's understand the MEAN Stack.
MEAN Stands for:M - MongoDB
MongoDB is a NoSQL database, and it is an open-source database that is designed to provide faster performance than a relational database.
E - ExpressJs
express is a Web application framework that is built on top of the Nodejs, which provides many robust features for web and mobile applications.
A – Angular
Angular is an open-source front-end web application framework that is used to create single-page applications.
N – Nodejs
Nodejs is a JavaScript runtime that is built on Google’s V8 engine which is used to create a scalable network application.
MEAN Stack has many advantages because it has a collection of different JavaScript technologies to create robust, faster, and highly scalable web and mobile compatible applications very easily, In short, to develop MEAN Stack app we just need to understand only one language which is called JavaScript than we can build MEAN Stack app in an easy manner. So in this article, we are going to cover CRUD operation step by step with Angular Material Datatable with ease.
Project Structure
In our application, basically, we should have an angular project as front-end and for the backend, we need to implement some server-side code which is covered by nodejs and expressjs, below you can find the example of a mean stack app, but keep in mind that it can vary from person to person. Thus you can enhance the project structure as per your requirement to simplify such things.
There is no specific guideline regarding the project structure for the Angular application because the business need can be different for the different projects, hence choosing the best suitable project structure based on the weight of the requirement is more important.
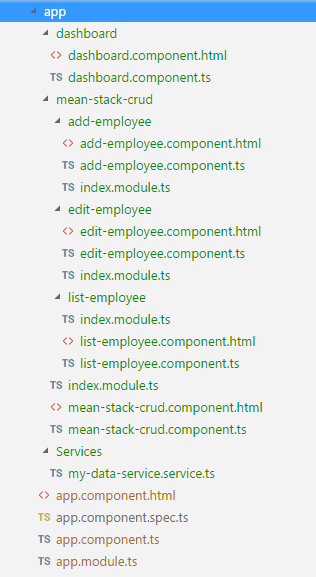
Front-end Project
For the front-end, we are using the Angular application which contains a structure as given in the below snapshot. Primarily we are going to use three primary components to work with CRUD operations, at the end main advantage is to achieve the re-usability of the component by creating an independent component as given below.
- add-employee: To add new employees by adding details into the form
- edit-employee: To edit an employee's details by clicking on the edit button from the list of the employee's table
- list-employee: To list out all the set of employees from the database
Server Side
And for the server-side application, we are going to use the server configuration, routes, models, etc. So for that, I have basically created the three different folders Model, Routes, and Server respectively inside the separate server application /server and not into the Agular application structure.
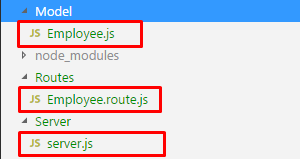
So this is how the structure looks like if you want to cover every server-side file then you can create a separate folder for the server and put those files inside as well.
Prerequisites
To work with MEAN Stack, we need to have a few tools and packages to be installed into our respective applications of front-end and back-end.
Install Nodejs
https://nodejs.org/en/download/
Install MongoDB
https://www.mongodb.com/download-center
Code Editor
In this article, Visual studio code is used as the primary editor but you can use any other editor like sublime, visual studio, etc.
In this article, I am using a Windows operating system, but if you are using any other o/s then download and configure the above tools according to the download guidelines for the specific O/S.
Setup and Installation
After installing the above-listed tools and packages, now it’s time to install a few dependencies which we are being used throughout this article for both the front-end and back-end. For that, we need to execute a series of npm commands as listed below.
For server-side
For Client-Side
Here in this article, we are using the Angular Material Datatable component to list the set of employees, so for that, we are using the Angular Material Component and need to install the following dependencies before using it.
So far we have set up our application and with other essential dependencies which we are using in this MEAN Stack app, after the completion, the next step is to implement the CRUD operation step by step where we will first configure the back-end app and then Angular app respectively.
Setup of Backend
To get the CRUD operation with real-time data, we need to configure our backend using nodejs, expressjs, and MongoDB.
Setting Up Server Environment
Our first step is to create a server and provide the necessary configuration to the application such as database connectivity, importing the third-party packages, parsing the API request, for that just create a new folder named \server and inside the folder create a new file called server.js and paste the following code snippets.
 // Imported required packages
const express = require('express'),
 path = require('path'),
 bodyParser = require('body-parser'),
 cors = require('cors'),
 mongoose = require('mongoose');

// MongoDB Databse url
var mongoDatabase = 'mongodb://localhost:27017/employeeDetails';

// Created express server
const app = express();
mongoose.Promise = global.Promise;

// Connect Mongodb Database
mongoose.connect(mongoDatabase, { useNewUrlParser: true }).then(
 () => { console.log('Database is connected') },
 err => { console.log('There is problem while connecting database ' + err) }
);

// All the express routes
const employeeRoutes = require('../Routes/Employee.route');

// Conver incoming data to JSON format
app.use(bodyParser.json());

// Enabled CORS
app.use(cors());

// Setup for the server port number
const port = process.env.PORT || 4000;

// Routes Configuration
app.use('/employees', employeeRoutes);

// Staring our express server
const server = app.listen(port, function () {
 console.log('Server Lisening On Port : ' + port);
});
As you can see in the above server file, we have included multiple npm packages, express server configuration, route configuration, data formatted, etc. In the above file, I have already included the MongoDB database configuration which looks like this.
// MongoDB Databse url
var mongoDatabase = 'mongodb://localhost:27017/employeeDetails';

// Connect Mongodb Database
mongoose.connect(mongoDatabase, { useNewUrlParser: true }).then(
 () => { console.log('Database is connected') },
 err => { console.log('There is problem while connecting database ' + err) }
);
Here in this code snippet, I have added the database URL and at the end, we are going to connect the MongoDB database by using connect() method to ensure that the database is connected with our express application.
MongoDB Model Schema
In this article, we are going to use the schema of Employee management, which will allow us to create a CRUD operation user document. For that, I would suggest you create a new folder named \Model and inside the folder create a new file named Employee.js and paste the following code snippets.
const mongoose = require('mongoose');
const Schema = mongoose.Schema;

// List of columns for Employee schema
let Employee = new Schema({
 firstName: {
 type: String
 },
 lastName: {
 type: String
 },
 email: {
 type: String
 },
 phone: {
 type: Number
 }
},{
 collection: 'employees'
});

module.exports = mongoose.model('Employee', Employee);
So we have created a MongoDB collection schema in which I have added four different columns with the appropriate data types with the collection employees.
Crete API Controller or Routes
As we know that we are working with nodejs and express that we need to have routes to perform CRUD operations. To work with MongoDB user documents, we need to have an API controller which allows us to implement and use different routes for CRUD operations.
Create a folder named \Routes and inside the folder create a new file named Employee.route.js and paste the following code snippets.
// Importing important packages
const express = require('express');

// Using express and routes
const app = express();
const employeeRoute = express.Router();

// Employee module which is required and imported
let employeeModel = require('../Model/Employee');

// To Get List Of Employees
employeeRoute.route('/').get(function (req, res) {
 employeeModel.find(function (err, employee) {
 if (err) {
 console.log(err);
 }
 else {
 res.json(employee);
 }
 });
});

// To Add New Employee
employeeRoute.route('/addEmployee').post(function (req, res) {
 let employee = new employeeModel(req.body);
 employee.save()
 .then(game => {
 res.status(200).json({ 'employee': 'Employee Added Successfully' });
 })
 .catch(err => {
 res.status(400).send("Something Went Wrong");
 });
});

// To Get Employee Details By Employee ID
employeeRoute.route('/editEmployee/:id').get(function (req, res) {
 let id = req.params.id;
 employeeModel.findById(id, function (err, employee) {
 res.json(employee);
 });
});

// To Update The Employee Details
employeeRoute.route('/updateEmployee/:id').post(function (req, res) {
 employeeModel.findById(req.params.id, function (err, employee) {
 if (!employee)
 return next(new Error('Unable To Find Employee With This Id'));
 else {
 employee.firstName = req.body.firstName;
 employee.lastName = req.body.lastName;
 employee.email = req.body.email;
 employee.phone = req.body.phone;

 employee.save().then(emp => {
 res.json('Employee Updated Successfully');
 })
 .catch(err => {
 res.status(400).send("Unable To Update Employee");
 });
 }
 });
});

// To Delete The Employee
employeeRoute.route('/deleteEmployee/:id').get(function (req, res) {
 employeeModel.findByIdAndRemove({ _id: req.params.id }, function (err, employee) {
 if (err) res.json(err);
 else res.json('Employee Deleted Successfully');
 });
});

module.exports = employeeRoute;
In this file, I have done several configurations which are described below.
Imported some of the important packages
Used express as a web framework and routes to work with four different APIs for CRUD operations
Imported the employee model
Four types of routes with API function to perform CRUD operations into a single file
Now our backend and the functionality for CRUD API are ready to use, and our next move is to test the implemented APIs.
Test REST Api’s
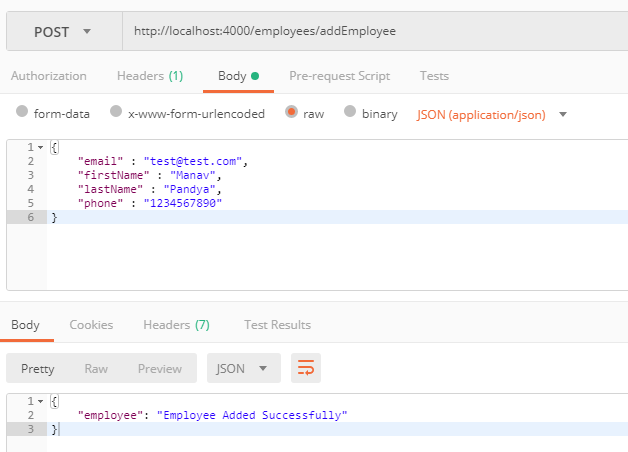
As far as our API will be implemented, it’s time to test or API's created for CRUD operation, for that open any API testing tool, here I am using Postman as an API testing tool to test the various HTTP based APIs.
Post Request
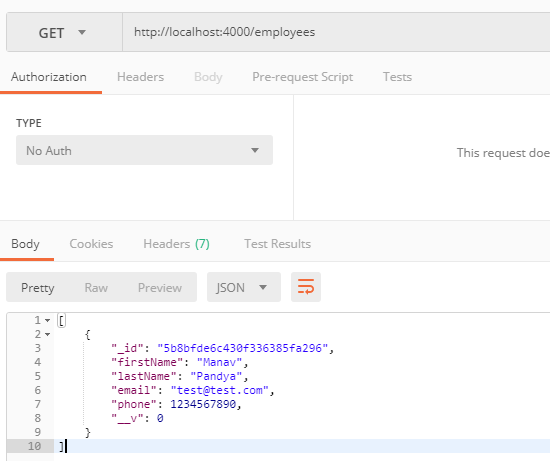
Get Request
Get by Id Request
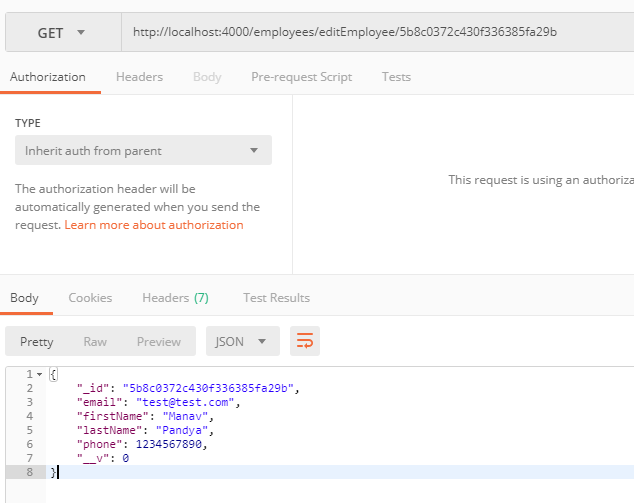
Put Request

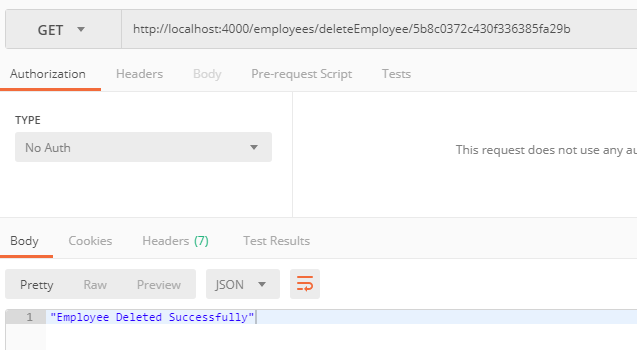
Delete Request
So this is how we have developed and tested our CRUD related APIs using the API testing tool Postman, now our backend is completely ready to use, it’s time to move into the Front-end part of our application where we will consume all the above APIs for the CRUD operations.
Front-end
In our front-end, we have used the Angular application, and for displaying employee records, we are using Angular material Datatable component. Few material components that we are going to use in the front-end application are given below.
Angular Material Datatable
Angular Material Card
Angular Material Paginator
Angular Material Sorting
Angular Material Form Fields (Input, Button, etc.) and many others as well
To create the components for CRUD operation, we need to create multiple components, for that, I would recommend creating a folder inside the app folder named /mean-stack-crud or any other suitable name of your choice then executing the series of commands to create the different components as given below.
ng generate component addEmployee
ng generate component editEmployee
ng generate component listEmployee
After executing the above npm commands, now we have our CRUD related components are created, but to call API from our back-end service, so for that create a new folder named \service and change your directory to a newly created folder and execute below npm command.
ng generate service myDataServiceSo far we have created all the important components and also the service files to call REST API from the back-end services, next step is to configure routes to route through the different pages of the Angular application.
Route Configuration
To configure routes, create a new file into the app directory called routes.ts and paste the following code snippet.
import { ModuleWithProviders } from '@angular/core';
import { Routes, RouterModule } from '@angular/router';
import { DashboardComponent } from './dashboard/dashboard.component';
import { MeanStackCrudComponent } from './mean-stack-crud/mean-stack-crud.component';

const appRoutes: Routes = [
 { path: '', redirectTo:'Crud',pathMatch:'full' },
 {
 path: 'Crud',
 loadChildren: './mean-stack-crud/index.module#MeanStackModule'
 },

];

export const routing: ModuleWithProviders = RouterModule.forRoot(appRoutes);
As you can see here I have used the loadChildren instead component because I have multiple components inside \mean-stack-crud components, so when the request goes to a mean-stack-crud component that it loads its own module runtime, it is called lazy loading. With the completion of the Routing configuration, a further step is to implement the services for our MEAN stack app.
Angular Service
We have already created a service file named my-data-service.service.ts, services are used to call the API from front-end to back-end server. And to implement services for CRUD operation just opens the file and paste the following code snippet.
import { Injectable } from '@angular/core';
import { HttpClient } from '@angular/common/http';
import { map } from 'rxjs/operators';

@Injectable({
 providedIn: 'root'
})
export class MyDataServiceService {

 // Main api url to call api
 uri = 'http://localhost:4000/employees';

 constructor(private http: HttpClient) { }

 // To Get The List Of Employee
 getEmployees() {
 return this
 .http
 .get(`${this.uri}`);
 }

 // To Get Employee Details For Single Record Using Id
 getEmployeeById(empid) {
 return this.http.get(`${this.uri}/editEmployee/${empid}`);
 }

 // To Updated Specific Employee
 updateEmployee(id, body) {
 return this.http.post(`${this.uri}/updateEmployee/${id}`, body);
 }

 // To Create/Add New Employee
 addEmployee(body) {
 return this.http.post(`${this.uri}/addEmployee`, body);
 }

 // To Delete Any Employee
 deleteEmployee(empid) {
 return this.http.get(`${this.uri}/deleteEmployee/${empid}`);
 }

}
For the complete CRUD operation, in service, I have created a total five number of different service methods to call Nodejs REST API. That’s it for now, let’s summarized the things we have covered
We have created three different components to create, edit, and show the list of employees.
Created service to call REST APIs.
Router Configuration for routing through the different pages
Services File Implementation
Configure Home Page
Our entry point of application is the App component where we need to load the listing page for employees. So just open app.component.html and paste the following HTML code.
<div>
<router-outlet></router-outlet>
</div>
Here I have used a router-outlet that loads the view as per the routing configuration which loads the component based on the routes configured, and we have imported a few material components into root module files.
App.module.ts
import { BrowserModule } from '@angular/platform-browser';
import { NgModule } from '@angular/core';
import { routing } from './routes';
import { AppComponent } from './app.component';
import { HttpClientModule } from '@angular/common/http';
import { MeanStackCrudComponent } from './mean-stack-crud/mean-stack-crud.component';
import { BrowserAnimationsModule } from '@angular/platform-browser/animations';
import { Routes } from '@angular/router';
import { MatCardModule, MatToolbarModule, MatToolbar, MatButtonModule, MatButton, MatMenuModule, MatFormFieldModule, MatInputModule } from '@angular/material';
import { MatTableModule } from '@angular/material/table';
import { MatPaginatorModule } from '@angular/material/paginator';

@NgModule({
 declarations: [
 AppComponent,
 ],
 imports: [
 routing,
 BrowserModule,
 HttpClientModule,
 BrowserAnimationsModule,
 MatCardModule,
 MatToolbarModule,
 MatButtonModule,
 MatMenuModule,
 MatFormFieldModule,
 MatTableModule,
 MatPaginatorModule,
 MatInputModule
 ],
 exports: [
 BrowserModule,
 MatCardModule,
 MatToolbarModule,
 MatButtonModule,
 MatMenuModule,
 MatFormFieldModule,
 MatTableModule,
 MatPaginatorModule,
 MatInputModule
],
 providers: [],
 bootstrap: [AppComponent]
})
export class AppModule { }
So far, we have configured routes and the configuration for the home page, and also the root module file, now when we run our example it will look for the mean-stack-crud component always so for that open mean-stack-crud folder and create a new file named index.module.ts and paste following code.
import { NgModule } from '@angular/core';
import { CommonModule } from '@angular/common';
import { RouterModule, Routes } from '@angular/router';
import { FormsModule, ReactiveFormsModule } from '@angular/forms';
import { MeanStackCrudComponent } from './mean-stack-crud.component';
import { MatCardModule, MatToolbarModule, MatToolbar, MatButtonModule, MatButton, MatMenuModule, MatFormFieldModule, MatInputModule } from '@angular/material';
import { MatTableModule } from '@angular/material/table';
import { MatPaginatorModule } from '@angular/material/paginator';

const routes: Routes = [{
 path: "",
 component: MeanStackCrudComponent,
 children: [
 {
 path: "",
 loadChildren: './list-employee/index.module#ListEmployeeModule'
 },
 {
 path: "create",
 loadChildren: './add-employee/index.module#AddEmployeeModule'
 },
 {
 path: "edit/:id",
 loadChildren: './edit-employee/index.module#EditEmployeeModule'
 }
 ]
}];

@NgModule({
 imports: [
 CommonModule,
 FormsModule,
 ReactiveFormsModule,
 RouterModule.forChild(routes),
 MatCardModule,
 MatToolbarModule,
 MatButtonModule,
 MatMenuModule,
 MatFormFieldModule,
 MatTableModule,
 MatPaginatorModule,
 MatInputModule
 ],
 exports: [
 MatCardModule,
 MatToolbarModule,
 MatButtonModule,
 MatMenuModule,
 MatFormFieldModule,
 MatTableModule,
 MatPaginatorModule,
 MatInputModule
 ],
 declarations: [
 MeanStackCrudComponent
 ]
})
export class MeanStackModule { }
mean-stack-crud.component.html
<mat-card>
<div class="alert alert-info">
<strong>MEAN Stack - CRUD Operation</strong>
</div>
</mat-card>
<br/>
<mat-card>
<router-outlet></router-outlet>
</mat-card>
Let me explain that here mean-stack-crud is the main entry point of our CRUD operation where we have three different components, so when you see the routes in which I have specified the default route of list employee so once the application gets loaded, the first page will show the list of employees in the table.
Stylesheet For Whole Application
As we have discussed that we are using many angular material components, for that we are going to use some themes and custom CSS classes to beautify the material components. Specifically for this article, we are going to use the deeppurple-amber theme but you can use other themes as well which are given below.
Other themes
indigo-pink@import '~@angular/material/prebuilt-themes/indigo-pink.css';pink-bluegrey
@import '~@angular/material/prebuilt-themes/pink-bluegrey.css';purple-green
import '~@angular/material/prebuilt-themes/purple-green.css';
Open styles.css in \app directory and paste the following lines of code.
@import '~@angular/material/prebuilt-themes/deeppurple-amber.css';

/* Custom CSS Classes */

.mat-card {
 text-align: -webkit-center;
}

.demo-toolbar {
 display: flex;
 align-items: center;
 width: 60%;
}

.demo-form {
 min-width: 150px;
 max-width: 500px;
 width: 100%;
}

.demo-full-width {
 width: 100%;
}

body {
 margin: 0;
 font-family: Roboto, sans-serif;
}

mat-card {
 max-width: 80%;
 margin: 2em auto;
 text-align: center;
}

mat-toolbar-row {
 justify-content: space-between;
}

.done {
 position: fixed;
 bottom: 20px;
 right: 20px;
 color: white;
}

.content-center {
 text-align: -webkit-center;
}

.alert {
 padding: 15px;
 margin-bottom: 20px;
 border: 1px solid transparent;
 border-radius: 4px;
}

.alert-info {
 color: #31708f;
 background-color: #d9edf7;
 border-color: #bce8f1;
}

strong {
 font-size: 30px;
}

/* Specific class for table */

.example-container[_ngcontent-c21] {
 display: flex;
 flex-direction: column;
 min-width: 300px;
}

.mat-elevation-z8 {
 box-shadow: 0 5px 5px -3px rgba(0, 0, 0, .2), 0 8px 10px 1px rgba(0, 0, 0, .14), 0 3px 14px 2px rgba(0, 0, 0, .12);
}

.mat-cell {
 text-align: -webkit-left;
}

.mat-header-cell {
 text-align: left;
}

img {
 border-radius: 20px;
 height: 70px;
}

/* End Table Class */
List Employee
Now we are going to show the list of all employees in the material data table. Create a new file called index.module.ts into a list-employee folder and paste the following code.
import { NgModule } from '@angular/core';
import { CommonModule } from '@angular/common';
import { RouterModule, Routes } from '@angular/router';
import { FormsModule, ReactiveFormsModule } from '@angular/forms';
import { ListEmployeeComponent } from './list-employee.component';
import { MatCardModule, MatToolbarModule, MatToolbar, MatButtonModule, MatButton, MatMenuModule, MatFormFieldModule, MatInputModule , MatSortModule } from '@angular/material';
import { MatTableModule } from '@angular/material/table';
import { MatPaginatorModule } from '@angular/material/paginator';

const routes: Routes = [{
 path: "",
 component: ListEmployeeComponent,
}];

@NgModule({
 imports: [
 CommonModule,
 FormsModule,
 ReactiveFormsModule,
 RouterModule.forChild(routes),
 MatButtonModule,
 MatFormFieldModule,
 MatTableModule,
 MatPaginatorModule,
 MatInputModule,
 MatSortModule
 ],
 exports: [
 MatButtonModule,
 MatFormFieldModule,
 MatTableModule,
 MatPaginatorModule,
 MatInputModule,
 MatSortModule
 ],
 declarations: [
 ListEmployeeComponent
 ]
})
export class ListEmployeeModule {}
list-employee.component.html
<!-- For User ID -->
 <ng-container matColumnDef="lastName">
 <mat-header-cell *matHeaderCellDef mat-sort-header> Last Name </mat-header-cell>
 <mat-cell *matCellDef="let data"> {{data.lastName}} </mat-cell>
 </ng-container>

 <!-- For Title -->
 <ng-container matColumnDef="email">
 <mat-header-cell *matHeaderCellDef mat-sort-header> Email </mat-header-cell>
 <mat-cell *matCellDef="let data"> {{data.email}} </mat-cell>
 </ng-container>

 <!-- For Completion Status -->
 <ng-container matColumnDef="phone">
 <mat-header-cell *matHeaderCellDef mat-sort-header> Contact No </mat-header-cell>
 <mat-cell *matCellDef="let data"> {{data.phone}} </mat-cell>
 </ng-container>

 <!-- For Completion Status -->
 <ng-container matColumnDef="action">
 <mat-header-cell *matHeaderCellDef> Actions </mat-header-cell>
 <mat-cell *matCellDef="let data">
 <button mat-button color="primary" (click)="editEmployee(data._id)">Edit</button>
 <button mat-button color="warn" (click)="deleteEmployee(data._id)">Delete</button>
 </mat-cell>
 </ng-container>

 <mat-header-row *matHeaderRowDef="displayedColumns"></mat-header-row>
 <mat-row *matRowDef="let row; columns: displayedColumns;"></mat-row>
</mat-table>

<!-- To paginate between pages with search -->
<mat-paginator #paginator [length]="employeeList && employeeList.length" [pageSize]="5" [pageSizeOptions]="[5, 10, 20]">
</mat-paginator>
</div>
<!-- </mat-card> -->
list-employee.component.ts
import { Component, OnInit, AfterViewInit, ViewChild } from '@angular/core';
import { Router } from '@angular/router';
import { MatPaginator, MatSort, MatTableDataSource } from '@angular/material';
import { MyDataServiceService } from '../../Services/my-data-service.service';

export interface Employee {
 firstName: string;
 lastName: string;
 email: string;
 phone: string;
}

@Component({
 selector: 'app-list-employee',
 templateUrl: './list-employee.component.html',
})
export class ListEmployeeComponent implements OnInit {

 @ViewChild(MatPaginator) paginator: MatPaginator;
 @ViewChild(MatSort) sort: MatSort;

 // Important objects
 MyDataSource: any;
 employeeList: Employee[];
 displayedColumns: string[] = ['firstName', 'lastName', 'email', 'phone', 'action'];

 constructor(private service: MyDataServiceService, private router: Router) {
 }

 ngOnInit() {
 this.getEmployees();
 }

 // To Get List Of Employee
 getEmployees() {
 this.service
 .getEmployees()
 .subscribe((data: Employee[]) => {
 this.MyDataSource = new MatTableDataSource();
 this.MyDataSource.data = data;
 this.MyDataSource.paginator = this.paginator;
 this.MyDataSource.sort = this.sort;
 });
 }

 // To Edit Employee
 editEmployee(empid) {
 this.router.navigate([`/Crud/edit/${empid}`]);
 }

 // Search specific result
 filterEmployee(searchstring: string) {
 searchstring = searchstring.trim();
 searchstring = searchstring.toLowerCase();
 this.MyDataSource.filter = searchstring;
 }
}
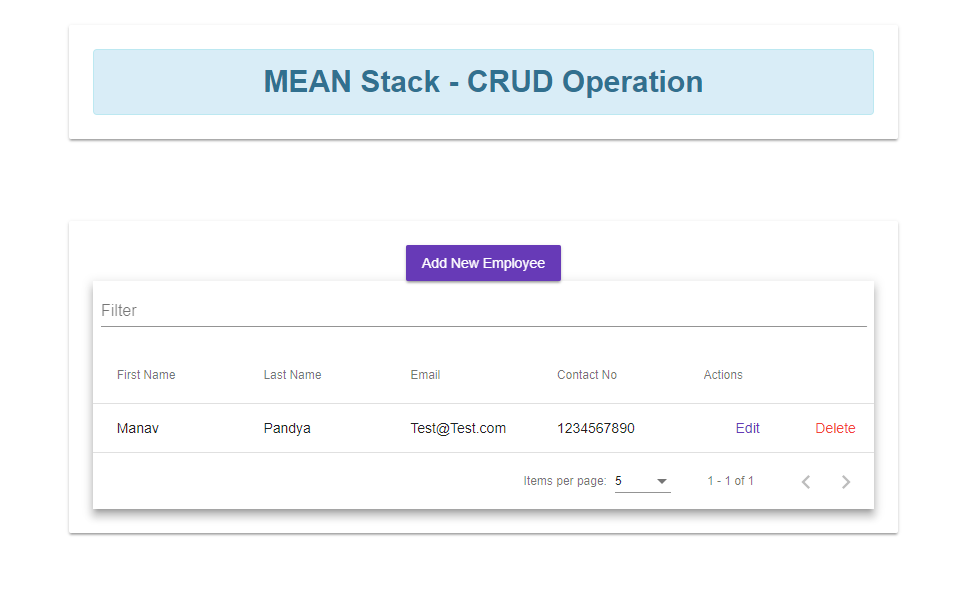
In this listing of employee components, basically, we have used Angular Material Datatable which lists the total number of employees, and apart from the listing, also implemented some other important functionality.
Filter records based on the specific search parameter
Sorting employees either ascending or descending
Pagination with total number of count, next and previous buttons, and the total number of results visible per page
We are done with our listing of employee functionality; our next move is to create a new employee.
Create Employee
To create the new employee we need to have a form with submit button so that once the user adds the employee details, it will be saved into the database, so for that, I have used different material form controls.
Material form controls
Material Button Component
Material Card
Create index.module.ts inside the add-employee folder and paste the following code.
Index.module.ts
import { NgModule } from '@angular/core';
import { CommonModule } from '@angular/common';
import { RouterModule, Routes } from '@angular/router';
import { FormsModule, ReactiveFormsModule } from '@angular/forms';
import { AddEmployeeComponent } from './add-employee.component';
import { MatButtonModule, MatButton, MatFormFieldModule, MatInputModule } from '@angular/material';

const routes: Routes = [{
 path: "",
 component: AddEmployeeComponent,
}];

@NgModule({
 imports: [
 CommonModule,
 FormsModule,
 ReactiveFormsModule,
 RouterModule.forChild(routes),
 MatButtonModule, MatFormFieldModule, MatInputModule
 ],
 exports: [
 MatButtonModule, MatFormFieldModule, MatInputModule
 ],
 declarations: [
 AddEmployeeComponent
 ]
})
export class AddEmployeeModule {}
add-employee.component.html
 <input formControlName="lastName" matInput placeholder="Last Name">
 </mat-form-field>
 <mat-error>
 <span *ngIf="!formGroup.get('lastName').valid && formGroup.get('lastName').touched">Please enter last name</span>
 </mat-error>
</td>
</tr>
<tr>
<td colspan="2">
 <mat-form-field class="demo-full-width">
 <input formControlName="email" matInput placeholder="Email">
 </mat-form-field>
 <mat-error>
 <span *ngIf="!formGroup.get('email').valid && formGroup.get('email').touched">Please enter email</span>
 </mat-error>
</td>
</tr>
<tr>
<td colspan="2">
 <mat-form-field class="demo-full-width">
 <input formControlName="phone" matInput placeholder="Contact No">
 </mat-form-field>
 <mat-error>
 <span *ngIf="!formGroup.get('phone').valid && formGroup.get('phone').touched">Please enter contact no</span>
 </mat-error>
</td>
</tr>
<tr>
<td colspan="2" class="content-center">
 <button mat-raised-button color="accent" [disabled]="!formGroup.valid">Submit</button>
</td>
</tr>
<tr>
<td></td>
</tr>
</table>
</form>
add-employee.component.ts
import { Component, OnInit } from '@angular/core';
import { Router } from '@angular/router';
import { FormsModule, FormGroup, FormControl, Validators, FormBuilder } from '@angular/forms';
import { MyDataServiceService } from '../../Services/my-data-service.service';

@Component({
 selector: 'app-add-employee',
 templateUrl: './add-employee.component.html',
})
export class AddEmployeeComponent implements OnInit {

 formGroup: FormGroup;

 constructor(private formBuilder: FormBuilder, private service: MyDataServiceService, private router: Router) { }

 ngOnInit() {
 this.initializeForm();
 }

 // To initialize Form
 initializeForm() {
 this.formGroup = this.formBuilder.group({
 firstName: ['', [Validators.required]],
 lastName: ['', [Validators.required]],
 email: ['', [Validators.required]],
 phone: ['', [Validators.required]],
 });
 }

 // Add Employee When Submit Button Is Clicked
 addEmployee() {
 if (this.formGroup.valid) {
 let data = this.formGroup.value;
 this.service.addEmployee(data).subscribe(() => {
 this.router.navigate(['/Crud']);
 });
 }
 }

}
In this component of Create employee, we have created a reactive form using multiple Angular Material Form components, and when the user submits the form it will call the service and a new employee will be created.
Update Employee
When the user wants to update the record and click on the edit button from the list of the employee data table, the new component comes into the picture with the form and the values that the user has created already. Create an index.module.ts file inside the edit-employee folder and paste the following code into the file.
Index.module.ts
import { NgModule } from '@angular/core';
import { CommonModule } from '@angular/common';
import { RouterModule, Routes } from '@angular/router';
import { FormsModule, ReactiveFormsModule } from '@angular/forms';
import { EditEmployeeComponent } from './edit-employee.component';
import { MatButtonModule, MatButton, MatFormFieldModule, MatInputModule } from '@angular/material';

const routes: Routes = [{
 path: "",
 component: EditEmployeeComponent,
}];

@NgModule({
 imports: [
 CommonModule,
 FormsModule,
 ReactiveFormsModule,
 RouterModule.forChild(routes),
 MatButtonModule,
 MatFormFieldModule,
 MatInputModule
 ],
 exports: [
 MatButtonModule,
 MatFormFieldModule,
 MatInputModule
 ],
 declarations: [
 EditEmployeeComponent
 ]
})
export class EditEmployeeModule {}
edit-employee.component.html
</mat-form-field>
<mat-error>
 <span *ngIf="!frmGroup.get('lastName').valid && frmGroup.get('lastName').touched">Please enter last name</span>
</mat-error>
</td>
</tr>
<tr>
<td colspan="2">
<mat-form-field class="demo-full-width">
 <input formControlName="email" matInput placeholder="Email">
</mat-form-field>
<mat-error>
 <span *ngIf="!frmGroup.get('email').valid && frmGroup.get('email').touched">Please enter email</span>
</mat-error>
</td>
</tr>
<tr>
<td colspan="2">
<mat-form-field class="demo-full-width">
 <input formControlName="phone" matInput placeholder="Contact No">
</mat-form-field>
<mat-error>
 <span *ngIf="!frmGroup.get('phone').valid && frmGroup.get('phone').touched">Please enter contact no</span>
</mat-error>
</td>
</tr>
<tr>
<td colspan="2" class="content-center">
<button mat-raised-button color="accent" [disabled]="!frmGroup.valid">Submit</button>
</td>
</tr>
<tr>
<td></td>
</tr>
</table>
</form>
edit-employee.component.ts
import { Component, OnInit } from '@angular/core';
import { MyDataServiceService } from '../../Services/my-data-service.service';
import { Router, ActivatedRoute } from '@angular/router';
import { FormGroup, FormBuilder, Validators } from '@angular/forms';
import Employee from '../../../../Model/Employee';

@Component({
 selector: 'app-edit-employee',
 templateUrl: './edit-employee.component.html',
})
export class EditEmployeeComponent implements OnInit {

 empid: string;
 employeeDetail: Employee;
 frmGroup: FormGroup;

 constructor(private service: MyDataServiceService, private formBuilder: FormBuilder, private router: Router, private activatedRoute: ActivatedRoute) {
 this.activatedRoute.params.subscribe(params => {
 this.empid = params.id;
 });
 this.initializeForm();
 }

 ngOnInit() {
 this.getEmployeeById(this.empid);
 }

 // To Initialize Form
 initializeForm() {
 this.frmGroup = this.formBuilder.group({
 firstName: ['', [Validators.required]],
 lastName: ['', [Validators.required]],
 email: ['', [Validators.required]],
 phone: ['', [Validators.required]],
 });
 }

 // To Single Employee Details By ID
 getEmployeeById(empid) {
 this.service.getEmployeeById(empid).subscribe(res => {
 this.employeeDetail = res;
 this.frmGroup.patchValue({
 firstName: this.employeeDetail.firstName,
 lastName: this.employeeDetail.lastName,
 email: this.employeeDetail.email,
 phone: this.employeeDetail.phone,
 });
 });
 }

 // To Update Employee Detail
 updateEmployee() {
 if (this.frmGroup.valid) {
 let data = this.frmGroup.value;
 this.service.updateEmployee(this.empid, data).subscribe(() => {
 this.router.navigate(['/Crud']);
 });
 }
 }

}
In the edit employee page, we have a form similar to the create employee page but in the edit form, we are getting the values of the selected employee record from REST API and binding it to the form elements, and whenever a user submits the form, the data will be updated.
Delete Employee
In this article, there is no separate page for the delete operation, but on the employee list page, we need to add one more function which calls the service method and passes the employee id as a parameter. Open list-employee.ts and add the following method.
// Delete Employee
 deleteEmployee(empid) {
 this.service.deleteEmployee(empid).subscribe(() => {
 this.getEmployees();
 });
 }
After adding the above method, we can delete an employee by clicking on the delete button which is present in the employee list data table which was already implemented. We are done with our front-end configuration for all the CRUD operations-related components/pages, now it’s time to execute the application and test all the implemented functionality one by one.
Running MEAN Stack App
Open PowerShell in visual studio code and use the following commandng serve -oOpen another PowerShell window and execute the following code to start the express server
>node server.js
How it Works.
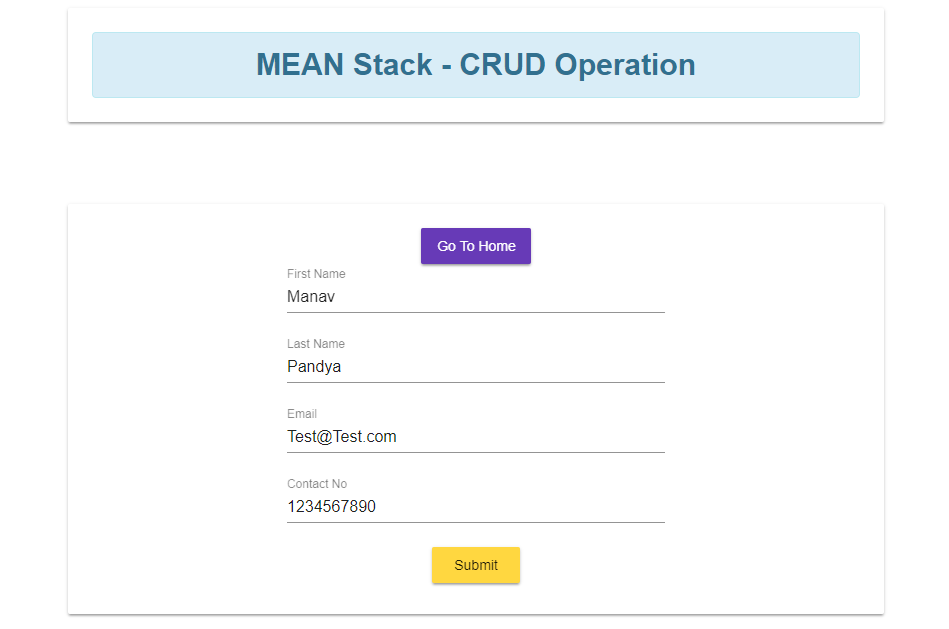
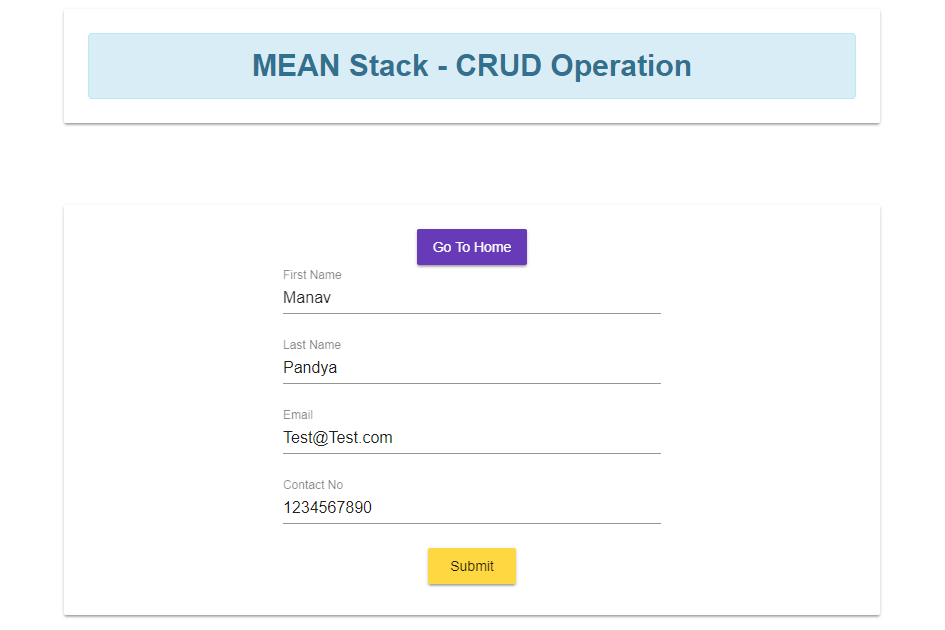
Create Operation
Click on Add New Employee button and the form will have appeared on the screen as given below.
Read Operation
When we execute the application, you will be redirected to this default page which lists out the number of employees along with the button to create the new employee.
Edit Operation
When you click on the edit button from the material table, it will open a new page to update the existing record.
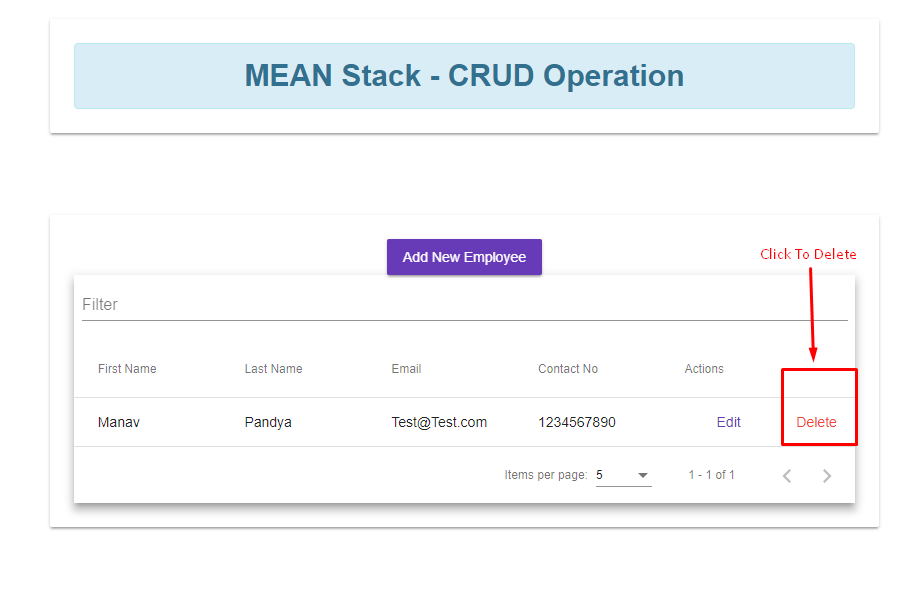
Delete Operation
To delete an employee just we need to click on the delete button and then the specific record will be removed from the database.
Important Note
This example shows the basic implementation of using CRUD operation, and this is not the only way to achieve it, hence, this example can be improved with the multiple advances and robust concepts which are given below.
Add error handling module to handle run-time errors and to inform about the same the end-user
Show toaster notification as soon as the status change in between the user interactivity
Better user experience using the advanced UI/UX setup
And many more feature enhancements can be done as per the business needs
Summary
In the end, you have completed the MEAN Stack application with different JavaScript technologies like Angular, Nodejs, expressjs, and MongoDB. Bu using the MEAN stack mechanism we can achieve higher performance, robustness, and reusable components. Try to play with the code that we have implemented and do modifications as per your requirements, I hope you have learned something from this MEAN stack guide, Happy coding then.