What is OAuth? Secure Your ASP.NET Core App with OAuth 2.0

ASP.NET Core Course
What is OAuth?: An Overview
These days whenever you visit any website or application to create/login, you will see many options other than the regular register/login screen which will do the same work for you.
Let’s take the example of scholarhat.com. When you click on the Login button in their application, the below pop-up comes in front of you. You can log in using your Email ID/password OR Facebook Account OR Google Account. Right?
So, what happens when you click on the ‘Sign in with Google’ button? Dotnettricks.com redirects you to the Google sign-in page (image below), where you can use your already existing credentials OR create a new account using Google, to sign in to dotnettricks.com.
But then you must be thinking how does this user get validated if your application is not supposed to worry? It’s the OAuth service provider. The OAuth service provider is responsible for doing all the ground work from authenticating the user to protecting user data.
Enroll Yourself In the Best ASP.NET Core certification training From ScholarHat and Start Your Tech Career the Right Way!
Read More: Top 50 ASP.NET Core Interview Questions and Answers for 2024
OAuth 2.0 Flow Types
- Authorization Code Flow: This exchanges authorization codes for tokens. To make this exchange work, your app must be server-side because you’re exchanging your app’s Client Secret which has to be stored securely in your client.
- Client Credentials Flow: This allows apps to exchange their Client Secret and Client IDs to an authentication server. This authenticates the user without any user involvement and returns a token.
- Resource Owner Password Flow: This asks users to enter credentials like their username and password using an interactive form. The credentials are passed on to the back end and can be stored for future use, meaning the app has to be trusted completely with this information.
- Implicit Flow with Form Post: This uses OpenID Connect (OIDC) to execute a web sign-in. The web app solicits and retrieves tokens through the front channel without needing secrets or back-end calls. This flow type is used by apps that don’t want to locally store secrets.
- Hybrid Flow: Thisis used by apps that can store client secrets securely, providing your app with instant access to an ID token while simultaneously providing secure retrieval of access and refresh tokens. It is advantageous for apps that need immediate access to user data on an ongoing basis, the hybrid flow can be handy.
Read More: What is an ASP.NET Core Developer? Skills to become ASP.NET Core Developer
Example of Using OAuth 2.0
User Authentication Application
Creating Login Application
For this article, we will be using the default authentication scaffolding provided by .Net Core using Visual Studio 2019. For details, you can refer to this article.
Please note: While selecting the new scaffolding, select ‘Account/Login’
After your application is ready, run the application.
We have a readymade HTML which we will be updating further. Now, let us see how to bind the OAuth service to our application.
In this article, we will be seeing how to integrate OAuth into your application using the Google+ (Google Plus) authentication service.
Creating OAuth Credentials
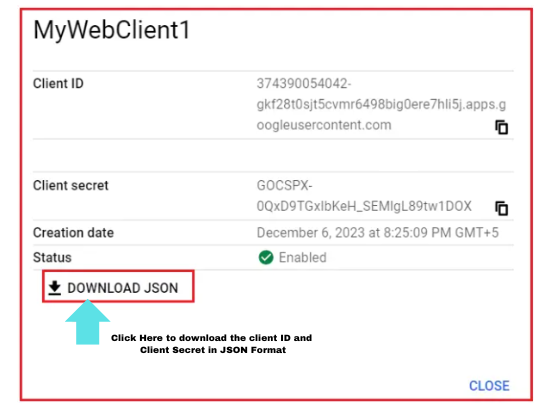
To enable the Google+ authentication service, we first need to register our application with Google. This step will give us the Google+ credentials like ClientId and SecretKey, which we would need to bind the service in our application.
Step 1: Navigate to the Developer Console
- Navigate to https://console.developers.google.comand log in with your Gmail credentials which you want to use to manage your application with Google authentication service.
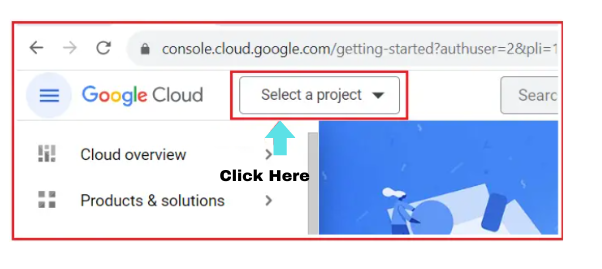
Step 2: Create a new project
- Click on ‘Select a project’. A new window will open.
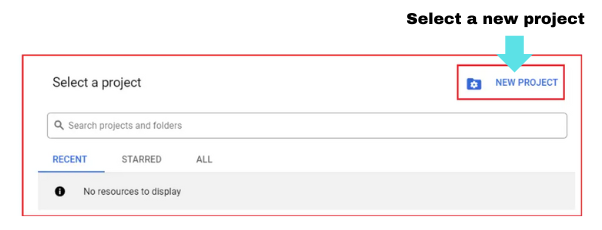
- Click on ‘New project’.
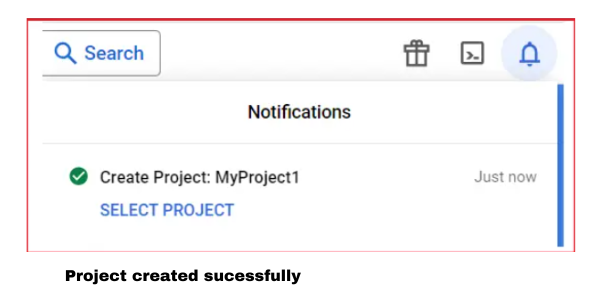
- Give a meaningful name to your project. I gave it as ‘MyProject1’.
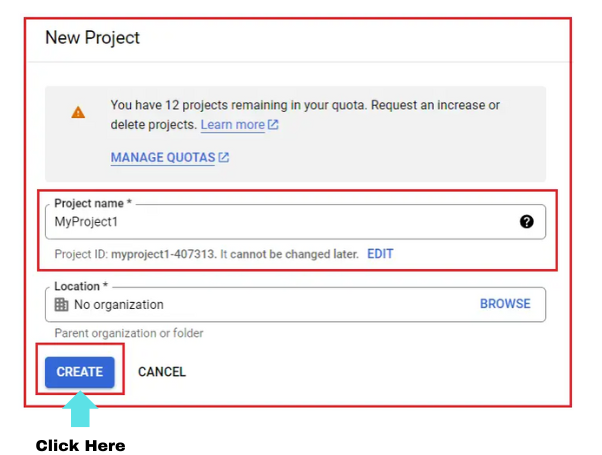
- Click on Create
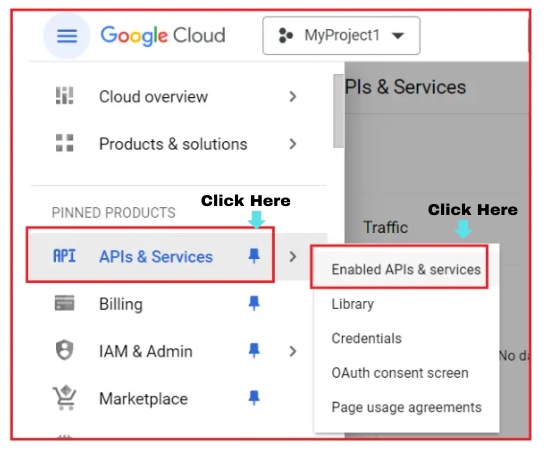
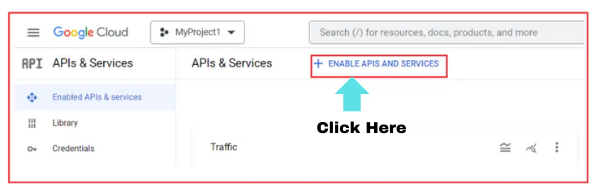
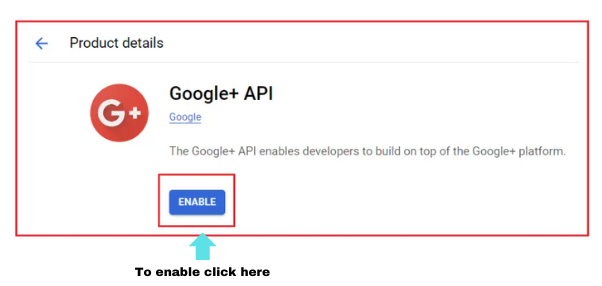
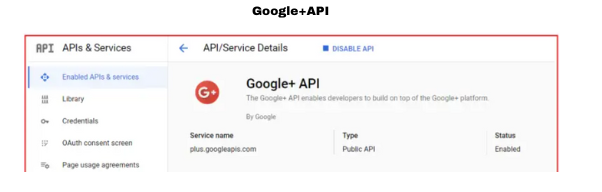
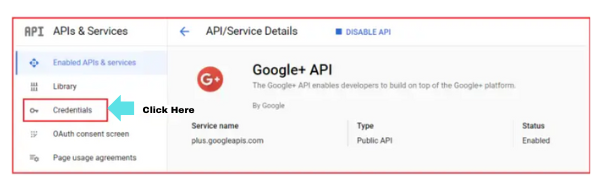
Step 3: Enable Google+ API
- Click on either the ‘Library’ menu or ‘Enable APIs and services’. This will launch the Google API Library page.
- Search for ‘Google Plus’.
- After searching, you will get many options to choose from. Select the appropriate one. For this article, I will click on the ‘Google+ API’ option.
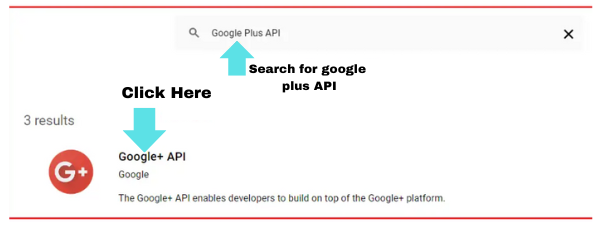
- This will load the Google+ API page. Click the ‘Enable’ button.
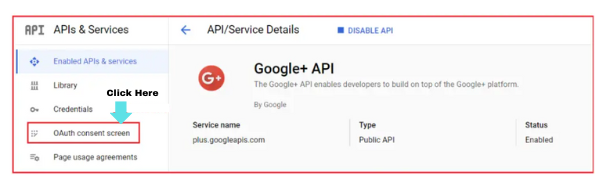
Step 4: Configure the OAuth Consent Screen
- Click on the header logo to load the required menu
- Select ‘OAuth consent screen’
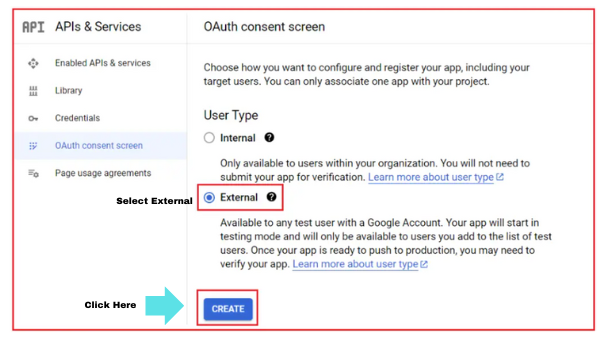
- Here you will get two options to select from,
- Internal
- This option is used if you want your application to be accessed by users in your organization only.
- The user will be verified with the organization G Suite users
- The default Google verification will be ignored in such a case
- In short, if your application is private
- External
- Your application is accessible to any user with a Google account
- Please note, if your application is requesting some sensitive user data, in such cases verification of your application needs to be done by Google which would take 4-6 weeks approx.
- Also if you have selected some scope that includes extra security checks, it would cost you in your pocket.
- Internal
Let’s select ‘External’, as my account is not a registered G Suite account. Click on Create.
Now you can see a form, which contains the below configuration options:
OAuth Consent Screen
- App Information
- Here you have two mandatory fields,
- App Name: This name will come into the picture when a user logs in using the OAuth Service. We will see this name in action soon.
- User support email: Id where users can contact you for any information related to their consent.
- Apart from this, you can also specify a logo (optional).
- Here you have two mandatory fields,
- App Domain and Authorize domain
- These are optional fields
- In these sections, you can give links to your website privacy policies, terms, and conditions so that when the user is login using the OAuth service, these links will be provided on the screen for their go-through.
- Apart, you can also attach your registered domain details.
- Developer contact information
- This email id is used by Google to inform you about any changes related to your service.
- It is a mandatory field.
- Click ‘Save and Continue’.

Scopes
- This decides the type of user data that can be shared with your application by Google.
- Divided into 3 types:
- Non-sensitive
- The public user data
- Eg: email id or any profile data which you have set as public
- Sensitive
- The private user data
- Eg: your phone number
- Restrictive
- The very sensitive user data
- Eg: your upi details which you use to transact in the Play Store
- Non-sensitive
- We will be using Non-Sensitive data for our article. To do so, click on the ‘Add/Remove scope’ button and click on all the three checkboxes (figure 1 below)
- Note: If data is of type sensitive or restrictive, a lock will be displayed in the ‘Lock type’ column for the particular data row (figure 2 below). In our case, we are not configuring any sensitive or restrictive data with our project, hence we can’t see any lock symbol.
- Scroll down and click on the update button.
- Click on ‘Save and Continue’.
Optional Info
Here you can give more details about your app which would help google for verification. I left the fields blank and clicked on ‘Save and Continue’
You can anytime go and edit the consent as per your application needs. Once the OAuth Consent is ready, let’s now create the credentials.
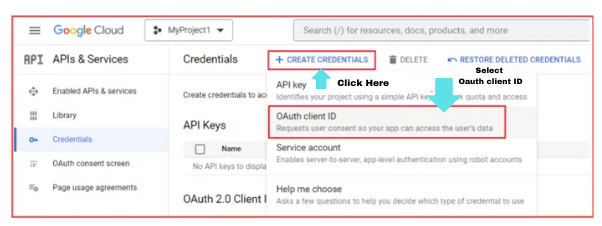
Step 5: Create client credentials
This is the last step to configure the OAuth Service which will be used by your application J (finally !!)
- Click on the ‘Credentials’ menu
- Click on ‘Create Credentials’
- Select ‘OAuth client ID’
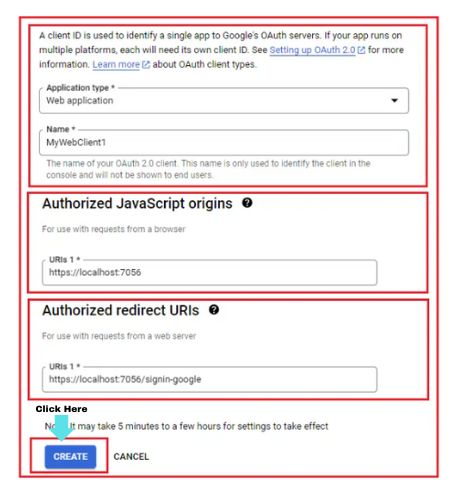
- A form gets loaded that has certain fields which need to be configured. They are,
- Application Type: We will be selecting ‘Web Application’
- Name
- Give a meaningful name to the web client. I gave something similar to the app name which was given in consent (step 4), ie.‘DotNetTricks Authentication Client’
- Authorized JavaScript origins
- The URI where your application is hosted.
- But as our application is still running locally, we will give our localhost URI.
- Right-click on the project in Visual Studio
- Select Properties
- Select debug option
- Scroll down. You will see the APP URL with the Enable SSL checkbox.
- Check the Enable SSL option if not checked. It will generate an https URL.
- Copy and paste the URL in the APP URL textbox and save the setting.
- Let’s get back to the form. Click on ‘Add URI’ under Authorized Javascript Origins and paste the same APP URL
- We will see this URI in action once we bind the OAuth Service with our application.
- Authorized Redirect URIs
- This is the URI where the user will be redirected after being authenticated by Google.
- Click on ‘Add URI’ and paste the same APP URL suffixed with ‘/signin-google.
- Eg: https://localhost/ sign in-google
- We will see this URI in action once we bind the OAuth Service with our application.
- Click on save.
- At this stage, if you see the credentials page, an entry is created under the ‘OAuth 2.0 Client IDs’ table.
Binding OAuth Service In Application
Step 1: Install NuGet Package
- Right-click on the project and select Manage Nuget Packages.
- Search and install Microsoft.AspNetCore.Authentication.Google
- Once installed, the package should be available under dependencies.
Step 2: Configure ClientId and SecretKey in StartUp.cs
- We need to configure the IServiceCollection to support Google Authentication.
- For this, open StartUp.cs file and add the below code in the ConfigureServices method
- AddAuthentication() tells the IServiceCollection that we are adding an Authentication mode
- AddGoogle() tells the type of mode. In our case, it is Google authentication
- GetSection("Authentication: Google") fetches the credentials required for Authentication using Google OAuth
- ClientId and options.ClientSecret are the parameters that will be used by Google OAuth to verify the user
builder.Services.AddAuthentication()
.AddGoogle(options =>
{
    options.ClientId = "[Your Google Client ID]";
    options.ClientSecret = "[Your Google Client Secret]";
    // You can set other options as needed.
})
.AddMicrosoftAccount(microsoftOptions =>
 {
     microsoftOptions.ClientId = "[Your Microsoft Client ID]";
     microsoftOptions.ClientSecret = "[Your Microsoft Client Secret]";
 });
where
NoteI have used ‘Secret Manager’ provided by .Net Core to store sensitive data like ClientId and ClientSecret.
Step 3: Create and bind properties in a model
In my Login.cshtml.cs file, I already have properties to hold data for login, like username, and password. We need to create properties that will be responsible for holding data when a user opts for the OAuth service.
We need to declare two properties,
1. ReturnURL
This property will be responsible for holding the URL which the user is trying to access. Once the user is successfully authenticated by the OAuth service, in our case, by Google, the user can be redirected to the same URL.
2. ExternalLogin
Now with in the orange block in the above image, we need to show a button or image to let the users log in using the OAuth service. In our example, we are using Google OAuth service, but there can be chances where you may use multiple services like Facebook, Twitter, or Microsoft accounts.
This property will be responsible for holding the list of such services which we declared in Step 2. This property will be a list of AuthenticationSchema.
Below is the screen print of the method we need to add in Login.cshtml.cs file. This method will be called when the user loads the Login page.
[AllowAnonymous]
public async Task ExternalLoginCallback(string? returnUrl, string? remoteError)
{
    returnUrl = returnUrl ?? Url.Content("~/");

    LoginViewModel loginViewModel = new LoginViewModel
    {
        ReturnUrl = returnUrl,
        ExternalLogins = (await signInManager.GetExternalAuthenticationSchemesAsync()).ToList()
    };

    if (remoteError != null)
    {
        ModelState.AddModelError(string.Empty, $"Error from external provider: {remoteError}");

        return View("Login", loginViewModel);
    }

    // Get the login information about the user from the external login provider
    var info = await signInManager.GetExternalLoginInfoAsync();
    if (info == null)
    {
        ModelState.AddModelError(string.Empty, "Error loading external login information.");

        return View("Login", loginViewModel);
    }

    // If the user already has a login (i.e., if there is a record in AspNetUserLogins table)
    // then sign-in the user with this external login provider
    var signInResult = await signInManager.ExternalLoginSignInAsync(info.LoginProvider,
        info.ProviderKey, isPersistent: false, bypassTwoFactor: true);

    if (signInResult.Succeeded)
    {
        return LocalRedirect(returnUrl);
    }

    // If there is no record in AspNetUserLogins table, the user may not have a local account
    else
    {
        // Get the email claim value
        var email = info.Principal.FindFirstValue(ClaimTypes.Email);

        if (email != null)
        {
            // Create a new user without password if we do not have a user already
            var user = await userManager.FindByEmailAsync(email);

            if (user == null)
            {
                user = new ApplicationUser
                {
                    UserName = info.Principal.FindFirstValue(ClaimTypes.Email),
                    Email = info.Principal.FindFirstValue(ClaimTypes.Email),
                    FirstName = info.Principal.FindFirstValue(ClaimTypes.GivenName),
                    LastName = info.Principal.FindFirstValue(ClaimTypes.Surname),
                };

                //This will create a new user into the AspNetUsers table without password
                await userManager.CreateAsync(user);
            }

            // Add a login (i.e., insert a row for the user in AspNetUserLogins table)
            await userManager.AddLoginAsync(user, info);

            //Then Signin the User
            await signInManager.SignInAsync(user, isPersistent: false);

            return LocalRedirect(returnUrl);
        }

        // If we cannot find the user email we cannot continue
        ViewBag.ErrorTitle = $"Email claim not received from: {info.LoginProvider}";
        ViewBag.ErrorMessage = "Please contact support on info@dotnettutorials.net";

        return View("Error");
    }
}
Where
- returnUrl is the URL from where the user came to the Login page. Once the user authentication is successful, we will redirect the user to the same URL.
- GetExternalAuthenticationSchemesAsync() gives us the list of OAuth services we have bound to the configuration service in StartUp.cs
Step 4: The HTML code to show the buttons/images for the external login(s)
Because we have declared the ExternalLogin property as an IList in Step 3, so there can be two possibilities, either the list is empty (we didn’t bind any OAuth service) or the list has data. Our code should be sufficient enough to handle either of the cases.
- Empty list – we will add a count check.
- The list is not empty – In this case, we need to create and write down the logic to iterate through the list.
Let’s see how we can satisfy both our above conditions.
Input
@model LoginViewModel

<div class="row">
    <div class="col-md-6">
        <h1>Local Account Login</h1>
        <hr/>
        <form method="post" asp-action="Login" asp-controller="Account">
            <input type="hidden" name="ReturnUrl" value="@Model.ReturnUrl" />
            <div asp-validation-summary="All" class="text-danger"></div>
            <div class="form-group">
                <label asp-for="Email"></label>
                <input asp-for="Email" class="form-control" />
                <span asp-validation-for="Email" class="text-danger"></span>
            </div>
            <div class="form-group">
                <label asp-for="Password"></label>
                <input asp-for="Password" class="form-control" />
                <span asp-validation-for="Password" class="text-danger"></span>
            </div>
            <div class="form-group">
                <div class="checkbox">
                    <label asp-for="RememberMe">
                        <input asp-for="RememberMe" />
                        @Html.DisplayNameFor(m => m.RememberMe)
                    </label>
                <</div>
            </div>
            <button type="submit" class="btn btn-primary">Login</button>
        </form>
    </div>
    <div class="col-md-6">
        <h1>External LoginNo external logins configured</div>
            }
            else
            {
                <form method="post" asp-action="ExternalLogin" asp-route-returnUrl="@Model.ReturnUrl">
                    <div>
                        @foreach (var provider in Model.ExternalLogins)
                        {
                            <button type="submit" class="btn btn-primary"
                                    name="provider" value="@provider.Name"
                                    title="Log in using your @provider.DisplayName account">
                                @provider.DisplayName
                            </button>
                        }
                    </div>
                </form>
            }
        }
    </div>
</div>
Where
- The action method is to be called when the user clicks on any of the external login buttons. We will be creating this method as we proceed further.
- The ReturnURL will be passed as a parameter to the ExternalLogin method.
- As we are sending the parameter, we would need a Post-method
- The ExternalLogins property in the model, which we are using to iterate
- It’s always preferred to add a unique ID to your elements
- @provider.name contains the name of the OAuth service you are binding
- @provider.DisplayName contains the name of the OAuth service that you want to show to the user.
HTML OUTPUT
DOM STRUCTURE OF THE FORM
Note: If you have a closer look, you will see action and parameter got combined to form a single URL in the DOM.
Step 5: Create the submit action method when clicked on the external login
This action will require two types of parameters,
- Provider details
- Return URL
Where
- This parameter will be derived from the ‘name’ attribute we have declared in the HTML.
- It is case-sensitive and hence the parameter should match exactly what’s been declared in HTML.
- If it doesn’t match, .Net Core will not be able to bind it, resulting in sending an empty string.
- This parameter will be derived from the ‘asp-route-returnUrl’ attribute we have declared in the HTML.
- After the user authentication is successful, we need to redirect the user to our application. In our case, it will be the Home page of the application.
- This method configures the provider and the redirect URL
- ChallengeResult is used to perform authentication whereabouts for external providers. You can learn more about ChallengeResults from MSDN documents.
After Step 5, once you re-run your application and Click on the Google button, you will be redirected to the Google Authentication page.
Advantages and Disadvantages of OAuth 2.0
Every service comes with Pros and Cons. Let us see one by one.
Pros
- OAuth 2.0 is a good and useful approach when you wish to refrain from User Authentication and managing their data.
- Your application is carefree to protect the user details. The OAuth 2.0 Service will be reliable to do all the groundwork to make sure user info is safe.
- OAuth 2.0 plug-and-play approach is quite feasible. It only gives out the data that has been requested by you, making sure the mode of transfer is also safe.
- Your application will get access to user data without actually bothering about username/password. OAuth 2.0 uses token-based functionality.
- Nevertheless, implementation is easy.
Cons:
- If the OAuth service database is hacked where it's maintaining its data, all the applications using the service will be at stake.
Benefits of using OAuth 2.0
- User-friendly: OAuth 2.0 improves the user experience by allowing users to access multiple applications with one set of login credentials.
- Secure: By enabling applications to access user accounts without revealing user passwords, OAuth 2.0 helps to reduce the risk of a security breach. The tokens used in OAuth 2 expire after a certain period, further enhancing the security by limiting the period an attacker can use a stolen token.
- Supports a wide range of applications: With its various authorization grant types, OAuth 2 can cater to different types of applications, including web and mobile applications, and even devices like smart TVs and game consoles. This makes it a flexible and versatile authentication solution.
Limitations of OAuth 2.0
- Complexity: Implementing OAuth 2.0 can be complex, especially for developers new to the protocol.
- Limited Scope: It may not be suitable for all authentication and authorization use cases, particularly those requiring fine-grained access control or multi-factor authentication.
- Security Concerns: OAuth 2.0 doesn't mandate encryption, leaving the transmission of tokens and other sensitive data vulnerable to interception.
- Lack of Encryption: OAuth 2.0 does not define any encryption mechanisms for the tokens it issues.
- Dependence on SSL/TLS: OAuth 2.0 relies heavily on SSL/TLS for security.
Summary
Hence, in this ASP.NET Core tutorial, we saw in detail what is OAuth, why it's needed, how to implement it by creating a user authentication application, advantages and disadvantages of OAuth. To do hands-on labs and gain more expertise, consider our ASP.NET Core Certification Program.
FAQs
Q1. What are the two mandatory fields in the OAuth Consent Screen?
Q2. What are the three types of scopes of the user data that can be shared with your application by Google?
Q3. What are the two properties for holding data when a user opts for the OAuth service?
Q4. What is OAuth 2.0?
Q5. Why choose OAuth 2.0 for ASP.NET Core security?
Take our free aspnet skill challenge to evaluate your skill

In less than 5 minutes, with our skill challenge, you can identify your knowledge gaps and strengths in a given skill.