
Blazor Data Binding : One-way, Two-way and Event Binding
Being a developer, you must have realized that applications in real life are just a way to capture data and show them in the desired way to the end user so that they can take some intellectual decisions. Well, today’s applications are much more than this but what I am trying to say is once the data is captured, it needs to be shown in the application as per the user requirement. Whatever technologies you choose to build your application, they provide a rich set of features to bind the data to different controls and Blazor is not an exception. As Blazor is an SPA framework, it supports features like components, one-way & two-way data binding etc. An application built with Blazor, runs completely in the browser. Blazor supports 3 kinds of data binding
One-way data binding
Two-way data binding
Event binding
Pre-requisites
If you are new to Blazor, I would strongly suggest you to go through the fundamental article on Blazor which should be pretty much able to answer all your questions regarding what Blazor is.
Basic knowledge about Razor. You may refer official Microsoft docs for some quick idea about Razor -
https://bit.ly/2PrgbnI.Visual Studio or Visual Studio code installed in your system.
Blazor language services
Command Line: dotnet new -i Microsoft.AspNetCore.Blazor.Templates
One-way data binding
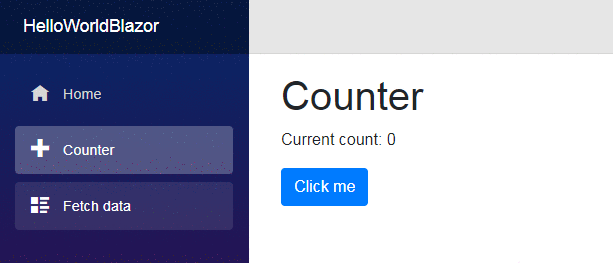
One-way data binding in Blazor is the process of rendering the View as per the value in the Model. Sometime the Model can be just a property or a simple variable. In the previous article, we had tried creating a simple application using Blazor’s inbuilt HelloWorld template. Let’s open the counter component i.e. Counter.cshtml file and see how it has implemented one-way data binding. A Blazor component is a reusable piece of code & UI.
 @page "/counter"
 <h1>Counter</h1>
 <p>Current count: @currentCount</p>
 <button class="btn btn-primary" onclick="@IncrementCount">Click me</button>

 @functions {
 int currentCount = 0;
 void IncrementCount()
 {
 currentCount++;
 }
 }
Let’s remove some of the lines to make this simpler to understand.
 @page "/counter"
 <h1>Counter</h1>
 <p>Current count: @currentCount</p>

 @functions {
 int currentCount = 0;
 }
Now, our Counter component has a single member defined in the @functions block. In this case, it constitutes a variable and a function with logic to increment the value of the variable by 1 each time it gets called. In a component, the members defined in the @function block can be used in the rendering logic. Let’s forget about theNow, as per the one-way binding logic, the view gets updated when it renders with the value set to the variable in the following section containing the variable i.e.
<p>Current count: @currentCount</p>
Output

Two-way data binding
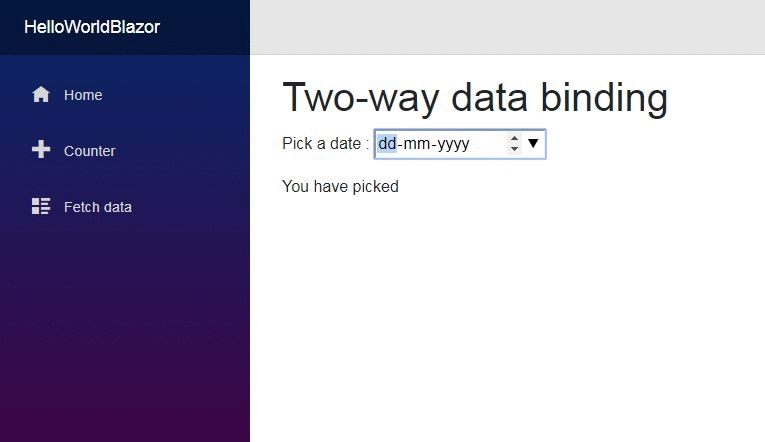
In two-way data binding, any changes in the Model gets reflected in the View and similarly any changes in the View gets reflected in the View automatically. This is done using attribute bind. To demonstrate this let’s create a new component named twowaybinding and so the file name would be twowaybinding.cshtml. Paste the following code in that file and save it.
 @page "/twowaybinding"
 <h1>Two-way data binding</h1>
 <p>Pick a date : <input type="date" bind="@pickeddate" /></p>
 <p>You have picked @pickeddate</p>

 @functions {
 string pickeddate;
 }
We have added an input element of type date. Whenever the user picks a date from the calendar, it will be reflected in the next line. So, when we make any changes in the view, the value in the model gets changed and which in turns updates the other portion of the view which uses the same model/variable.
Output
Event Binding
Blazor’s latest version now supports events to a greater extent as compared to the earlier version which was limited to just onclick, onchange and onkeypress events. The attribute for event in an HTML element starts with “on” and follows the format on
UIEventArgs
UIChangeEventArgs
UIKeyboardEventArgs
UIMouseEventArgs
A simple example of an Event can be seen in the Counter component of our HelloWorld application.
 @page "/counter"
 <h1>Counter</h1>
 <p>Current count: @currentCount</p>
 <button class="btn btn-primary" onclick="@IncrementCount">Click me</button>

 @functions {
 int currentCount = 0;
 void IncrementCount()
 {
 currentCount++;
 }
 }
The IncrementCount() method gets called when we click on the button and hence the value gets incremented as per the logic written in the method.
Output
Let’s see how to capture values on event via event arguments.
 <input type="text" onkeypress="@(e => KeyPressed(e))" />
 <p>Message: @pressedkeys</p>

 @functions {
 string pressedkeys;
 private void KeyPressed(UIKeyboardEventArgs args)
 {
 if (args.Key == "a")
 {
 pressedkeys="You pressed key A.";
 }
 else
 {
 pressedkeys="You pressed a key other than A.";
 }
 }
 }
Output

You can use lambda expressions as well.
<button onclick="@(e => Console.WriteLine("Clicked!"))">Click</button>
User-defined events
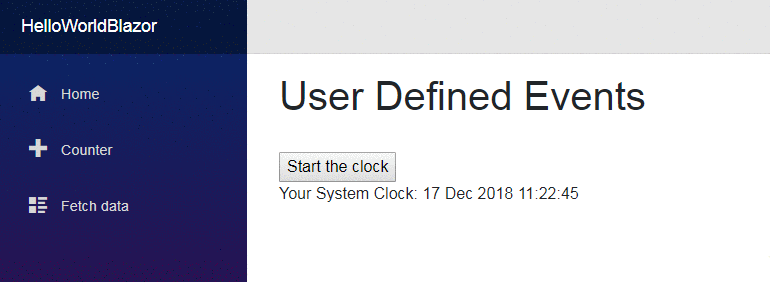
While developing a single page application, you might sometime need to define your own event. In such cases, you may need to manually trigger the UI refresh. To do that, we need to call BlazorComponent.StateHasChanged. One simple example can be when you want to update the UI in an interval of time. Let's create a component to demonstrate this which will show the current time in “dd MMM yyyy hh:mm:ss” format and will change the value along with the system time.
Example
 @page "/userdefinedevent"
 @using System.Threading;


 <h1>User Defined Events</h1>
 <br/>
 <button onclick=@StartClock>Start the clock</button>
 <br/><br/>
 Your System Clock: @currenttime


 @functions
 {
 string currenttime =DateTime.Now.ToString("dd MMM yyyy hh:mm:ss");

 void StartClock()
 {
 var timer = new Timer(new TimerCallback(_ =>
 {
 currenttime =DateTime.Now.ToString("dd MMM yyyy hh:mm:ss");
 this.StateHasChanged();
 }), null, 1000, 1000);
 }
 }
Output
Conclusion
In this article, we saw the different types of binding supported by Blazor with appropriate examples. We also learned how to trigger manual UI refresh, in case we get such a requirement. Blazor is going to be shipped as a part of ASP.Net Core as announced in the last .Net Conf. So, expect it to have more and more features.