


25
apr.HTML5 Forms - Elements and Attributes
25 aug. 2022
Intermediate
8,39K Views
21 min read
In the previous articles, we have deep dived into HTML5, its advent, HTML5 elements, their browser compatibility, and stuff. Let’s have a deeper look into HTML5 forms in this article. Form element plays a very vital role in web development, this is the entity within which we keep various other elements and try to post the data within the form to the server side.
Let’s create an HTML form to understand more about it, which would look something like below:
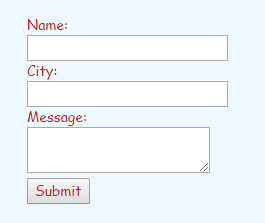
This form has 3 input type fields, namely Name, City, Message, and a button named as Submit. A general idea is to click on the Submit button that would save the 3 inputs in a sort of repository at the server end. Let’s create this form in HTML.
 <!DOCTYPE html>
 <html>
 <head>
 <meta charset="utf-8" />
 <title>HTML Forms</title>
 <link href="~/css/StyleSheet.css" rel="stylesheet" />
 </head>
 <body>
 <form method="post">
 <div class="container">
 <div class="row"> Name: </div> <div class="row">
 <input type="text" id="userName" name="userName" /> </div>
 <div class="row"> City: </div>
 <div class="row"> <input type="text" id="userCity" name="userCity" /> </div>
 <div class="row"> Message: </div> <div class="row">
 <textarea id="userMessage" name="userMessage"></textarea> </div>
 <div class="row"> <input type="submit" value="Submit" /> </div> </div>
 </form>
 </body>
 </html>
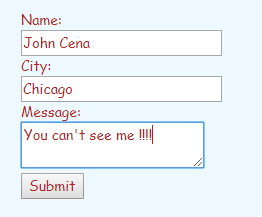
The display in the browser would be as below
2 input type=”text” elements
1 Textarea element
1 input type=”submit” element
to create the above form.
In the<form> element, we see that we have an attribute as method=”post”, which tells that the data within the form needs to be posted to the server as soon as we click on the submit button. I have created an MVC app in which this form would be posted to the controller (server-side through the API) end for further processing to the database layer or else. Let’s have a look at the controller code
public class HomeController : Controller
{
public IActionResult Index()
{
return View();
}
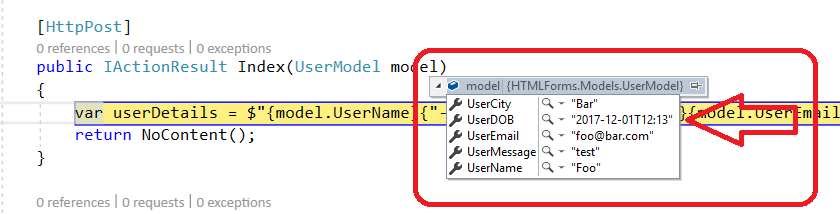
[HttpPost]
public IActionResult Index(UserModel model)
{
var userDetails = $"{model.UserName}{"--"}{model.UserCity}{"--"}{model.UserMessage}";
return NoContent(); }
}
The <form>> would be posted to the POST Index method as it has the HTTP type as HttpPost, which has an argument, namely UserModel. It is nothing but a model which contains properties to map the form data such as user name, user city, and user message.
 public class UserModel
 {
 public string UserName { get; set; }
 public string UserCity { get; set; }
 public string UserMessage { get; set; }
 }
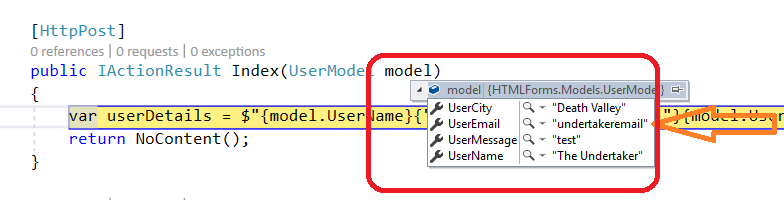
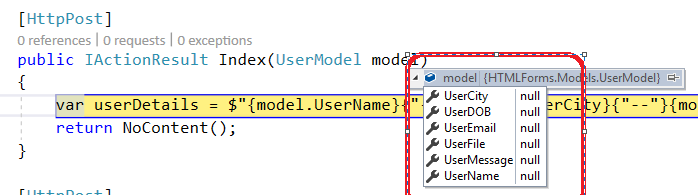
Let’s see whether the server-side POST method actually catches the form data, and for that, put one debugger with the index method to identify the data being submitted as given below.
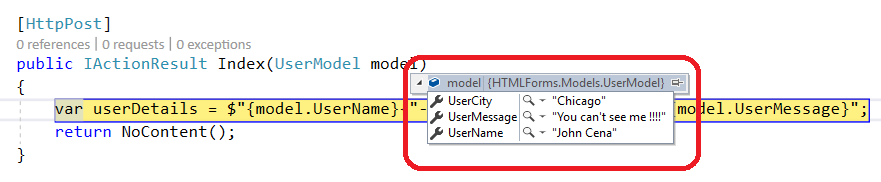
We can see that the server side code reflects the form data correctly; here element has played the most important role as it’s the link between user interaction and server side pieces of stuff. In this scenario MVC app written in C# has been used, HTML form can be used along with any server side language. The name attribute of the form elements is very important to map the data to the server end along with the model value and it should be the same. Since we are talking about attributes, let’s see what new attributes have been added in HTML5.
HTML5 NEW ATTRIBUTES
<form> element new attributes -
autocomplete
novalidate
Let’s see relevant examples
Autocomplete
As the name suggests, the form’s autocomplete attribute prompts auto completeness for various input elements present inside the form. It can be set at the form level and can be turned on/off at the individual element level as well.
The autocomplete feature can be updated from the browser whether we want to allow autocomplete form values, and we can also set up frequently used form values for the autocomplete such as credit/debit card details, native residence or other addresses, company/client details, etc.
 <!DOCTYPE html>
 <html>
 <head>
 <meta charset="utf-8" />
 <title>HTML5 Form Attributes</title>
 <link href="wwwroot/css/StyleSheet.css" rel="stylesheet" />
 </head>
 <body>
 <form method="post" autocomplete="on">
 <div class="container">
 <div class="row"> Name: </div>
 <div class="row"> <input type="text" id="userName" name="userName" /> </div>
 <div class="row"> City: </div>
 <div class="row"> <input type="text" id="userCity" name="userCity" /> </div>
 <div class="row"> Email: </div>
 <div class="row"> <input type="email" id="userEmail" name="userEmail" /> </div>
 <div class="row"> DOB: </div>
 <div class="row"> <input type="datetime-local" id="userDOB" name="userDOB" /> </div>
 <div class="row"> <input type="submit" value="Submit" /> </div>
 </div>
 </form>
 </body>
 </html>
Here autocomplete is on at the form level, let’s see whether the input fields are prompted for values or not.
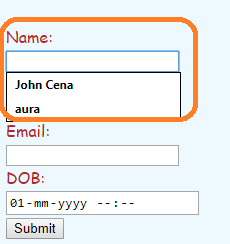
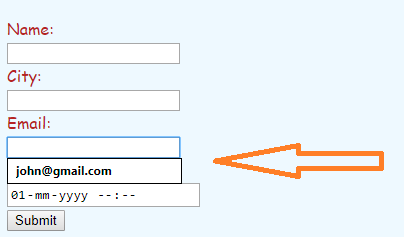
As soon as the user clicks on the text input, the autocomplete field will show the additional promptly with the suggested values and if you click on those values then the values will be filled inside the element as shown above.
We can turn off autocomplete at element level as shown below
<input type="datetime-local" id="userDOB" name="userDOB" autocomplete="off" />
Novalidate
As the name suggests, the addition of this form attribute would not validate the form, even if invalid data has been entered. Let’s see an example. We know that the input type=”email” element will validate the email pattern as shown below.
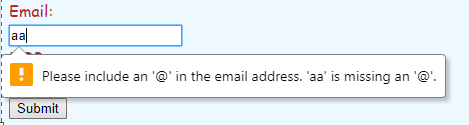
But if we turn on novalidate at the form level, the form won’t be validated even if we have entered an invalid email pattern. Invalid email pattern entered as shown in the below screenshot:
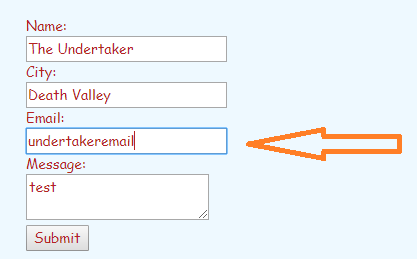
Let’s hit submit, we will see that the form data will flow to the server end without any validation errors thrown.
The complete HTML code is as follows
 <!DOCTYPE html>
 <html>
 <head>
 <meta charset="utf-8" />
 <title>HTML Forms</title>
 <link href="~/css/StyleSheet.css" rel="stylesheet" />
 </head>
 <body>
 <form method="post" novalidate>
 <div class="container">
 <div class="row"> Name: </div> <div class="row">
 <input type="text" id="userName" name="userName" /> </div>
 <div class="row"> City: </div>
 <div class="row"> <input type="text" id="userCity" name="userCity" /> </div>
 <div class="row"> Email: </div>
 <div class="row"> <input type="email" id="userEmail" name="userEmail" /> </div>
 <div class="row"> Message: </div>
 <div class="row"> <textarea id="userMessage" name="userMessage">"></textarea> </div>
 <div class="row"> <input type="submit" value="Submit" /> </div> </div>
 </form>
 </body>
 </html>
New <input>elements attribute in alphabetical order are as below
autocomplete
autofocus
form
formaction
formenctype
formmethod
formnovalidate
formtarget
height and width
list
min and max
multiple
pattern (regexp)
placeholder
required
step
Let’s have a look at each of them in detail.
Autocomplete
We have turned off autocomplete for the Name input field explicitly, hence the autocomplete doesn’t prompt on the Name field, but it does on the City field.
<input type="text" id="userName" name="userName" autocomplete="off" />
Autofocus
The autofocus attribute sets the focus on the element for which it has been turned on when the web page loads.
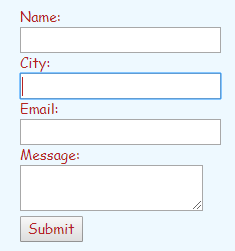
In the above snapshot, we have turned on the autofocus for the City field.
<input type="text" id="userCity" name="userCity" autofocus/>
Form
form attribute on an input element refers to the HTML form the input element belongs to.
 <!DOCTYPE html>
 <html>
 <head>
 <meta charset="utf-8" />
 <title>HTML Forms</title>
 <link href="~/css/StyleSheet.css" rel="stylesheet" />
 </head>
 <body>
 <form method="post" id="SearchForm">
 <div class="container">
 <div class="row"> Name: </div>
 <div class="row"> <input type="text" id="userName" name="userName" /> </div>
 <div class="row"> City: </div>
 <div class="row"> <input type="text" id="userCity" name="userCity" autofocus /> </div>
 <div class="row"> Email: </div>
 <div class="row"> <input type="email" id="userEmail" name="userEmail" /> </div>
 <div class="row"> Message: </div>
 <div class="row"> <textarea id="userMessage" name="userMessage"></textarea> </div>
 <div class="row"> <input type="submit" value="Submit" /> </div> </div>
 </form>
 <div class="row"> DOB: </div>
 <div class="row"> <input type="datetime-local" id="userDOB" name="userDOB" form="SearchForm" /> </div>
 </body>
 </html>
We have an HTML form whose id = ‘SearchForm’, we have an input element DOB, which is outside the form, but the form attribute is set as ‘SearchForm’ itself. Let’s see the output in the browser and whether the submitted form does hold the value for the DOB field or not.
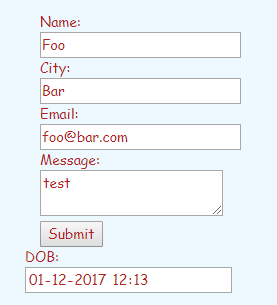
We can see from the above snapshot that the value of DOB is also posted to the server in spite of it being outside the form.
Formaction
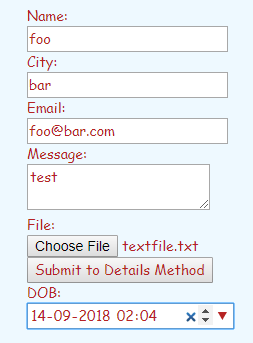
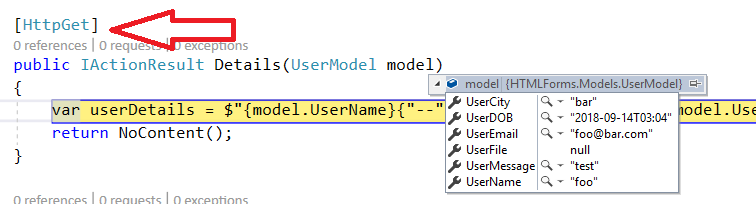
Formaction attribute helps to submit the form to a different method rather than the default method defined by the HTML form attribute. Let’s see an example.
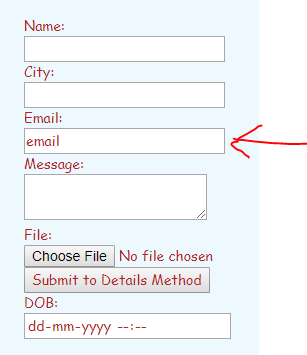
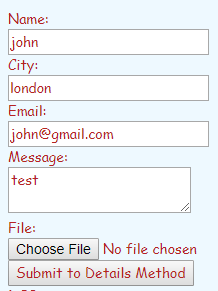
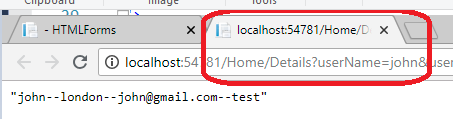
<input type="submit" value="Submit to Details Method" formaction="/Home/Details" />


The form data gets successfully posted to the Details method as suggested by the formaction attribute.
Formenctype
As the name suggests, it refers to the encoding format when posting data to the server and the encoding format decides which type of data is being submitted such as text, file, media, etc. Let’s see an example wherein we need to post a file to the server end.
 <div class="row"> <input type="file" name="userFile"/> </div>
 <div class="row"> <input type="submit" value="Submit" formenctype="multipart/form-data" />
 </div>
Here formenctype is multipart/form-data, let’s see the property type which will hold its value at the server end.
public IFormFile UserFile { get; set; }
ASP.NET Core provides us with an IFormFile type to work with file uploads in a very easy and compatible way.
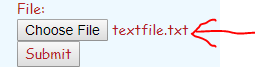
A text file has been browsed through by the file control.
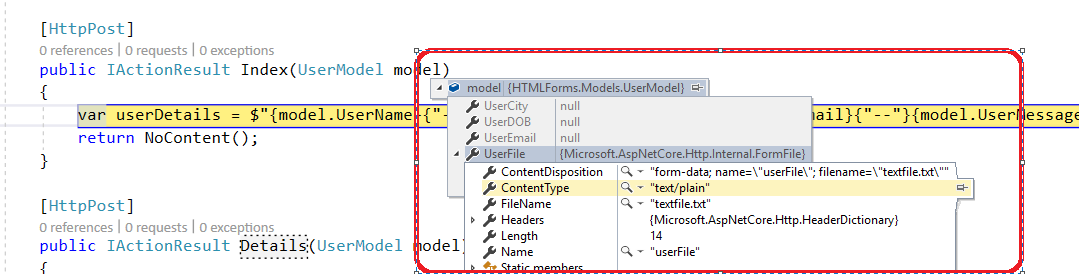
The server side code captures the uploaded file and its details such as contentType, fileName, Length, Name, etc. If we don’t mention the formenctype, then the posted data would be null for the file upload control so it's recommended to provide the appropriate enc type before the file upload.
Formmethod
As the name suggests, this attribute refers to the type of method to be hit at the server end. This attribute at the element level overrides the parent method defined at the form level.We can see in the below code that the formmethod is GET, it overrides the parent POST type and gets submitted to the GET method at the controller end.
<input type="submit" value="Submit to Details Method" formmethod="get" formaction="/Home/Details" />
Formnovalidate
This attribute doesn’t let the form validate itself before posting.
<input type="submit" value="Submit to Details Method" formnovalidate formmethod="get" formaction="/Home/Details" />
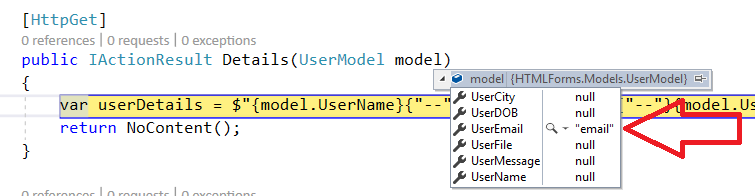
Here email field isn’t validated and submitted.
Formtarget
formtarget refers to the target where in the response of the action will be displayed.
<input type="submit" value="Submit to Details Method" formtarget="_blank" formmethod="get" formaction="/Home/Details" />
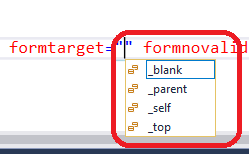
It has 4 different values.
Here we have set formtarget as _blank and hence the response is displayed in a new window.
Height and Width
As the name suggests, these attributes are used to set the height and width of the input type=”image” element.
Always specify both the height and width attributes along with the appropriate values for image elements. If height and width are set, the space required for the image is preserved when the page is loaded. but, without the height and the width attributes, the browser may not know the actual size of the image, and cannot reserve the appropriate space for it into the DOM. The effect will be that the page layout will be changed while loading the images.
<input type="image" src="~/images/download.jpg" width="100" height="100" />

List
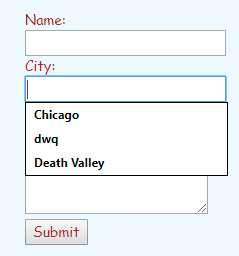
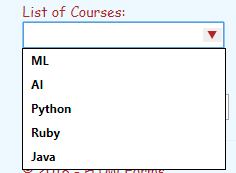
list attribute identifies a set of pre-defined records/options to be prompted to the user.
 <div class="row"> List of Courses: </div>
 <div class="row"> <input list="courses"/>
 <datalist id="courses">
 <option>ML</option>
 <option>AI</option>
 <option>Python</option>
 <option>Ruby</option>
 <option>Java</option>
 </datalist>
 </div>
Min and Max
Self-explanatory, defines the upper and lower limit for the input elements. Can be used with input types - number, range, date, datetime-local, month, time, and week.
<input type="number" name="userNumber" min="1" max="10">

The numeric picker won’t go beyond the limits of 1 and 10.
Multiple
This attribute helps us to select multiple files or emails.
<input type="file" name="userFile" multiple/>

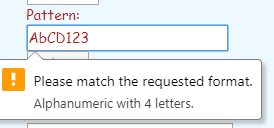
Pattern
Used to validate an input against a regular expression (pattern). Works with input types - text, search, url, tel, email, and password.
<input type="text" name="userPattern" pattern="[A-Z0-9]{4}" title="Alphanumeric with 4 letters." />
Placeholder
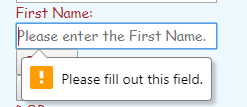
It prompts the hint of the value to be entered in the input field, very user friendly. Works with input types - text, search, url, tel, email, and password.
<input type="text" name="firstName" placeholder="Please enter the First Name." />

Required
As the name suggests, this attribute sets the mandatory requirement of an input field. Works with input types - text, search, url, tel, email, password, date pickers, number, checkbox, radio, and file.
Keep in mind the required field validation behavior may be different for certain browser compatibility and it may possible that some browsers do not support such validation.
<input type="text" name="firstName" placeholder="Please enter the First Name." required/>
Step
As the name suggests, this attribute sets the interval of an input element.
<input type="number" step="2" />
The numeric picker will set the interval as 2, permissible values will be …-4,-2,0,2,4,6…. Having discussed various HTML5 attributes, let’s have a look at the HTML5 data attributes.
HTML5 DATA ATTRIBUTES
HTML5 has introduced data attributes; these are used to store trivial values for which there aren’t pre-defined attributes. For example, I have a span element that displays a text as ‘Employee name is John!!’, for further calculation, I need to store John’s employee id as well on the UI, In this case, I can use a data attribute and store the emp id.
<span data-employee-id="2367">Employee name is John!!!</span>
data attributes usually start with the prefix ‘data-’ Let’s try to retrieve this data attribute using jQuery.
 <!DOCTYPE html>
 <html>
 <head>
 <meta charset="utf-8" />
 <title>HTML5 Form Attributes</title>
 <link href="wwwroot/css/StyleSheet.css" rel="stylesheet" />
 </head>
 <body>
 <form method="post">
 <div class="container">
 <div class="row">
 <span data-employee-id="2367">Employee name is John!!!</span>
 </div>
 <div class="row">
 <input type="button" value="Get Employee Id" data-attr="btnClick" />
 </div>
 </div>
 </form>
 <script src="wwwroot/lib/jquery/dist/jquery.js"></script>
 <script>
 $('[data-attr="btnClick"]').on('click', function () {
 console.log($('span').data('employeeId'));
 });
 </script>
 </body>
 </html>
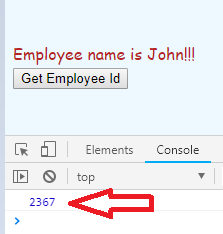
With the click of the button, we are retrieving the data attribute’s value.jQuery provides us with a .data() API, which helps us to retrieve the data attribute.JavaScript also provides us with the dataset API to retrieve/set the data attribute. Let’s see in detail.
 <!DOCTYPE html>
 <html>
 <head>
 <meta charset="utf-8" />
 <title>HTML5 Form Attributes</title>
 <link href="wwwroot/css/StyleSheet.css" rel="stylesheet" />
 </head>
 <body>
 <form method="post">
 <div class="container">
 <div class="row">
 <span data-employee-id="2367">Employee name is John!!!</span>
 </div>
 <div class="row">
 <input type="button" value="Get Employee Id" data-attr="btnClick" />
 </div>
 </div>
 </form>
 <script src="wwwroot/lib/jquery/dist/jquery.js"></script>
 <script>
 $('[data-attr="btnClick"]').on('click', function () {
 var employee = document.getElementsByTagName('span');
 console.log(employee[0].dataset.employeeId);
 });
 </script>
 </body>
 </html>
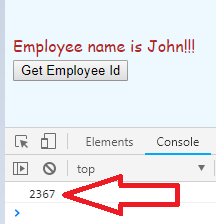
The dataset API works in the following manner, Get the element whose data attribute needs to be picked up.
var result=document.getElementById('spnEmployee');
 var employeeId=result.dataset.employeeId;
 console.log(employeeId);
Get the attribute values as a dataset.attributename. Let’s have a look at the HTML5 Validations.
HTML5 VALIDATIONS
HTML5 provides us with a set of inherent common validations.
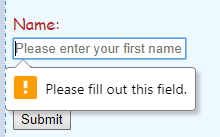
Required Validation
It throws the mandatory requirement.
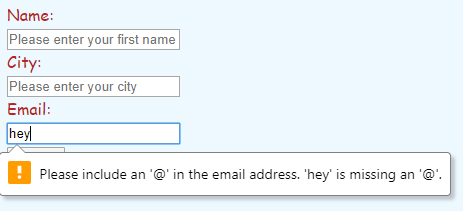
<input type="text" placeholder="Please enter your first name" required />
Email Validation
Input type=”email” throws the email validation if the value entered is incorrect.
<input type="email" name="userEmail" placeholder="Email"/>
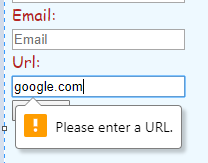
URL Validation
Input type=”URL” throws the URL validation if the value entered is incorrect.
<input type="url" name="userUrl" placeholder="Url" />
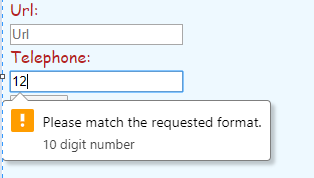
Phone Number Validation
Input type=”tel” along with pattern throws the telephone number validation if the value entered is incorrect and doesn’t match the pattern.
<input type="tel" name="userPhone" pattern="d{10}" title="10 digit number" placeholder="Telephone Number" />
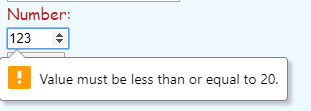
Number Validation with Min and Max
<input type="number" name="userNumber" min="10" max="20"/>
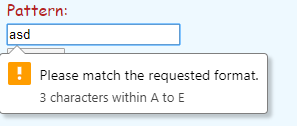
Pattern Validation
pattern attribute will match against the provided pattern and alert us if the value entered is incorrect.
<input type="text" name="userText" pattern="[A-Ea-e]{3}" title="3 characters within A to E"/>
The above are the common sets of validation helpers provided by HTML5, these don’t require any custom JavaScript code to be written. However, we can use JavaScript code to display custom error messages and to perform custom validations as well. Complete validation for an application also includes server-side validations as well.
SUMMARY
In this article we have looked at HTML form deeply, its various attributes, various input type attributes, custom data attributes, and validations through HTML5. In the articles to come, we shall learn HTML5 APIs, graphics, and much more.
Take our free skill tests to evaluate your skill!

In less than 5 minutes, with our skill test, you can identify your knowledge gaps and strengths.
