
React Form Validations

ReactJS Course
React Form Validation: An Overview
Form validation is always a crucial task for any platform like for web applications and mobile applications. In this React Tutorial, we are going to learn about basic Form Validation using Custom Validation Strategies. To learn more interesting concepts of React, you can try our insightful step by step training course React JS Certification.
What is Form Validation?
The motive behind form validations is to get the expected data from the user based on the product requirement, and before uploading the user data into the server, it is necessary to check the format either it is valid or not.Form validation will be normally categorized into two main categories.
Client-side validation
Server-side validation
In client-side validation, the data will be validated before sending it to the server, where server-side works opposite of client-side in which data is sent to server-side as request and after validating data, the server sends acknowledgment as a response.
Read More - React JS Roadmap For Beginners
Required Validation
Sometimes we have the form in which all fields should be required to be filled by the end-user; in this case, we can implement the required validation to make the end-user enter all the values of form controls before submitting the form. Many browsers support required filed validators, but it may also be possible that it won’t work on some browsers and can work on the specific browser, so for that, we cannot use an inbuilt validator because it is browser-specific required validators.
Example
If we use “required” along with input form control so it works as expected like this. Create a new file called Demo.html and paste the following code.
Demo.html <!DOCTYPE html>
<html>
<body>
<form name="myForm" method="post">
First Name :
<input required type="text" name="firstname">
<input type="submit" value="Submit">
</form>
</body>
</html>
Now run the above file in the browser, I’m using the Google Chrome browser and the output may look like this.
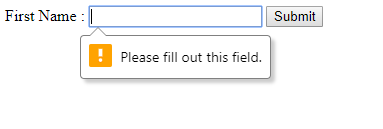
As can see in a demo.html file, I have not implemented any custom validation logic which handles required field validation, thus it's working as expected because browser dopes support such validations by nature, it's working because JavaScript supports validation like this, and keep in mind that not all browser supports required validator, and again you need to check the browser feasibility before using it.
Read More - React Interview Questions For Freshers
Create React App
To get started with form validation using React application, our first required step is to create a new react app. Execute the below command to install create-react-app which is a tool that provides us with a ready and simple project with the setup to get us started easily with react.
Npm install create-react-appWhen we did the installation part, now it’s time to create a new react app using the below npm command.
Create-react-app react-forms-validationsImplement Required Field Validation Using React
In this article, we are going to implement simple and custom validations with different types of the form element, to get started we need to create a new folder named Forms inside the src directory. And inside the Forms directory, create a new file named SimpleForm.js and paste the following source code.
/Src/Forms/SimpleForm.js import React, { Component } from 'react';
class SimpleForm extends Component {
constructor() {
super();
this.state = {
formFields: {
firstName: '',
lastName: '',
email: '',
password: ''
},
errors: {}
}
this.handleChange = this.handleChange.bind(this);
this.handleSubmit = this.handleSubmit.bind(this);
};
// When any field value changed
handleChange(event) {
let formFields = this.state.formFields;
formFields[event.target.name] = event.target.value;
this.setState({
formFields
});
}
// To validate all form fields
validate() {
let formFields = this.state.formFields;
let errors = {};
let IsValid = true;
if (!formFields["firstName"]) {
IsValid = false;
errors["firstName"] = "Enter Your First Name";
}
if (!formFields["lastName"]) {
IsValid = false;
errors["lastName"] = "Enter Your Last Name";
}
if (!formFields["email"]) {
IsValid = false;
errors["email"] = "Enter Your Email";
}
if (!formFields["password"]) {
IsValid = false;
errors["password"] = "Enter The Password";
}
this.setState({
errors: errors
});
return IsValid;
}
// When user submits the form after validation
handleSubmit(event) {
event.preventDefault();
if (this.validate()) {
let formFields = {};
formFields["firstName"] = "";
formFields["lastName"] = "";
formFields["email"] = "";
formFields["password"] = "";
this.setState({ formFields: formFields });
}
}
render() {
return (
<div className="container" style={{ width: '315px' }}>
<h3>Employee Registration With Required Validation</h3>
<form onSubmit={this.handleSubmit} >
<div className="form-group">
<label>First Name</label>
<input className="form-control"
type="text"
name="firstName"
value={this.state.formFields.firstName}
onChange={this.handleChange} />
{this.state.errors.firstName &&
<div className="alert alert-danger">
{this.state.errors.firstName}
</div>
}
</div>
<div className="form-group">
<label>Last Name</label>
<input className="form-control"
type="text"
name="lastName"
value={this.state.formFields.lastName}
onChange={this.handleChange} />
{this.state.errors.lastName &&
<div className="alert alert-danger">
{this.state.errors.lastName}
</div>
}
</div>
<div className="form-group">
<label>Email</label>
<input className="form-control"
type="text"
name="email"
value={this.state.formFields.email}
onChange={this.handleChange} />
{this.state.errors.email &&
<div className="alert alert-danger">
{this.state.errors.email}
</div>
}
</div>
<div className="form-group">
<label>Password</label>
<input className="form-control"
type="text"
name="password"
value={this.state.formFields.password}
onChange={this.handleChange} />
{this.state.errors.password &&
<div className="alert alert-danger">
{this.state.errors.password}
</div>
}
</div>
<input type="submit" className="btn btn-primary" value="Submit" />
</form>
</div >
);
}
}
export default SimpleForm;
Let me explain all the things which I have implemented in this file.
Declared states with form fields to store the form element’s value
Created two different methods which are used to handle the form element values and another one is used to validate the user inputs before submitting the form.
An important method is handleSubmit, which is used to submit the form data after validating each of the form fields.
Inside render methods, I have created a form with different form fields with the error part, where we are going to display a different error message.
This is a kind of re-usable component, In order to execute this, we need to add it into the main component App.js which is the main component for our react application.
App.jsimport React, { Component } from 'react';
import './App.css';
import SimpleForm from './Forms/SimpleForm';
class App extends Component {
render() {
return (
<div className="App demoForm">
<h1>React Form Validations</h1><hr style={{ borderTop: '3px solid purple' }} />
<SimpleForm />
</div>
);
}
}
export default App;
In this file, I have imported our SimpleForm.js file, where we have created our form, and let’s see how it works.
Output
Run react application using npm command npm start and the output look like this when we directly submit our code without providing any values.
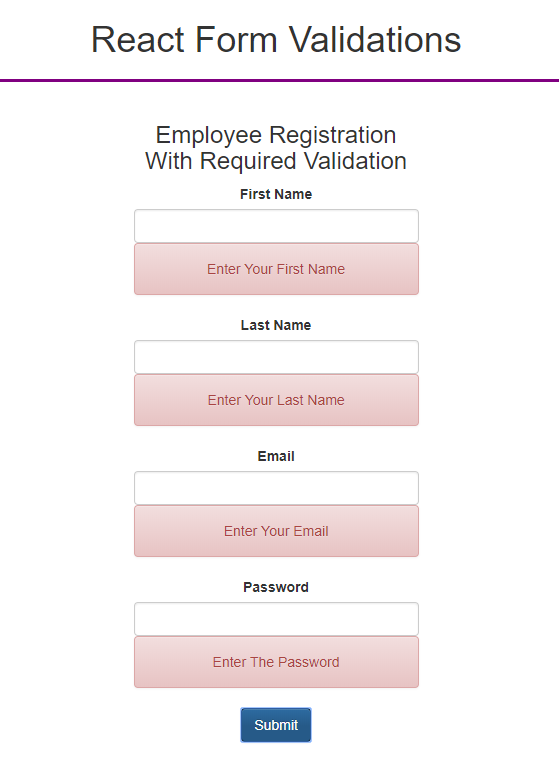
As you can see in the above image that when we directly click on the submit button without providing form values then it displays all error messages like this. Now we are going to provide all the form fields values and see the output.
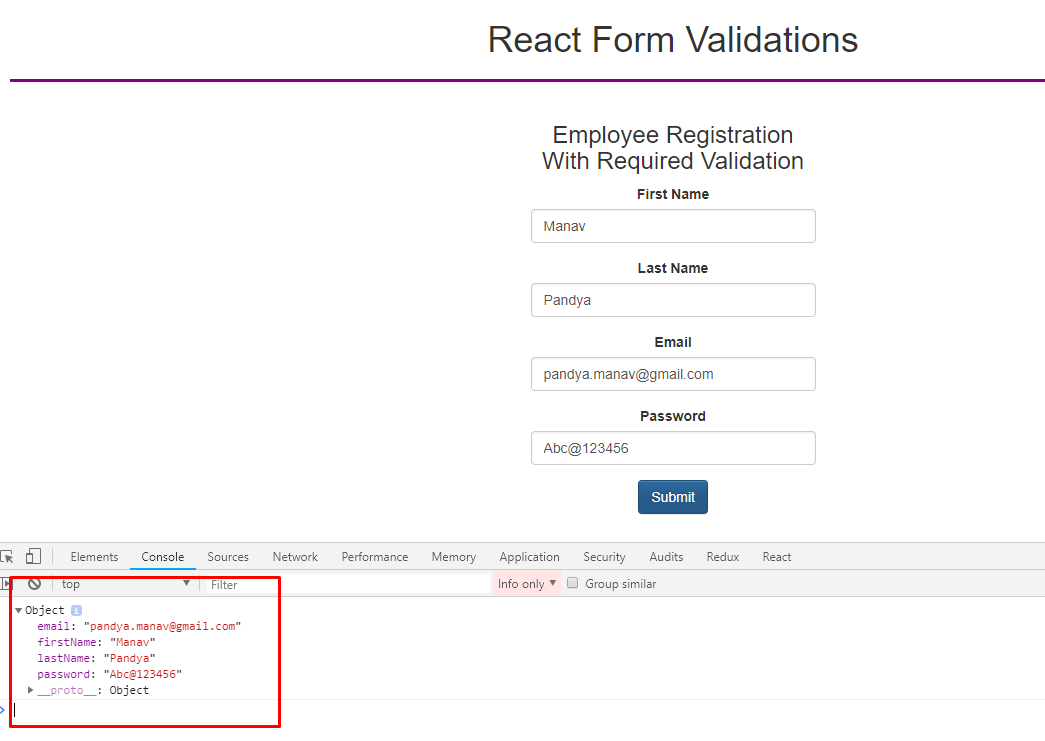
When we submit the form with all required fields, then we are ready to send the forms data to the server, this is how you can implement using conditions.
This is one of the ways to implement the validation but still, it is a custom logic or way that is being used, one can apply other ways to achieve the same feature.
Implement Different custom validations
Previously, we have seen the simply required field validation using custom code, now let’s add more flavors but with the same form fields using different validation criteria. Create a new file inside the Forms folder named RegistrationForm.js and paste the following source code.
/Src/Forms/RegistrationForm.js import React, { Component } from 'react';
class RegistrationForm extends Component {
constructor() {
super();
this.state = {
formFields: {
firstName: '',
lastName: '',
email: '',
password: ''
},
errors: {}
}
// To bind different events
this.handleChange = this.handleChange.bind(this);
this.handleSubmit = this.handleSubmit.bind(this);
};
// When any field value changed
handleChange(event) {
let formFields = this.state.formFields;
formFields[event.target.name] = event.target.value;
this.setState({
formFields
});
}
// To validate all form fields
validate() {
let formFields = this.state.formFields;
let errors = {};
let IsValid = true;
if (!formFields["firstName"]) {
IsValid = false;
errors["firstName"] = "Enter Your First Name";
}
// To allow only alphabets value
if (typeof formFields["firstName"] !== "undefined") {
if (!formFields["firstName"].match(/^[a-zA-Z ]*$/)) {
IsValid = false;
errors["firstName"] = "Only Alphabet Characters Are Allowed";
}
}
if (!formFields["lastName"]) {
IsValid = false;
errors["lastName"] = "Enter Your Last Name";
}
// To allow only alphabets value
if (typeof formFields["lastName"] !== "undefined") {
if (!formFields["lastName"].match(/^[a-zA-Z ]*$/)) {
IsValid = false;
errors["lastName"] = "Only Alphabet Characters Are Allowed";
}
}
if (!formFields["email"]) {
IsValid = false;
errors["email"] = "Enter Your Email";
}
// To allow valid email format
if (typeof formFields["email"] !== "undefined") {
var pattern = new RegExp(/^[a-z][a-zA-Z0-9_]*(\.[a-zA-Z][a-zA-Z0-9_]*)?@[a-z][a-zA-Z-0-9]*\.[a-z]+(\.[a-z]+)?$/);
if (!pattern.test(formFields["email"])) {
IsValid = false;
errors["email"] = "Invalid Email";
}
}
if (!formFields["password"]) {
IsValid = false;
errors["password"] = "Enter The Password";
}
// Should have valid password format
if (typeof formFields["password"] !== "undefined") {
if (!formFields["password"].match("^(?=.*[a-z])(?=.*[A-Z])(?=.*[0-9])(?=.*[!@#\$%\^&\*])(?=.{8,})")) {
IsValid = false;
errors["password"] = "Enter Valid Password";
}
}
this.setState({
errors: errors
});
return IsValid;
}
// When user submits the form after validation
handleSubmit(event) {
event.preventDefault();
if (this.validate()) {
let formFields = {};
formFields["firstName"] = "";
formFields["lastName"] = "";
formFields["email"] = "";
formFields["password"] = "";
this.setState({ formFields: formFields });
}
}
render() {
return (
<div className="container" style={{ width: '315px' }}>
<h3>Employee Registration With Different Validations</h3>
<form onSubmit={this.handleSubmit} >
<div className="form-group">
<label>First Name</label>
<input className="form-control"
type="text"
name="firstName"
value={this.state.formFields.firstName}
onChange={this.handleChange} />
{this.state.errors.firstName &&
<div className="alert alert-danger">
{this.state.errors.firstName}
</div>
}
</div>
<div className="form-group">
<label>Last Name</label>
<input className="form-control"
type="text"
name="lastName"
value={this.state.formFields.lastName}
onChange={this.handleChange} />
{this.state.errors.lastName &&
<div className="alert alert-danger">
{this.state.errors.lastName}
</div>
}
</div>
<div className="form-group">
<label>Email</label>
<input className="form-control"
type="text"
name="email"
value={this.state.formFields.email}
onChange={this.handleChange} />
{this.state.errors.email &&
<div className="alert alert-danger">
{this.state.errors.email}
</div>
}
</div>
<div className="form-group">
<label>Password</label>
<input className="form-control"
type="text"
name="password"
value={this.state.formFields.password}
onChange={this.handleChange} />
{this.state.errors.password &&
<div className="alert alert-danger">
{this.state.errors.password}
</div>
}
</div>
<input type="submit" className="btn btn-primary" value="Submit" />
</form>
</div >
);
}
}
export default RegistrationForm;
In this form, we are going to validate different elements with different conditions.
All fields are required by default
The first name can not contain characters other than alphabets
The last name cannot contain characters other than alphabets
The email address should be a valid format like :
The first character should be lower case
Must contains @ symbol
Must have a dot(.) after the @ symbol
The password should match some conditions like :
At least 1 Uppercase latter
At least 1 Lowercase latter
At least one special character like @#$&
At least 8 characters long password
So when the user fulfills all the above primary requirements then the form can be submitted otherwise it won’t possible to process further without solving all remaining conditions. To run the above example, we need to import it into the App.js component like this.
App.jsimport React, { Component } from 'react';
import './App.css';
import RegistrationForm from './Forms/RegistrationForm';
class App extends Component {
render() {
return (
<div className="App demoForm">
<h1>React Form Validations</h1><hr style={{ borderTop: '3px solid purple' }} />
<RegistrationForm />
</div>
);
}
}
export default App;
Output
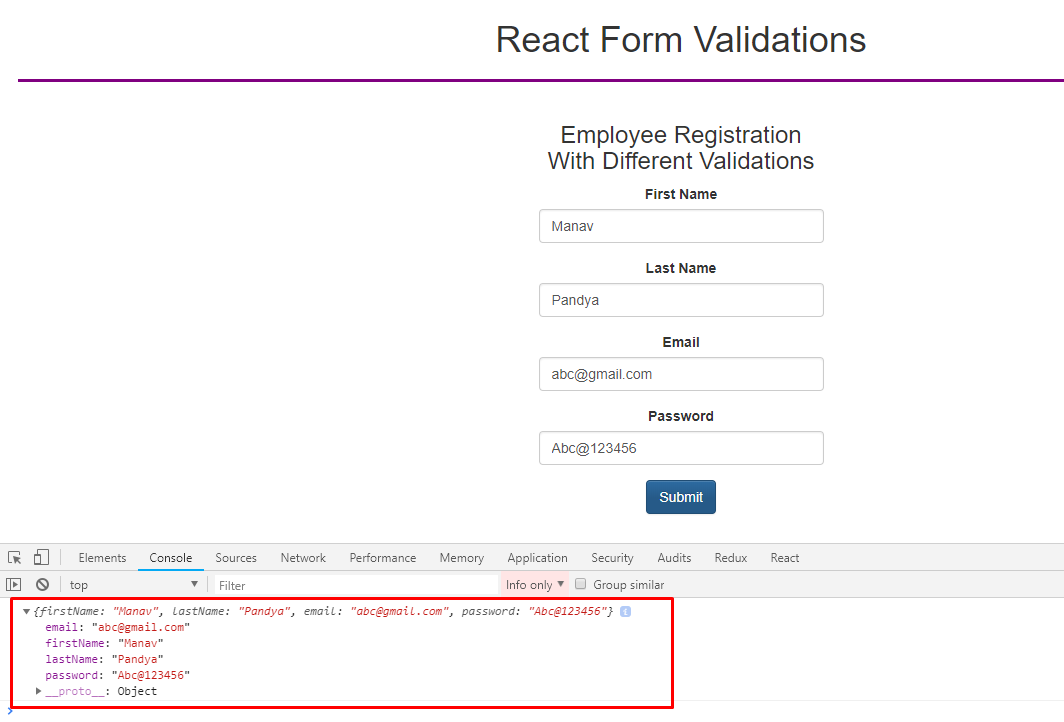
To demonstrate that all validations are working properly, I am going to provide invalid values to form fields like this.
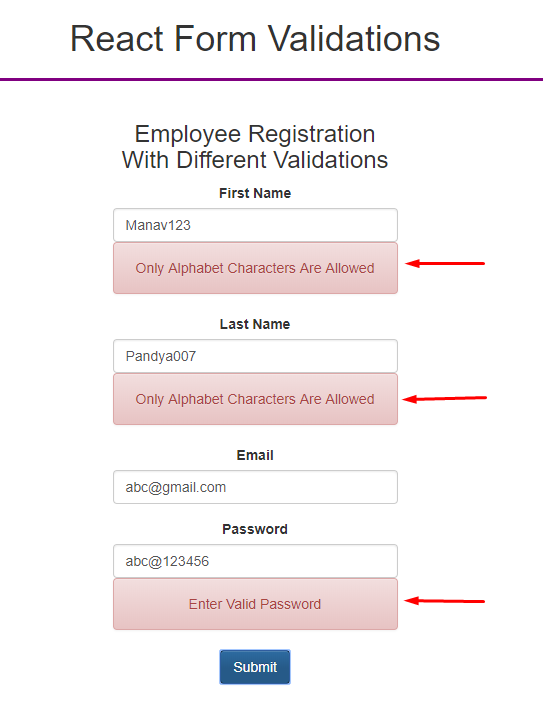
In this form, I have provided invalid values against the policy, other than the email address where I have provided the valid format. When I submit after providing all valid data then I will be able to submit the form successfully like this.
This is how we have implemented form validations with different conditions with required validation, but still, you can expand it as per your different requirements.
Summary
Form handling is an essential part of almost all web applications or mobile-based applications. The forms take the important information from the end-user for different purposes such as credit/debit card, UPI, government-approved citizen documents, location addresses, and so on, so for that, we must create robust and clean form components that can handle inputs and their validation in an effective way which enhances user interactivity and usability.
In this tutorial, we have learned how to implement simple and custom validations using different conditions, thus we can make use of other third-party libraries to achieve the same result, if you want to try custom validation then download the source code attached to this article and implement different validation like file validation, length validation, strangeness validation, etc, Thanks for reading.
FAQs
Q1. How do you validate a form in React?
Q2. What is controlled component in React form validation?
Q3. How do I display error messages in React form validation?
Take our free react skill challenge to evaluate your skill

In less than 5 minutes, with our skill challenge, you can identify your knowledge gaps and strengths in a given skill.