
Routing in React using React-Router: Part1

ReactJS Course
Routing in React Using React-Router: An Overview
React Router works like a GPS in the world of Web Development. Routing is a kind of mechanism by which users can navigate through different URLs available in a whole web application. But at the same time when we are developing large-scale applications than it is difficult to manage all the pages so for that, we can make use of routing to manage everything with ease. In this React Tutorial, we will try to learn about What is Routing and How to use React Routing with Examples. If you're a newbie to the React Development world start your React Journey with us by enrolling in our React JS Certification Training
What is Routing
Routing is one of the important concepts in terms of features while developing Single Page Application (SPA). Using routing we can load the view partially without loading the webpage again from the server which makes our web app very much faster in terms of performance.
In React, there is a third-party package called react-routerwhich is used to implement routing in reactjs when we create a new application using create-react-app.The react-router package is essential of React Router and it provides all the core functionalities for both react-router-domand react-router-native
To install and create a new react app, we need to install it in our React application by using the below-given commands.
npm install create-react-app
create-react-app react-routing-with-bootstrap4
npm start
So when you execute the above command using a command prompt or power shell, now we can create a new reactjs app using the following command.
When we run the above command, you can see that our project will be created and run the application by using the following npm command.
A new window into our default system browser will automatically open and a new window and you can see that our application is up and running somewhat as a given snapshot.

Read More - React Interview Questions For Freshers
React-router
Now we have a new project created with the name "react-routing-with-bootstrap4", and when you open the package.json file, it will look like this.
{
 "name": "react-routing-with-bootstrap4",
 "version": "0.1.0",
 "private": true,
 "dependencies": {
 "react": "^16.5.1",
 "react-dom": "^16.5.1",
 "react-scripts": "1.1.5"
 },
 "scripts": {
 "start": "react-scripts start",
 "build": "react-scripts build",
 "test": "react-scripts test --env=jsdom",
 "eject": "react-scripts eject"
 }
}
So as you can see in the above code snippet, we don't have the package installed called “react-router”, which is used to implement routing in react applications. When we create a new react app, it will not be installed automatically into our project but if you want to use this package or are unable to find this package in your package.json then you can use the below npm command.
npm install react-router
npm install react-router-dom
npm install react-bootstrap
There is a package named react-router-dom which indirectly depends on react-router, and in this article, we are going to use this package, in order to use it, execute the below npm command.
To design our page, we are going to use an additional third-party package of Bootstrap which is called react-bootstrapwhich provides different bootstrap-based components for the React application, just install the package using the below command.
So far we have covered the introduction part and also the installation part, now it’s time to implement a simple routine procedure.
Read More - React JS Roadmap 2024
Steps to configure routing
Step 1
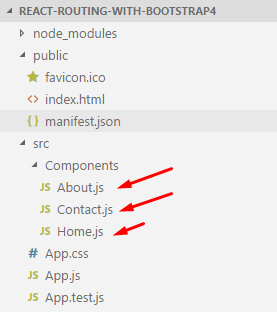
In this simple yet effective example, we are going to work with the three different pages as Dashboard, About Us, and Contact Us. And for that, let's create a new folder inside the /src directory in React application and create three different files as given below.
Home.js
About.js
Contact.js
And in these files, we are just showing static messages, and going to export these components, for that open the respective file and paste the following code snippets.
Home.js import React from 'react';
const Home = () => (
<div>
<h1>This Is From Dashboard Page</h1>
</div>
)
export default Home; import React from 'react';
const About = () => (
<div>
<h1>This Is From About Us Page</h1>
</div>
)
export default About; import React from 'react';
const Contact = () => (
<div>
<h1>This Is From Contact Us Page</h1>
</div>
)
export default Contact;So these three files are acts as the different independent pages just to see the routing in action by going from one page to another, the very next step is to design our user interface, and for design purposes, we have used react-bootstrap components such as Navbar, Nav, MenuItem as explained into the second step.
Step 2
After creating all those files, it’s time to implement the user interface part in which we are going to implement navigations using react-bootstrap design components. Open App.js and paste the following code snippet.
 import React, { Component } from 'react';
import './App.css';

// ract-bootstrap components
import { Navbar, Nav, NavItem, MenuItem, NavDropdown } from 'react-bootstrap';

// Our speperately created components
import Home from './Components/Home';
import About from './Components/About';
import Contact from './Components/Contact';

// To use routing functionalities
import { Link, Switch, Route } from 'react-router-dom';
class App extends Component {
 render() {
 return (
 <div className="App">
 <Navbar>
 <Navbar.Header>
 <Navbar.Brand>
 <a>Routing With React-Router</a>
 </Navbar.Brand>
 </Navbar.Header>
 <Nav>
 <NavItem href="javascript:void(0)">
 <Link to="/">Dashboard</Link>
 </NavItem>
 <NavItem href="javascript:void(0)">
 <Link to="/about">About Us</Link>
 </NavItem>
 <NavItem href="javascript:void(0)">
 <Link to="/contact">Contact Us</Link>
 </NavItem>
 </Nav>
 </Navbar>
 <Switch>
 <Route exact path='/' component={Home} />
 <Route path='/about' component={About} />
 <Route path='/contact' component={Contact} />
 </Switch>
 </div>
 );
 }
}

export default App;
Here in this code snippet, we have used different markups to implement routing, let’s see about each of them in detail as given below.
Navbar: A bootstrap component that is used to implement a navigation bar into our application.
Navbar.header: This containsthe header part of Navbar.
Nav: It contains the list of navigation links.
Navitem: Holds separate navigation links.
Link: This isa router API that allows accessing navigation throughout the application.
Switch: It renders the child component based on the location that matches exactly the same as provided.
Route: The route is one of the most important parts/components in react-router and it is used to render the user interface when any location matches.Note
We have used react-bootstrap in our react application, for that we need to include two different style sheets, please find the below code snippet.
Public/Index.html <!DOCTYPE html>
<html lang="en">
<head>
<meta charset="utf-8">
<meta name="viewport" content="width=device-width, initial-scale=1, shrink-to-fit=no">
<meta name="theme-color" content="#000000">
<link rel="manifest" href="%PUBLIC_URL%/manifest.json">
<link rel="shortcut icon" href="%PUBLIC_URL%/favicon.ico">
<!-- Bootstrap CDN Files -->
<link rel="stylesheet" href="https://maxcdn.bootstrapcdn.com/bootstrap/3.3.7/css/bootstrap.min.css" integrity="sha384-BVYiiSIFeK1dGmJRAkycuHAHRg32OmUcww7on3RYdg4Va+PmSTsz/K68vbdEjh4u"
crossorigin="anonymous">
<link rel="stylesheet" href="https://maxcdn.bootstrapcdn.com/bootstrap/3.3.7/css/bootstrap-theme.min.css" integrity="sha384-rHyoN1iRsVXV4nD0JutlnGaslCJuC7uwjduW9SVrLvRYooPp2bWYgmgJQIXwl/Sp"
crossorigin="anonymous">
<!-- End -->
<title>React App</title>
</head>
<body>
<noscript>
You need to enable JavaScript to run this app.
</noscript>
<div id="root"></div>
</body>
</html>Primarily I have included two different bootstrap CDN and the version is 3.3.7, still, we can use bootstrap 4 as well, for that just we need to search for the latest CDN files for that and include them into our main index.html file. We are done with the user interface part so far, our next step is very much important so let’s have a look.
Step 3
We are done with the UI part, but it won’t work as expected because we have not configured our app component with the router configuration, so for that, we need to use a router API called <BrowserRouter> as explained below.
What is BrowserRouter
When we are working with the router in react, in the background it manages the history API of HTML5, I mean when we routing through the different pages, at that time we should maintain browsing history so that the components will be available to route back again whenever requested from the components. Basically, it manages three different events which are given below.
pushState
popState
replaceState
These events are used to manage the different routing activity using state and update accordingly, and every time it manages its own history object for each of them.
To configure BrowserRouter, we need to import the API from the package react-router-dom like this.
import { BrowserRouter } from 'react-router-dom';And the complete code will look like this for the file index.js.
 import React from 'react';
import ReactDOM from 'react-dom';
import './index.css';
import App from './App';
import registerServiceWorker from './registerServiceWorker';
import { BrowserRouter } from 'react-router-dom';

ReactDOM.render(
 <BrowserRouter>
 <App />
 </BrowserRouter>, document.getElementById('root'));
registerServiceWorker();
Now we are done with most of the primary settings required for the routing, and in order to test how routing works so for that, we need to run the application using the below npm command into the command prompt.
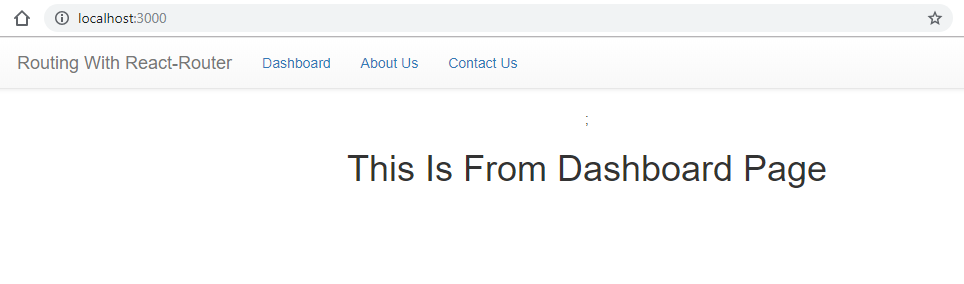
Npm startHow it works..
DashboardWhen we execute our application, at that time the first page will appear as Dashboard (Home) page, and you can see the output as given below.
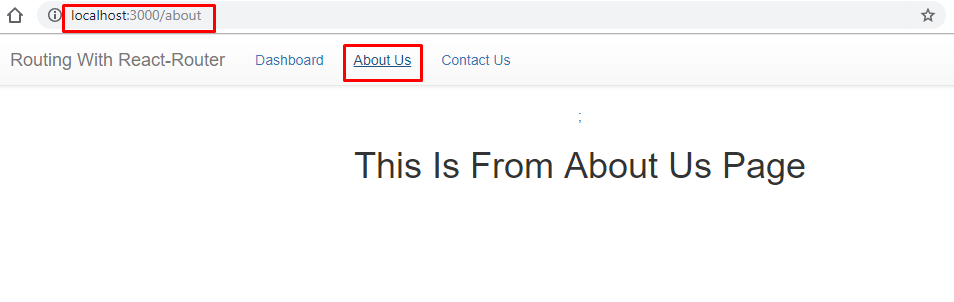
When we click on the About us link, the about us page from the respective routing configuration will be redirected.
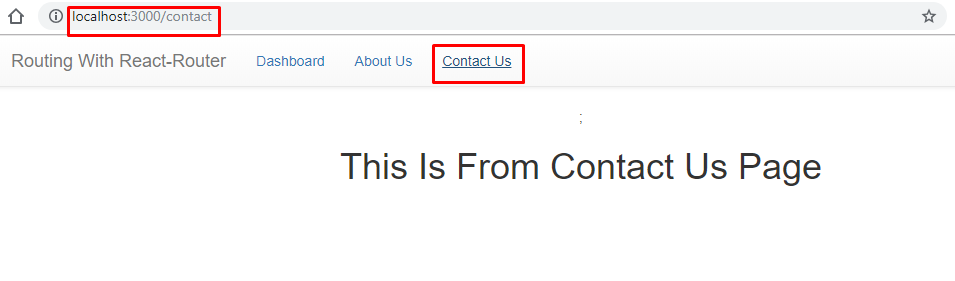
The third page is for contact us and you can see the output as given below.
That's a wrap, we have created a straightforward React application using the routing configuration to showcase how multiple components can be configured with the routing and redirect can be done, and for the exercise, you can enhance this example by creating nested routing, parameterized routing or the hash-based routing configuration.
Summary
In this part of the series for react with routing, we have covered a few things; let’s recap all of them quickly.
Introduction
Important packages to work with routing
Introduction to react-router
Steps to implement routing in React with the bootstrap components
This is the basic routing tutorial in which we have developed a page-level routing mechanism, in our next article, we will learn and expand this guide about nested child routing in a detailed manner along with the appropriate examples, meanwhile, download the source code and play around it and create something amazing stuff out of it.
Take our free react skill challenge to evaluate your skill

In less than 5 minutes, with our skill challenge, you can identify your knowledge gaps and strengths in a given skill.