Dependency Injection in ASP.NET Web API
Let’s think of a scenario where you are having the fever, you go to a medical shop and ask for medicine but then in return, the medical guy asked which or what type of medicine you need. Ooopz!! Now what? You land up visiting the doctor who understands your needs and writes down the medicine which would work for you. Amazing!! Isn’t it. You got your work done with just a call of service. And that’s what Dependency Injection is in software development.
Dependency Injection aka DI is a way in which one object (The Doctor) is capable to give the dependencies of another object (The patient) as per the need. I won’t be going in depth of explaining Dependency Injection in this article though.
Dependnecy Injection Containers
In the above scenario, different doctors have different ways of treating the illness or giving you the service as per need. Similarly, there are different kinds, popularly known as containers, of dependency injection. In other ways, different design patterns for the dependency injection containers. Below are few of them.
Castle Windsor : This is one of the mature and best Inversion of Control container for .NET and Silverlight applications
Unity : If you are looking for Lightweight extensible dependency injection container, Unity is one of the container you can select from. It comes with support for constructor, property, and method call injection
Autofac : One of the preferred IoC
DryIoc : Simple, fast and fully featured IoC container.
Ninject : Called as ninja of .NET dependency injectors
StructureMap : The original IoC/DI Container for .Net
Spring.Net
Open source application framework
LightInject : An ultra-lightweight IoC container
Simple Injector : An easy-to-use Dependency Injection (DI) library for .NET 4+, It can support Silverlight 4+, Windows Phone 8, Windows 8 including Universal apps and Mono.
Microsoft.Extensions.Dependency Injection : A default IoC container in-built in ASP.NET Core applications.
Scrutor : An extensions for Microsoft.Extensions.Dependency Injection which supports assembly scanning
VS MEF : Managed Extensibility Framework (MEF) implementation used by Visual Studio.
TinyIoC : Best for small scale projects as it’s easy to use and hassle free as well.
Let us understand the ninja of .Net dependency injection, The Ninject.
Introduction to Ninject in ASP.NET Web API
Ninject is a light-weighted, flexible and open source dependency injector for .Net applications. Due to its flexible nature, managing the application at code level becomes easier and reusable. Ninject is hosted in GitHub. For more details about its advantages and the differences between older-newer versions, you can visit https://github.com/ninject/Ninject
Configuring the Ninject in Web API2
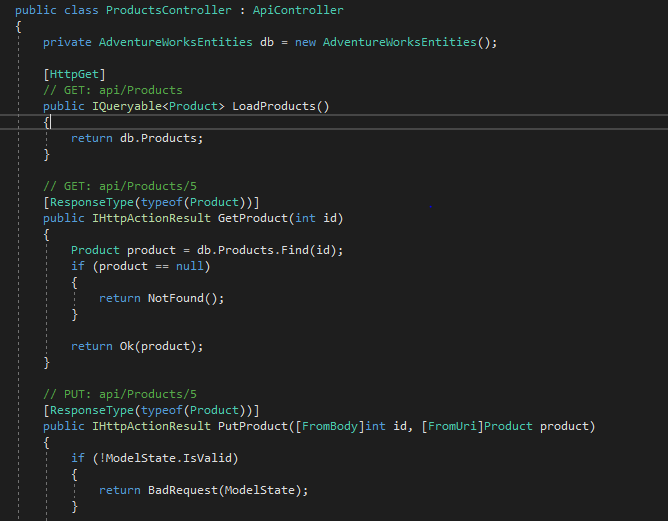
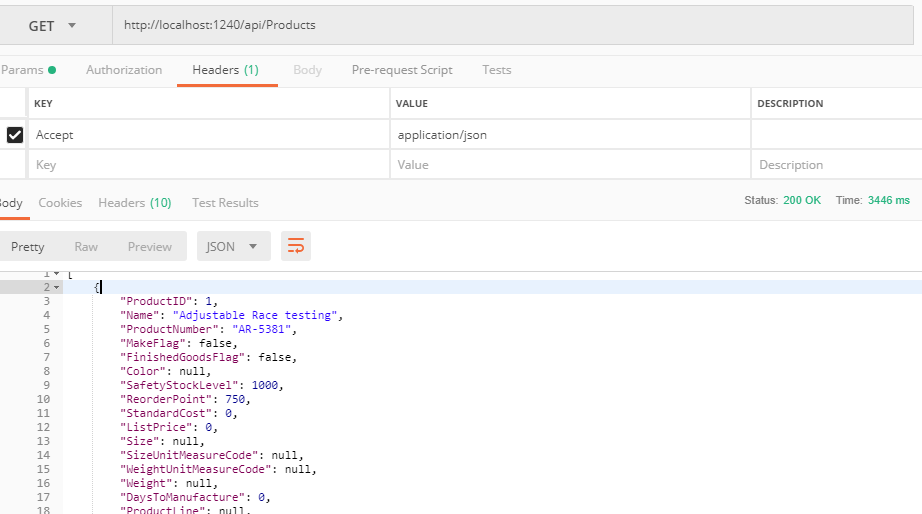
Let’s now see how we can introduce Ninject in our application. I will consider the same example, I created in the article Content Negotiation in ASP.NET WebAPI, I will be enabling the ProductController to use the Ninject Dependecy Injection to exchange the desired data and for testing will be using POSTMAN. If you are unaware of POSTMAN, I would suggest you to first go through Understanding Model Binding in ASP.NET Web API. Here I have explained and how to use POSTMAN. So now let’s get started with the Ninja, The NINJECT!! Current the ProductsController looks as below :
STEP 1
Create an Interface with in the model folder as follows
 public interface IProducts
 {
 IQueryable<Product> LoadProducts();
 }
Please Note, for time being I am only converting the first action method ‘LoadProducts’ to use Ninject. This method brings all the product data from server.
STEP 2
For the body of the method in the interface, I will make database call. To achieve that, first I created a Service Folder under the root project. In that folder, I created a service class ‘ProductService’ which inherits the interface ‘IProducts’. The class looks as follows
 public class ProductService : IProducts
 {
 private AdventureWorksEntities db = new AdventureWorksEntities();

 public IQueryable<Product> LoadProducts()
 {
 return db.Products;
 }
 }
STEP 3
Now let us change our ProductsController code to use the interface and the service class.
 private readonly IProducts productRepository;

 public ProductsController(IProducts product_Repository)
 {
 this.productRepository = product_Repository;
 }

 [HttpGet]
 // GET: api/Products
 public IQueryable<Product> LoadProducts()
 {
 //return db.Products;
 return productRepository.LoadProducts();
 }
STEP 4
Now finally the time comes, the time to include The Ninja of Dependency Injection, Ninject in the application. To incorporate Ninject with in the application, firstly we need to install two packages.
Ninject.Web.WebApi
Ninject.Web.WebApi.WebHost
Right click on project => select Manage NuGet packages =>Browse and install the required packages
Tools => NuGet Package Manager => Package Manager Console
2.1. If you have multiple projects, you need to select the correct project where you want to install the package.
2.2. PM => Install-Package Ninject.Web.WebApi
PM => Install-Package Ninject.Web.WebApi.WebHost
Both the packages are available in Nuget. You can install it either of the way mentioned below,
Note that when we install Ninject.Web.WebApi, two more packages get installed automatically
Ninject
Ninject.Web.Common
Whereas when you install Ninject.Web.Common.WebHost, it installs WebActivatorEx package and also add a new class called Ninject.Web.Common.cs with in App_Start directory.
STEP 5
Now the last step. To enable the use of ProductService class via IProduct interface, we first need to bind them. For this, go to the ‘RegisterServices’ method in ‘Ninject.Web.Common.cs’ file with in App_Start directory.
 private static void RegisterServices(IKernel kernel)
 {
 kernel.Bind<IProducts>().To<ProductService>();
 }
Here we are done with making changes in the code to configure Ninject Dependency Injector container. Let’s go ahead and test it using PostMan.
Similarly you can change the code structure for other action methods to use Ninject.
Summry
Dependency Injection being one of the way in which reusability and maintaining the application at code level becomes easy, Ninject serves as a strong open-source IoC for .Net application. Its easily available via NuGet Manager and also under implementing the same is easier.