
Token Based Authentication in ASP.NET Web API
Token-Based Authentication in ASP.NET Web API: An Overview
In a Web API Tutorial, token-based authentication involves a client application sending credentials to the server (usually a username and password) in exchange for a unique token. This token acts as proof of identity for subsequent requests, removing the need to provide sensitive credentials repeatedly, making it a valuable concept to learn in ASP.NET Core Training.
Why Do We Need Token-Based Authentication in ASP.NET Web API?
The ASP.NET Web API is an excellent framework provided by Microsoft for developing Web APIs, i.e., HTTP-based services on top of the .NET Framework. Once we have developed the services using Web API, they will be used by a wide range of customers, including
- Browsers
- Mobile applications
- Desktop applications
- IOTs, etc.
How Does The Token-Based Authentication work?
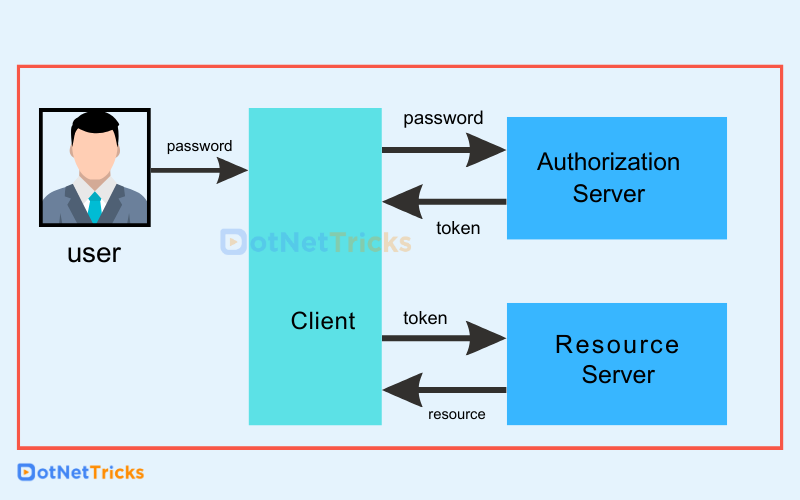
Token-Based Authentication operates as follows:
- The user inserts his credentials (i.e., username and password) into the client (here, the client refers to the browser or mobile device, for example).
- After that, the client sends these credentials (username and password) to the Authorization Server.
- After that, the Authorization Server validates the client credentials (username and password) and generates and returns an access token. This Access Token contains sufficient information to identify a user and the token expiry time.
- The Access Token is then included in the Authorization header of the HTTP request by the client application toaccess the restricted resources from the Resource Server until the token expires.
Implementation of Token-Based Authentication
Step 1
Open Visual Studio 2017 => create a new Web API project => Name the project, in my case, I named it Token_Auth_Web_API, and set the Authentication to an Individual User Account as shown in the below figure.

Step 2
Go to Startup.cs file under the App_Start folder in the solution
// Configure the application for OAuth based flow
 PublicClientId = "self";
 OAuthOptions = new OAuthAuthorizationServerOptions
 {
 TokenEndpointPath = new PathString("/Token"),
 Provider = new ApplicationOAuthProvider(PublicClientId),
 AuthorizeEndpointPath = new PathString("/api/Account/ExternalLogin"),
 AccessTokenExpireTimeSpan = TimeSpan.FromDays(14),
 // In production mode set AllowInsecureHttp = false
 AllowInsecureHttp = true
 };
Install the Owin using the below command in the package manager console
Install-Package Owin -Version 1.0.0
Owin: open web interface for .NET is a middleware that defines the interface between the web server and application.
TokenEndPointPath: This is a kind of request path client applications that communicate with the server directly as part of the OAuth protocol. It must begin with a slash “/”
Provider: The object provided by the application to process the event raised by the authorization server middleware.
AuthorizeEndpointPath: The request path where the client application will redirect the client/user to obtain a user account to issue a token
AccessTokenExpireTimeSpan: Defines the validity of the token
AllowInsecureHttp: It will allow a normal http request to authorize, if it is set to false, it will process only HTTP requests.
Step 3
To register the user, we are going to use the api/Account/Register Endpoint from a client which is available in AccountController of our WEB API project, as shown below.
// POST api/Account/Register
 [AllowAnonymous]
 public async Task<IHttpActionResult> Register(RegisterBindingModel model)
 {
 if (!ModelState.IsValid)
 {
 return BadRequest(ModelState);
 }

 var user = new ApplicationUser() { UserName = model.Email, Email = model.Email };

 IdentityResult result = await UserManager.CreateAsync(user, model.Password);

 if (!result.Succeeded)
 {
 return GetErrorResult(result);
 }

 return Ok();
 }
Go to the Index View of the home controller, as shown below figure, and add the code
Home=> Index.cshtml
 <script src="http://ajax.googleapis.com/ajax/libs/jquery/1.10.2/jquery.min.js"></script>
 <h4> Registration Form</h4>
 <div id="loginDiv" style="width:50%">
 <div style="width:50%">
 <div class="form-group">
 <label for="txtEmail">First Name </label>
 <input type='email' name="email" id="txtEmail" class="form-control">
 </div>
 <div class="form-group">
 <label>Password</label>
 <input type="password" id="textPwd" class="form-control">
 </div>
 <div class="form-group">
 <label>Confrim Password</label>
 <input type="password" id="txtConfirmPwd" class="form-control">
 </div>
 </div>
 <button id="register" class="btn btn-default">Submit</button>
 </div>
 <h4>Login </h4>

 <div id="loginDiv" style="width:50%">
 <div class="form-group">
 <label for="txtEmail">First Name </label>
 <input type='email' name="email" id="loginEmail" class="form-control">
 </div>
 <div class="form-group">
 <label>Password</label>
 <input type="password" id="loginPwd" class="form-control">
 </div>
 <button id="btnLogin" class="btn btn-default">Submit</button>
 </div>
 <div>
 <label id="msg"></label>
 </div>
 <script>
 $(document).ready(function () {
 $("#register").on('click', function () {
 var data = { Email: $("#txtEmail").val().trim(), Password: $("#textPwd").val().trim(), ConfirmPassword: $("#txtConfirmPwd").val().trim() };
 $.ajax({
 url: "http://localhost:49501/api/Account/Register",
 type: 'POST',
 data: data,
 success: function (resp) {
 window.location.href = '/Home/Index';
 }
 })
 });

 $("#btnLogin").on('click', function () {
 //var data = { Email: $("#loginEmail").val().trim(), Password: $("#textPwd").val().trim(), ConfirmPassword: $("#loginPwd").val().trim() };
 $.ajax(
 {
 url: "/TOKEN",
 type: "POST",
 data: $.param({ grant_type: 'password', username: $("#loginEmail").val(), password: $("#loginPwd").val() }),
 headers: { 'Content-Type': 'application/x-www-form-urlencoded' },
 success: function (resp) {
 sessionStorage.setItem('userName', resp.userName);
 sessionStorage.setItem('accessToken', resp.access_token);
 var authHeaders = {};
 authHeaders.Authorization = 'Bearer ' + resp.access_token;
 $.ajax({
 url: "http://localhost:49501/api/values",
 type: "GET",
 headers: authHeaders,
 success: function (response) {
 $("#loginEmail").val("");
 $("#loginPwd").val("");
 $("#msg").text(response);
 }
 });

 },
 error: function () {
 $("#msg").text("Authentication failed");
 }
 })
 });


 })
 </script>
From the above HTML code, it is obvious we have two form
Registration Form
Login Form
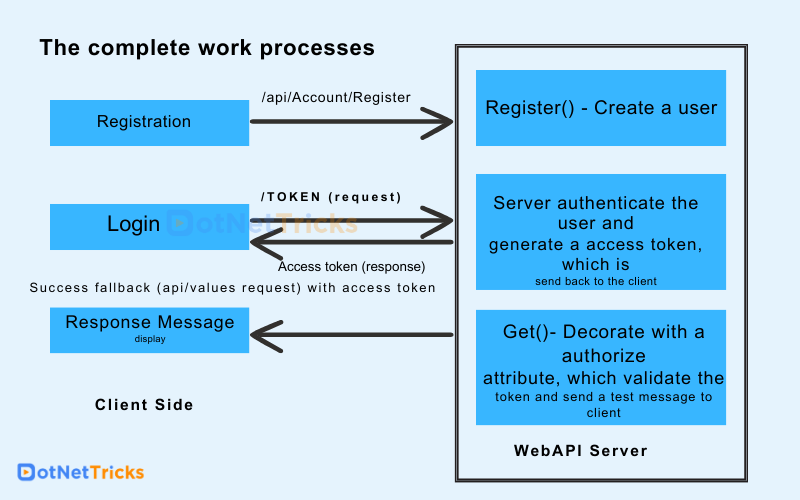
Registration Form: The registration formused to register the user using the /api/Account/Register API Service which doesn’t require any authentication
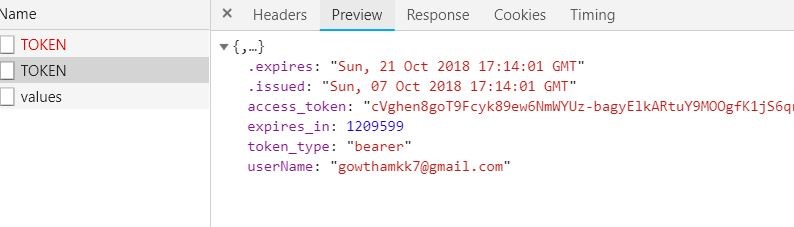
Login Form: In this user requests to give their credential, once they submit the form /TOKEN post service is fired, once the service validates the user it will generate an access token and send it as a response to a server with a username as shown in below figure.
In Login Ajax call success, we are saving the token and user details, and making another API call /api/values, this function definition is decorated with the [Authorize] attribute. we need to pass the access token as an authorization header whenever this HTTP service request happens from the client side.
 // GET api/values
 [EnableCors(origins: "*", headers: "*", methods: "*", exposedHeaders: "X-My-Header")]
 [Authorize]
 public IEnumerable<string> Get()
 {
 return new string[] {"You are successfully Authenticated to Access the Service"};
 }
[EnableCors(origins: "*", headers: "*", methods: "*", exposedHeaders: "X-My-Header")]: Enabled the CROS origin, so that it can be accessed from any domain
[Authorize]: It is used to authenticate the token sent from the client side, once the authentication is successfully the Get() will be fired
Client-side HTTP request with Authorization Header
$("#btnLogin").on('click', function () {
$.ajax(
{
url: "/TOKEN",
type: "POST",
data: $.param({ grant_type: 'password', username: $("#loginEmail").val(), password: $("#loginPwd").val() }),
headers: { 'Content-Type': 'application/x-www-form-urlencoded' },
success: function (resp) {
sessionStorage.setItem('userName', resp.userName);
sessionStorage.setItem('accessToken', resp.access_token);
var authHeaders = {};
authHeaders.Authorization = 'Bearer ' + resp.access_token;
$.ajax({
url: "http://localhost:49501/api/values",
type: "GET",
headers: authHeaders,
success: function (response) {
$("#loginEmail").val("");
$("#loginPwd").val("");
$("#msg").text(response);
}
});
},
error: function () {
$("#msg").text("Authentication failed");
}
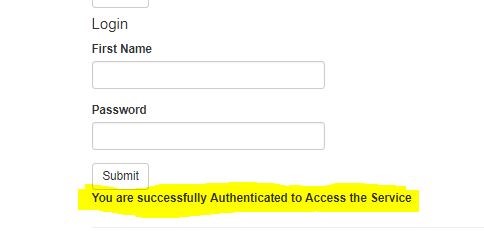
})authHeaders.Authorization = 'Bearer ' + resp.access_token: We are defining the authorization header with the access token when the /api/values HTTP call happens. On the server side, the token is validated, once its success it will return a message “You are successfully Authenticated to Access the Service”
Note: we need to send grant_type: 'password' as the data along with the user name and password through the body of the HTTP request which accesses the URL /TOKEN
Header with /api/values HTTP call

Success

From the above figures, it is obvious the token is validated, and the service returns a message.
Invalid Credential Entry
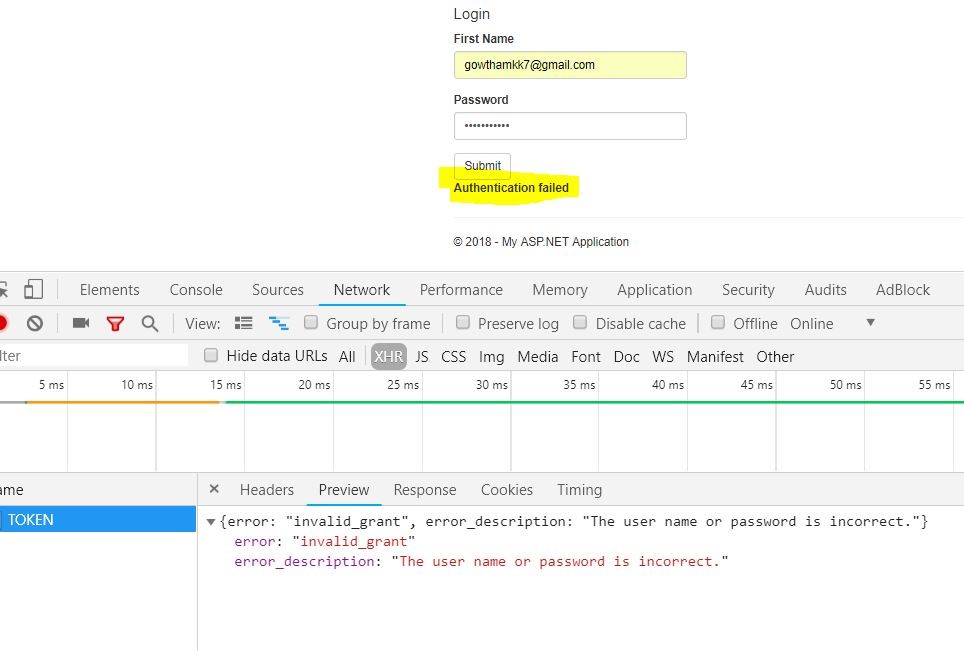
If the credential is wrong the service /TOKEN will return the error message which is shown above
Advantages of using Token-Based Authentication in ASP.NET Web API
- Server Scalability: The token provided by the client to the server is self-contained, which means it contains enough data to identify the person required for authentication. As a result, you can simply expand your web farm without relying on shared session stores.
- Loosely associated: The client application is not connected to or associated with any particular authentication system. The server only performs authentication when the token has been generated and confirmed.
- Mobile-Friendly: Cookies and browsers get along well, but managing cookies on native platforms such as Android, iOS, and Windows Phone is difficult. The token-based technique greatly simplifies this.
- Statelessness: Tokens are self-contained and contain all necessary information for authentication, allowing the server to be stateless. This scalability advantage enables horizontal scaling and simplified load balancing.
- Security: Tokens are often signed or encrypted, making them tamper-proof. They can also have short expiration durations, limiting attackers' window of opportunity.
- Decoupling: Token-based authentication allows for Single Sign-On (SSO) across various applications or services without requiring users to provide their credentials.
- Flexibility: Tokens can be used for a variety of purposes, such as user authentication, authorization, and granting specific permissions (for example, OAuth2 authorization tokens).
- Cross-Origin Resource Sharing (CORS): Tokens can be used with Cross-Origin Resource Sharing headers to secure API access from different domains.
Summary
Token-based authentication reduces the need to communicate sensitive credentials with each request, which improves security and scalability. Clients exchange credentials in return for a temporary token, which is then utilized for subsequent requests with minimal overhead. This method is suitable for a wide range of clients (browsers, mobile devices, etc.) and streamlines server-side activities. Signed/encrypted tokens, short expirations, and decoupling from session stores are all security benefits.