


25
AprASP.NET Core Authentication Using ASP.NET Core Identity
30 Mar 2024
Advanced
47.1K Views
29 min read

Learn via Video Course & by Doing Hands-on Labs
ASP.NET Core Course
ASP.NET Core Authentication Using ASP.NET Core Identity: An Overview
Authentication and Authorization is an important aspect while working on ASP.NET Core Applications. In this tutorial, we'll delve into What is Authentication, What is Authorization, What is ASP.NET Core Identity? and how to perform authentication and authorization using ASP.NET Core Identity. Learn more about different core concepts through our ASP.NET Certification Training.
What is Authentication?
Authentication is the process of checking the identity of the users accessing our application. Most of the applications have a feature for logging in and the application validates user identity against any trusted source such as a database or external login providers (i.e. Facebook, Gmail, Twitter, etc.). This process is called Authentication.
What is Authorization?
Authorization is the process of validating privileges to access a resource of the application. After successful login to the application, the authorization mechanism checks whether the login user has privileges to access the application resource.
Read More: Top 50 ASP.NET Interview Questions and Answers
What is ASP.NET Core Identity?
ASP.NET Core Identity is a built-in system in ASP.NET Core which is used for various security purpose such as managing user accounts, adding features like user registration, login, logout, managing of passwords and role based authorization. All this adds up to our ASP.NET Core applications to ensure its authentication and authorization so that the developers can properly focus on building their application without worrying much about its security.
Benefits of ASP.NET Core Identity
There are many benefits of ASP.NET Core Identity while creating ASP.NET applications that are as follows:
- Security- First and foremost advantage of ASP.NET Core Identity is its measures to enhance the security of our application. For that, it uses practices like password hashing, account lockout, protection against CSRF(Cross-Site Request Forgery) and XSS (Cross-Site Scripting).
- Customization- It lets the developers to customize user properties, password policies, authentication workflows, etc, to create their passwords as per their requirements.
- Social Logins- It means users can login through third parties who provide authentication such as Google, Facebook, Twitter or Microsoft accounts.
- Role-Based Authorization- There is built in support for role based authorization in ASP.NET Core Identity through which developers can set roles and permissions for users within their applications.
- Cross Platform Compatibility- The ASP.NET Core Identity is a cross platform mechanism that can easily run on Windows, Linux and macOS.
Drawbacks of ASP.NET Core Identity
While having so many benefits, ASP.NET Core Identity has some drawbacks to it as well like:
- For the developers who are new to the framework may find it complex as it has many components, configuration options and customization possibilities which may take some time to get used to.
- ASP.NET Core Identity uses Entity Framework by default for the purpose of data access. So, if you are working on an application that uses some other data access technology, it may a difficult task for you.
- It is not very much flexible when it comes to areas like customizing the authentication and authorization aspects of it.
- ASP.NET works only with ASP.NET Core middleware, So if your application is not a ASP.NET Core application, you will have to find other methods for its authentication and authorization.
Importance of Authentication in Web Applications
- The very first thing to why authentication is important is the security of your web application so as to protect your sensitive data.
- It also helps in maintaining the privacy of the user by only letting authenticated users to have access to their personal information and sensitive data.
- Implementing proper authentication mechanisms help in ensuring compliance with some of those regulations which are important to avoid legal failures.
- It also helps in building trust within the users that it will protect their sensitive data and privacy
Role of ASP.NET Core Identity in Authentication
ASP.NET Core Identity plays a major role in Authentication process.
- It provides a framework which helps to manage user accounts, include registration, login, logout and password management functionalities.
- It works well with ASP.NET Core's authentication middleware which enables many features like cookies, tokens and external logins.
- It comes with best security practices from password hashing, salting, to account lockout mechanisms which help in protecting the application from vulnerabilities.
- Data storage is more flexible due to many storage providers like Microsoft SQL Server, SQLite, etc
How to Perform Authentication Using ASP.NET Core Identity?
ASP.Net Core provides an identity membership system that enables us to add login functionality to our application. Identity can be added by creating a user account or can be used by external login providers such as Facebook or Twitter.
To configure the Identity in our application we can either use an SQL server database to store user information or use another persistent store such as Azure Table Storage. ASP.net Core project template allows us to create applications using .NET Core Identity. The application can be created by using Visual Studio or the Command line tool.

Using the following command, we can create an application using the Command Line Tool in the ASP.NET Core.
> donet new WebApplication1 --auth Individual
The template adds the following code to the ConfigureServices method of the startup class. This code is to add the identity service to our application. In this code, I am using the "services.AddDefaultIdentity" method that adds the default identity system configuration for specific users.
public void ConfigureServices(IServiceCollection services)
 {
 …
 …
 services.AddDefaultIdentity<IdentityUser>()
 .AddEntityFrameworkStores<ApplicationDbContext>();
 ….
 }
Alternatively, we can use the “AddIdentity” method that adds the identity configuration for specific roles and users. The AddIdentity method is used for role-based authentication. By calling the "app.UseAuthentication" method (that adds authentication middleware to the request pipeline) in the Configure method of the startup class, we can make identity available to the application.
public void Configure(IApplicationBuilder app, IHostingEnvironment env)
 {
 …
 …
 app.UseAuthentication();
 …
 }
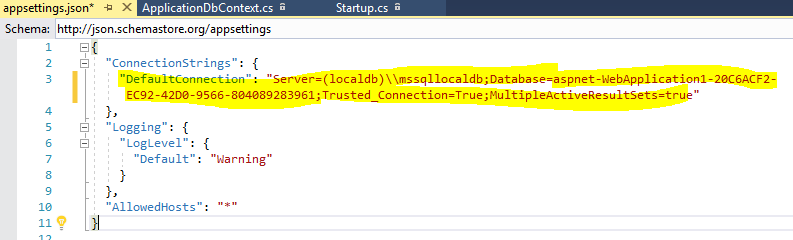
The ASP.net Core template adds the default database connection string in the appsetting.json file. The template adds the database name in the format "aspnet-{project name}-{guid}". This connection string is used in the initialization of the DBContext service in the ConfigureService method. Here we need to replace this with the actual connection string.
Read More: How can you become an ASP.NET developer
Appsettings.json
 {
 "ConnectionStrings": {
 "DefaultConnection": "Server=(localdb)\\mssqllocaldb;Database=AspnetIdentity;Trusted_Connection=True;MultipleActiveResultSets=true"
 }
 }
Now all the configuration related to authentication using Identity is done. When I launch the application and click on the "Register" link, the system will ask for database migration if the database is not compatible with the application or the database does not exist.

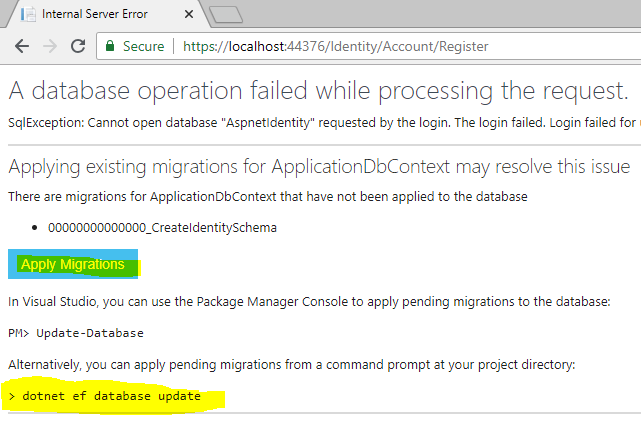
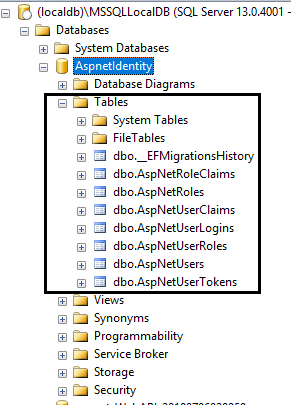
We can do the database migration either by clicking the "Apply Migrations" button or by using the command line (using the command: "dotnet ef database update"). The database migration will generate Identity membership-related tables.
This UI for login and registration is defined in the "Microsoft.AspNetCore.Identity" library as a Razor Pages. We can view or download source code for these pages from GitHub. We can also do the customization in the login and registration razor page by defining our pages.
In this library, both are defined under the “Identity” area. So, if you don’t want to change navigation, you need to add razor pages under the “Area/Identity/Pages/Account” folder. In this example, I have added my custom login page. I have added an “Account” controller and I have three methods: Login, Logout, and AccessDenied within this controller.
AccountController.cs
 using System.ComponentModel.DataAnnotations;
 using System.Threading.Tasks;
 using Microsoft.AspNetCore.Authorization;
 using Microsoft.AspNetCore.Identity;
 using Microsoft.AspNetCore.Mvc;
 namespace WebApplication1.Controllers
 {
 [AllowAnonymous]
 public class AccountController : Controller
 {
 private readonly SignInManager<IdentityUser> signInManager;

 public AccountController(SignInManager<IdentityUser> signInManager)
 {
 this.signInManager = signInManager;
 }

 [HttpGet]
 public IActionResult Login()
 {
 return View();
 }

 [HttpPost]
 [AllowAnonymous]
 [ValidateAntiForgeryToken]
 public async Task<IActionResult> Login(LoginModel model, string returnUrl = null)
 {
 ViewData["ReturnUrl"] = returnUrl;
 if (ModelState.IsValid)
 {
 var result = await signInManager.PasswordSignInAsync(model.UserName, model.Password, model.RememberMe, lockoutOnFailure: false);
 if (result.Succeeded)
 {
 return RedirectToAction(nameof(HomeController.Index), "Home");
 }
 else
 {
 ModelState.AddModelError(string.Empty, "Invalid login attempt.");
 return View(model);
 }
 }
 return View(model);
 }

 [HttpPost]
 [ValidateAntiForgeryToken]
 public async Task<IActionResult> Logout()
 {
 await signInManager.SignOutAsync();
 return RedirectToAction("Login");
 }

 public IActionResult AccessDenied()
 {
 return View();
 }
 }
 public class LoginModel
 {
 [Required]
 public string UserName { get; set; }
 [Required]
 [DataType(DataType.Password)]
 public string Password { get; set; }
 [Display(Name = "Remember me?")]
 public bool RememberMe { get; set; }
 }
 }
Login.cshtml
 @model WebApplication1.Controllers.LoginModel
 <div class="form-group">
 <label asp-for="UserName" class="col-md-2 control-label"></label>
 <div class="col-md-10">
 <input asp-for="UserName" class="form-control" />
 <span asp-validation-for="UserName" class="text-danger"></span>
 </div>
 </div>
 <div class="form-group">
 <label asp-for="Password" class="col-md-2 control-label"></label>
 <div class="col-md-10">
 <input asp-for="Password" class="form-control" />
 <span asp-validation-for="Password" class="text-danger"></span>
 </div>
 </div>
 <div class="form-group">
 <div class="col-md-offset-2 col-md-10">
 <div class="checkbox">
 <label asp-for="RememberMe">
 <input asp-for="RememberMe" />
 @Html.DisplayNameFor(m => m.RememberMe)
 </label>
 </div>
 </div>
 </div>
 <div class="form-group">
 <div class="col-md-offset-2 col-md-10">
 <button type="submit" class="btn btn-primary">Log in</button>
 </div>
 </div>
 </form>
 </section>
 </div>
 </div>
 </div>
 <div class="col-md-3"></div>
 </div>
Read More: What's new in ASP.NET Core 8 - Features, Optimizations, and Benefits
Configure Identity
Identity comes with some default configurations such as password policy, lockout policy, etc. We can also override this default configuration based on our requirements. We can override the following options
PasswordOptions (Password Policy)
Using PasswordOptions, we can put some restrictions on setting passwords. Following are password options supported by identity service.
RequireDigit: it specifies that the password must contain at least one digit
RequiredLength: it specifies the minimum length of the password
RequireNonAlphanumeric: it specifies that the user must enter a non-alphanumeric character in the password
RequireUppercase: it specifies that the password must contain at least one uppercase character
RequireLowercase: it specifies that the password must contain at least one lowercase character
RequiredUniqueChars: it specifies that the password must contain a unique set of characters
LockoutOptions(User's lockout)
It contains the user lockout-related settings. Followings are Lockout options supported by identity service.
DefaultLockoutTimeSpan: it is the default time for the user is locked out
MaxFailedAccessAttempts: it specifies the maximum number of failed attempts
AllowedForNewUsers: it determines that new user can be locked out
SignInOptions(Sign in settings)
It contains the setting related to sign-in. Followings are SignIn options supported by identity service.
RequireConfirmedEmail: it indicates that a confirmed email address is required
RequireConfirmedPhoneNumber: it indicates that a confirmed phone number is required
UserOptions (User validation settings)
It contains the settings related to user information. Following are UserOptions supported by identity service
RequireUniqueEmail: It indicates that the application requires a unique email address for each user
AllowedUserNameCharacters: Using this setting, we can specify the allowed character list in the user name
TokenOption
It contains an option related to the user token provider. It has the following options.
EmailConfirmationTokenProvider: it specifies the token provider that is used to generate tokens used in confirmation email
PasswordResetTokenProvider: it specifies the token provided that is used in the password reset email
ChangeEmailTokenProvider: it specifies the token provided that is used in the change confirmation email
ChangePhoneNumberTokenProvider:it specify the token provided that is used when the phone number is changed
AuthenticatorTokenProvider: it specifies the token provided that is used to validate two-factor sign-ins with an authenticator
ConfigureApplicationCookie (Cookie settings for Application)
It contains the settings related to application cookies. It has the following options
Cookie.Name: name of the application cookie
Cookie.HttpOnly: it specifies whether cookie is accessible from client-side scripts or not
ExpireTimeSpan: it specifies the time that the authentication ticket is stored in the cookie and remains valid.
LoginPath: Login Page path
LogoutPath: Logout Page path
AccessDeniedPath: it defines the path on which the user will redirect if authorization is fail
SlidingExpiration: This is a Boolean property. When it is set to true, a new cookie will be created when the current cookie is more than halfway through the expiration window.
ReturnUrlParameter: it is used by middleware and it specifies the return URL
In the following example, I have overridden some of the configuration options as:
The password configuration forces the user to enter at least one digit and the minimum password length is 10
The Lockout configuration that overrides default lock time and maximum failed password attempts
The Sign-In configuration forces the user to enter a confirmed email
The User configuration that allows unique emails
The cookie configuration that overrides cookie expiration time, login URL, logout URL, and Sliding Expiration setting
 public void ConfigureServices(IServiceCollection services)
 {
 …
 …

 services.AddDbContext<ApplicationDbContext>(options =>
 options.UseSqlServer(
 Configuration.GetConnectionString("DefaultConnection")));

 services.AddDefaultIdentity<IdentityUser>()
 .AddEntityFrameworkStores<ApplicationDbContext>();

 //Overide the configuration
 services.Configure<IdentityOptions>(opt =>
 {
 // Password settings
 opt.Password.RequireDigit = true;
 opt.Password.RequiredLength = 10;

 // Lockout settings
 opt.Lockout.DefaultLockoutTimeSpan = TimeSpan.FromMinutes(60);
 opt.Lockout.MaxFailedAccessAttempts = 5;

 //Signin option
 opt.SignIn.RequireConfirmedEmail = false;

 // User settings
 opt.User.RequireUniqueEmail = true;

 //Token Option
 opt.Tokens.AuthenticatorTokenProvider = "Name of AuthenticatorTokenProvider";

 });

 // Cookie settings
 services.ConfigureApplicationCookie(options =>
 {
 options.Cookie.Expiration = TimeSpan.FromDays(150);
 options.Cookie.HttpOnly = true;
 options.LoginPath = "/Account/Login";
 options.LogoutPath = "/Account/Logout";
 options.SlidingExpiration = true;
 });

 services.AddMvc().SetCompatibilityVersion(CompatibilityVersion.Version_2_1);
 }
Demo
To demonstrate the concept, I have marked the "About" action method of the Home Controller with the Authorize attribute so only authenticated users can able to access the method. If we try to access the About page without login, the system will redirect to the Login page.
 [Authorize]
 public IActionResult About()
 {
 ViewData["Message"] = "Your application description page.";

 return View();
 }
Authentication checks only the user's identity and allows the user to access the system resources. Authorization validates the user's privileges to access a system resource. There are many types of authorization available with asp.net code such as simple authorization, role-based, claims-based, and policy-based authorization. If we provide only authentication, it is called simple authorization. In this article, I will explain about the role-based authorization.
Role-based Authorization
The Identity Membership system allows us to define a role for the user and with the help of the user role, we can identify whether the user has the privilege to access the page or not. With the default template, only the UserManager class of the Identity service is available but do the role-based authentication, the RoleManager class is also required. Both the classes are available together by using the “AddIdentity” method that adds the identity configuration for specific roles and users.
 public void ConfigureServices(IServiceCollection services)
 {
 ….
 ….
 services.AddIdentity<IdentityUser, IdentityRole>()
 .AddEntityFrameworkStores<ApplicationDbContext>();
 ….
 ….
 }
To demonstrate the concept, I have created hard-code roles and users. Here, I have created 4 Roles and 4 users and mapped each user with one role. You can create a user and role by either inserting a record into the database table or using membership classes and methods you can add a user and role. In the following code snippet, I have created roles and users by using membership classes. This method is called from Configure method of the startup class when all the services are loaded and available for use.
public void Configure(IApplicationBuilder app, IHostingEnvironment env, IServiceProvider serviceProvider)
 {
 …
 …
 …
 app.UseMvc(routes =>
 {
 routes.MapRoute(
 name: "default",
 template: "{controller=Home}/{action=Index}/{id?}");
 });
 CreateUsersAndRoles(serviceProvider).Wait();
 }

 private async Task CreateUsersAndRoles(IServiceProvider serviceProvider)
 {
 //initializing custom roles
 var RoleManager = serviceProvider.GetRequiredService<RoleManager<IdentityRole>>();
 var UserManager = serviceProvider.GetRequiredService<UserManager<IdentityUser>>();
 string[] roleNames = { "Administrator", "GroupUser", "User", "Guest" };
 IdentityResult roleResult;

 foreach (var roleName in roleNames)
 {
 var roleExist = await RoleManager.RoleExistsAsync(roleName);
 if (!roleExist)
 {
 //create the roles and seed them to the database: Question 1
 roleResult = await RoleManager.CreateAsync(new IdentityRole(roleName));
 }
 }

 IdentityUser user = await UserManager.FindByEmailAsync("jignesht@gmail.com");

 if (user == null)
 {
 user = new IdentityUser()
 {
 UserName = "jignesht@gmail.com",
 Email = "jignesht@gmail.com",
 };
 await UserManager.CreateAsync(user, "abC@123abca");
 }
 await UserManager.AddToRoleAsync(user, "Administrator");

 IdentityUser user1 = await UserManager.FindByEmailAsync("tejast@gmail.com");

 if (user1 == null)
 {
 user1 = new IdentityUser()
 {
 UserName = "tejast@gmail.com",
 Email = "tejast@gmail.com",
 };
 await UserManager.CreateAsync(user1, "xyZ@123abca");
 }
 await UserManager.AddToRoleAsync(user1, "GroupUser");

 IdentityUser user2 = await UserManager.FindByEmailAsync("rakesht@gmail.com");

 if (user2 == null)
 {
 user2 = new IdentityUser()
 {
 UserName = "rakesht@gmail.com",
 Email = "rakesht@gmail.com",
 };
 await UserManager.CreateAsync(user2, "pQr@123abca");
 }
 await UserManager.AddToRoleAsync(user2, "User");

 IdentityUser user3 = await UserManager.FindByEmailAsync("guest@gmail.com");

 if (user3 == null)
 {
 user3 = new IdentityUser()
 {
 UserName = "guest@gmail.com",
 Email = "guest@gmail.com",
 };
 await UserManager.CreateAsync(user3, "pQrz@123abca");
 }
 await UserManager.AddToRoleAsync(user3, "Guest");
} 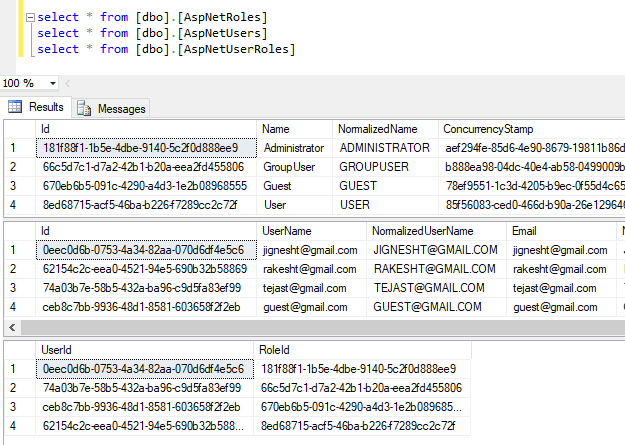
Using the RoleManager and UserManager classes of identity service, we can add the roles, users, and user - role mapping. Using the CreateAsync method of the RoleManager class, we can create new roles. Using the CreateAsync method of UserManager, we can create a new user, and using the AddToRoleAsync method, we can add a user to a particular role.
As described in the above section, we can do authorization using the Authorize attribute. This attribute has a Roles property in which we can specify the name of roles that allow access. Using the Following code, we can allow to access the action method to the user that has an "Administrator" role.
 [Authorize(Roles = "Administrator")]
 public IActionResult OnlyAdministratorAccess()
 {
 ViewData["userRole"] = "Administrator";
 return View("demo");
 }
The Authorize attribute can also be applied multiple times to the action method. By applying multiple attributes, we can allow multiple roles to access the action.
  [Authorize(Roles = "GroupUser")]
 [Authorize(Roles = "User")]
 public IActionResult MultipleRoleAccess1()
 {
 ViewData["userRole"] = "GroupUser,User";
 return View("demo");
 }
Alternatively, we can also specify multiple roles by passing comma-separated values for roles. In the following example, users in roles “GroupUser” and “User are allowed to access the action method.
 [Authorize(Roles = "GroupUser,User")]
 public IActionResult MultipleRoleAccess1()
 {
 ViewData["userRole"] = "GroupUser,User";
 return View("demo");
 }
Summary
ASP.net core provides a very rich identity membership service and using this service, we can add many facilities such as login, logout, registration, etc. by writing a few lines of the code. This service will take care of many things such as validating tokens, finding users, adding users, adding users to roles, etc. We can also customize these features and also override the behavior of the Identity Option such as PasswordOption, SignInOption, etc. For a more in-depth understanding, consider enrolling in our ASP.NET Core Certification Training Program.
FAQs
Q1. What are the Useroptions supported by identity service?
RequireUniqueEmail and AllowedUserNameCharacters are the Useroptions supported by the identity service.
Q2. What are the SignIn options supported by identity service?
RequireConfirmedEmail and RequireConfirmedPhoneNumber are the SignIn options supported by identity service.
Q3. What is SlidingExpiration?
This is a Boolean property. When it is set to true, a new cookie will be created when the current cookie is more than halfway through the expiration window.
Q4. How do I set up ASP.NET Core Identity in my ASP.NET Core application?
To set up ASP.NET Core Identity in your ASP.NET application, follow these steps:
- Install 'Microsoft.AspNetCore.Identity' package via NuGet.
- In the ConfigureServices method, configure the Identity services.
- Add the Identity middleware.
- Specify the user and role types.
Q5. What authentication methods are supported by ASP.NET Core Identity?
Authentication methods that are supported by ASP.NET Core Identity include:
- Cookie based authentication
- Token based authentication
- External authentication providers like OpenID Connect
Take our free aspnet skill challenge to evaluate your skill

In less than 5 minutes, with our skill challenge, you can identify your knowledge gaps and strengths in a given skill.