


25
AprPartial Views and View Components in ASP.NET Core
31 Mar 2024
Intermediate
45.6K Views
16 min read

Learn via Video Course & by Doing Hands-on Labs
ASP.NET Core Course
Partial Views and View Components in ASP.NET Core: An Overview
In the MVC (Model-View-Controller) pattern, the view is one of the most important layers since it is used to represent the data of the application including user interactions. A view is an HTML template that is embedded with Razor markup syntax. In ASP.NET Core, the file extension is .cshtml in which mainly C# programming language is used.
To further enhance your understanding, consider our ASP.NET Core Certification, where your coding journey transforms into a remarkable tech adventure.
In normal practice, view files are grouped in a folder name according to the controller’s name. These folders are normally stored within the views folder. Normally, views can be categorized into three different sections as follows:
Layouts
Layout is used to maintain consistency in the web pages and also using this, repetitive code can be reduced. Normally, the layout mainly contains header, navigation, menu elements, or footer sections.
Partial Views
Partial views mainly reduce code duplicates by maintaining reusable parts of the views.
View Components
It is quite similar to the partial view in terms of reusability and reduced code repetition.
Views help us to establish a SOC Design (Separation of Concerns) within the MVC application. It separates the user interface from other parts of the application. In this way, we make the application modular which gives us several benefits –
The application can be easily maintained since it is now better organized. Because views are normally grouped by the application features.
The application became loosely coupled. We can build or update the application views separately from the business logic and data access sections.
It is very easy to perform tests on the user interface since it is a separate unit.
Partial Views
Partial Views are just a view that can be reused across the web application. So, Partial Views can act as a pluggable reusable block that we can call from anywhere in the application and the content of the partial view is displayed. Whenever we use Partial Views, it must be rendered as a child view. It is very helpful as a reusable component or in the case of splitting a large interface into small parts.
We can create a partial view just like regular views and this view can be returned from the controller using ViewResult. The main difference is that the partial view does not run _ViewStart.cshtml before the rendering and also, the partial view is rendered within another view.
A partial view is normally rendered in the main views using @Html.Partial() method. Partial view passes the name of the partial and also can pass a model data which is optional. The partial view always removes the repetition because we can use the same partial view in several places of the applications.
We can also design our layout view by using partial views similar to using content views. In the normal scenario, the view engine always searches for partial view either into the current folder or shared folder. The partial view can access the parent views ViewData dictionary since it can obtain a copy of the view data.
Rendering Partial Views
Partial views can be included in an application's parent page in several ways. The below command is used to call the partial view from the parent interface –
@Html.Partial("_navigationbar")
@Html.Partial() helper method always renders the partial view in the application. This method always takes one argument as a string in which we normally specify the partial view name as a string and it returns the view content as MvcHtmlString type value. It always returns the content of the views as HTML and this gives us the facility to change or modify the HTML part before rendering.
The @Html Helper Objects also have 3 more methods namely PartialAsync, RenderPartial, and RenderPartialAsync which are mainly used for rendering the content of the partial UI. The method name contains Async will be rendered for the asynchronous code. The Render methods result needs to be written directly to the response.
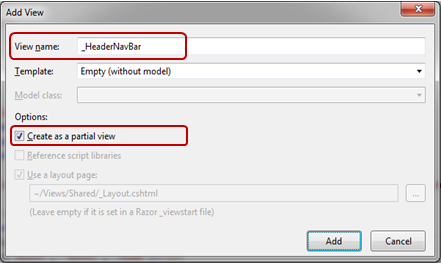
If we want to Create a Partial View, then we need to right-click on the view folder > click on the folder > select Add > click on View.
Now, the folks familiar with Angular 1. x might be in dilemma about what is actual difference between Component and Directives Right!? The major difference between both of them is Directives add behavior to existing DOM elements while Components create their view with attached behavior.
Now, we need to look at the HTML part of the partial view as per our requirements like below –
 <div class="navbar navbar-inverse navbar-fixed-top">
 <div class="container"<
 <div class="navbar-header">
 <button type="button" class="navbar-toggle" data-toggle="collapse" data-target=".navbar-collapse">
 <span class="icon-bar"></span>
 <span class="icon-bar"></span>
 <span class="icon-bar"></span>
 </button>
 @Html.ActionLink("Sample Project", "Index", "Home", new { area = "" }, new { @class = "navbar-brand" })
 </div>
 <div class="navbar-collapse collapse">
 <ul class="nav navbar-nav">
 <li>@Html.ActionLink("Home", "Index", "Home")</li>
 <li>@Html.ActionLink("About Us", "About", "Home")</li>
 <li>@Html.ActionLink("Contact", "Contact", "Home")</li>
 </ul>
 </div>
</div>
</div>
Then we can call the Partial view into the main view.
 <!DOCTYPE html>
 <html>
 <head>
 <meta charset="utf-8" />
 <meta name="viewport" content="width=device-width, initial-scale=1.0">
 <title>@ViewBag.Title – ASP.NET Core Application</title>
 @Styles.Render("~/Content/css")
 @Scripts.Render("~/bundles/modernizr")
 </head>
 <body>
 @{
 Html.RenderPartial("_HeaderNavBar");
 }
 <div class="container body-content">
 @RenderBody()

 <hr />
 <footer>
 <p>© @DateTime.Now.Year – ASP.NET Core Application</p>
 </footer>
 </div>

 @Scripts.Render("~/bundles/jquery")
 @Scripts.Render("~/bundles/bootstrap")
 @RenderSection("scripts", required: false)
 </body>
 </html>
View Component
View Components is one of the newly introduced features in ASP.NET Core MVC by Microsoft. It is very much similar to the partial view but it is much powerful compared to the partial view. View components do not use model binding. But, it works only with the data provided when we call it.
Like Partial View, View components do not depend on controllers. It has its class to implement the logic to develop the component’s model and razor markup view page. The most important thing is that View Components can utilize dependency injection, which makes them very powerful and testable. A View Components has the following features –
View Components supports SOC (Separation-Of-Concerns)
It can have its business logic as well as parameter
It is always invoked from the Layout Page
It always renders a chunk rather than a whole process.
View Components can be implemented in any part of the web application where there are some possibilities of code duplicates like the Navigation Pane, Login Panel, Menu, Shopping Cart, etc. So, in simple words, View Components behave like a web part that contains both business logic and UI design to create a web part package that can be reused in the multiple parts of the web application.
So, when we want to create a standard ASP.Net MVC page, it involves processing by both a Controller Class and a View. Just similar to this, View Components also involve processing by both a view component class and a View. The View Component class must be derived from the ViewComponent class.
In ASP.Net Core, we have two processes to declare a view component. One is we can create a class with a name and then append the ViewComponent or we can decorate our class with the ViewComponent attribute, by setting our view components name through the attribute’s name property.
 public class EmployeeViewComponent: ViewComponent
 { }

 [ViewComponent(Name = "Employee")]
 public class EmployeeInfo: ViewComponent
 {}
We can store these class files in any folder in our application. But, since the main point of view component is to create something that can be used in multiple places in our application, it makes sense to put these files related to view components in the view folders called Shared folder.
Now, we have already created our view components class and view. So, now it’s just a matter of time to add the methods to our class and put Razor markup in the view. In our view component class, we must define one method and it must be –
Have the name InvokeAsync
Must return a Task object type to IViewComponentResult
Must be decorated with the Async Keyword
Must accept a single parameter (of any type)
The async attribute will take care of wrapping the object that we return from our InvokeAsync method inside a Task object. Currently, the View method is the only method in the ViewComponent class whose return type is IViewComponentResult.
 public async Task InvokeAsync(string EmployeeCode) {
 Employee objEmployee;
 //...retrieve or build Employee object for a specified Employee
 return View(objEmployee);
 }
Now, of course, creating a view component is not much if we can’t invoke that view component from any part of the web application. So, to invoke a view component from any other view, we need to use @Component.InvokeAsync() as below:
@Component.InvokeAsync("EmployeeViewComponent",<anonomous type containing params>)
These parameters will be passed to the InvokeAsync method. Suppose, I want to fetch the employee details of code A001. For that, the invoking state will be look like this –
@await Component.InvokeAsync("EmployeeViewComponent", "A001")
View Components are normally invoked from views. But, we can invoke the view components from a controller method. Despite view components does not define any endpoints like controllers, but still we can easily implement a controller action method that can return the content of a ViewComponentResult as in the below example:
 public IActionResult EmployeeView()
 {
 return ViewComponent("EmployeeViewComponent", "A001");
 }
SUMMARY
View Component is an important feature of ASP.NET Core. It is very similar to the Partial View. In this article, we have discussed how to create and use the View Component in ASP.NET Core. You can also consider doing our ASP.NET Core Online Training from Dot Net Tricks to upskill your career.
FAQs
Q1. How a partial view can be returned from the controller?
This view can be returned from the controller using ViewResult.
Q2. Does View Components support SOC (Separation-Of-Concerns)?
Yes, View Components support SOC (Separation-Of-Concerns).
Q3. What must be the name of the compulsory method in our view component class?
It must have the name InvokeAsync.
Take our free aspnet skill challenge to evaluate your skill

In less than 5 minutes, with our skill challenge, you can identify your knowledge gaps and strengths in a given skill.