
How to Upload a File in ASP .NET MVC?
Uploading a file in ASP .NET MVC: An Overview
In this MVC Tutorial, we will see how to upload a file. Uploading a file in the ASP.NETMVC application is very easy. The posted file is automatically available as a HttpPostedFileBase parameter in the action of the controller. For uploading a file on the server you are required to have a file input control within HTML form having the encoding type set to multipart/form-data. The default encoding type of a form is application/x-www-form-urlencoded and this is not sufficient for posting a large amount of data to the server.
Read More: MVC Interview Questions and Answers
Let's See How to Do It
Step 1: Form for uploading the file
@using (Html.BeginForm("FileUpload", "Home", FormMethod.Post, new { enctype = "multipart/form-data" }))
{
 @Html.ValidationSummary();
 <ol>
 <li class="lifile">
 <input type="file" id="fileToUpload" name="file" />
 <span class="field-validation-error" id="spanfile"></span>
 </li>
 </ol>
 <input type="submit" id="btnSubmit" value="Upload" />
}
Step 2: Validating the file on the client side
<script type="text/jscript">
//get file size
function GetFileSize(fileid) {
try
{
var fileSize = 0;
//for IE
if ($.browser.msie)
{
//before making an object of ActiveXObject,
//please make sure ActiveX is enabled in your IE browser
var objFSO = new ActiveXObject("Scripting.FileSystemObject"); var filePath = $("#" + fileid)[0].value;
var objFile = objFSO.getFile(filePath);
var fileSize = objFile.size; //size in kb
fileSize = fileSize / 1048576; //size in mb
}
//for FF, Safari, Opeara and Others
else
{
fileSize = $("#" + fileid)[0].files[0].size //size in kb
fileSize = fileSize / 1048576; //size in mb
}
return fileSize;
}
catch (e)
{
alert("Error is :" + e);
}
}
//get file path from client system
function getNameFromPath(strFilepath)
{
var objRE = new RegExp(/([^\/\\]+)$/);
var strName = objRE.exec(strFilepath);
if (strName == null)
{
return null;
}
else
{
return strName[0];
}
}
$("#btnSubmit").live("click", function ()
{
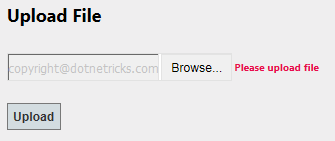
if ($('#fileToUpload').val() == "")
{
$("#spanfile").html("Please upload file");
return false;
}
else
{
return checkfile();
}
});
function checkfile()
{
var file = getNameFromPath($("#fileToUpload").val());
if (file != null)
{
var extension = file.substr((file.lastIndexOf('.') + 1));
// alert(extension);
switch (extension) {
case 'jpg':
case 'png':
case 'gif':
case 'pdf':
flag = true;
break;
default:
flag = false;
}
}
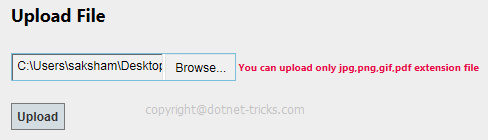
if (flag == false)
{
$("#spanfile").text("You can upload only jpg,png,gif,pdf extension file");
return false;
}
else
{
var size = GetFileSize('fileToUpload');
if (size > 3)
{
$("#spanfile").text("You can upload file up to 3 MB");
return false;
}
else
{
$("#spanfile").text("");
}
}
}
$(function ()
{
$("#fileToUpload").change(function () {
checkfile();});
});
</script>
Step 3: Controller's action for receiving the posted file
[HttpPost]
public ActionResult FileUpload(HttpPostedFileBase file)
{
 if (ModelState.IsValid)
 {
 if (file == null)
 {
 ModelState.AddModelError("File", "Please Upload Your file");
 }
 else if (file.ContentLength > 0)
 {
 int MaxContentLength = 1024 * 1024 * 3; //3 MB
 string[] AllowedFileExtensions = new string[] { ".jpg", ".gif", ".png", ".pdf" };

 if (!AllowedFileExtensions.Contains(file.FileName.Substring(file.FileName.LastIndexOf('.'))))
 {
 ModelState.AddModelError("File", "Please file of type: " + string.Join(", ", AllowedFileExtensions));
 }

 else if (file.ContentLength > MaxContentLength)
 {
 ModelState.AddModelError("File", "Your file is too large, maximum allowed size is: " + MaxContentLength + " MB");
 }
 else
 {
 //TO:DO
 var fileName = Path.GetFileName(file.FileName);
 var path = Path.Combine(Server.MapPath("~/Content/Upload"), fileName);
 file.SaveAs(path);
 ModelState.Clear();
 ViewBag.Message = "File uploaded successfully";
 }
 }
 }
 return View();
}
How it works...

Summary
I hope you will enjoy the tips while working with MVC. I would like to have feedback from my blog readers. Your valuable feedback, questions, or comments about this article are always welcome. Enjoy Coding..!