


25
AprGetting Started With React Redux : Part2
13 Mar 2024
Intermediate
5.73K Views
23 min read

Learn via Video Course & by Doing Hands-on Labs
ReactJS Course
Getting Started With React Redux: An Overview
In our previous part, Getting Started With React Redux : Part1, we have seen many concepts like What is Redux, How to use Redux, What are the different advantages of Redux with React, and the most important thing is Why we can use Redux with React. In this part of React Tutorial, we are going to see one example about How to use Redux with React.
We already learned some important concepts like Action, Store, and Reducer, so now let’s implement the simple Read operation of CRUD, let me tell you that I am not going to cover the complete CRUD operation. We will learn it later on using the separate article. For more knowledge on React, you should try our React JS Certification.
Read More - React JS Interview Questions And Answers
Implementing Redux with React
To implement Redux with React, we will follow a few steps to perform the Read operation, in which we are going to fetch the list of employees from our local json-server.
Step 1
The first and the primary step before working with React app is to create the new react app using the below npm command.
Create-react-app crud-react-reduxAfter executing the above npm command, our project will be created and we are going to work with the following project structure.
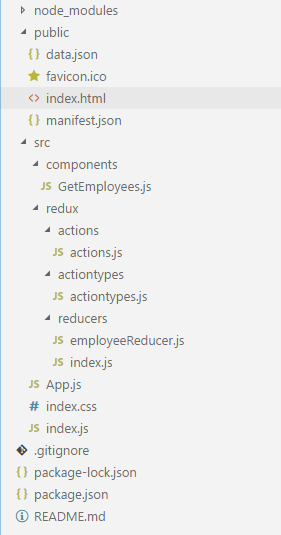
As you can see in the above image, I have created separate folders for better code and folder structure readability as given below.
- Components
It is used to store all the react components either stateful or function-based components into the application, its always recommended to follow some architectural pattern so that once the project gets the huge number of components, it can be easily accessible across the app.
- Redux
It consists of different child folders such as action, action types, and reducers that contain the all required configuration to create the Redux store object, configure the store, accessing reducers and respective files.
Step 2. Install Dependencies
To work with Redux and other things, we need to have installed a few dependencies, for that we need to just execute a few npm commands which are listed below.
Commands
Command
Description
Npm install react-redux
It is official redux binding to use different functions to use into your project
Npm install redux-thunk
Middleware for Redux which is used to call the actions creators which returns a function
Npm install Redux
It is a state container that consists module bundler, and also includes pre-compiled production and development builds
Npm install axios
Used to call the API and it is just an HTTP based client for the browser
Npm install reactstrap
To use different bootstrap components like Table in our application
Npm install –g json-server
We are going to create a fake API using JSON data
Npm install bootstrap
To use bootstrap minified CSS
Install all the above-listed dependencies, because we are going to work with all those libraries into our application using the example as explained given below.
Read More - React JS Roadmap
Step 3. Create fake API data
We have already installed json-server dependency previously, let me tell you what json-server is. Json-server is used to create fake API for mockup because sometimes we need to test some functionality without waiting for API to be created by the back-end developer, at that time json-server will be useful to generate fake data using a few steps. For that, we will create a JSON file that consists of fake JSON data for our demo, create a new file named data.json.
/public/data.json
 {
 "employees": [
 {
 "firstName": "Manavv",
 "lastName": "Pandya",
 "email": "manav@gmail.com",
 "phone": "12345678910",
 "id": 1
 },
 {
 "firstName": "test",
 "lastName": "test",
 "email": "a@b.com",
 "phone": "12345678910",
 "id": 2
 },
 {
 "firstName": "test1",
 "lastName": "test1",
 "email": "a123@b.com",
 "phone": "12345678910",
 "id": 3
 },
 {
 "firstName": "test2",
 "lastName": "test2",
 "email": "a1234@b.com",
 "phone": "12345678910",
 "id": 4
 },
 {
 "firstName": "test3",
 "lastName": "test3",
 "email": "a12345@b.com",
 "phone": "12345678910",
 "id": 5
 }
 ]
 }
In this data.json file, I have created a total of 5 different records for the employee, so we will render it inside a table using the redux pattern. I know you are eager to know how we can call these records, so for that, we need to use one command as described below. Go to the directory inside we have created a data.json file and executed the below command.
- Cd public
To change the existing targeted folder, and then write a single line of command to run json-server from our application.
- Json-server data.json
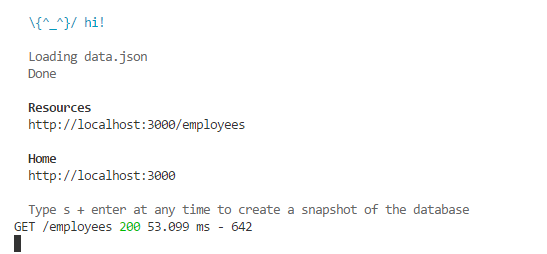
When you execute the above command, you can see the output into the console as given below which shows the details in which port, the fake API running, and its child API data along with the respective API end-point.
Open the above-given URL in the browser and see the data of employees and you will have an output like this.
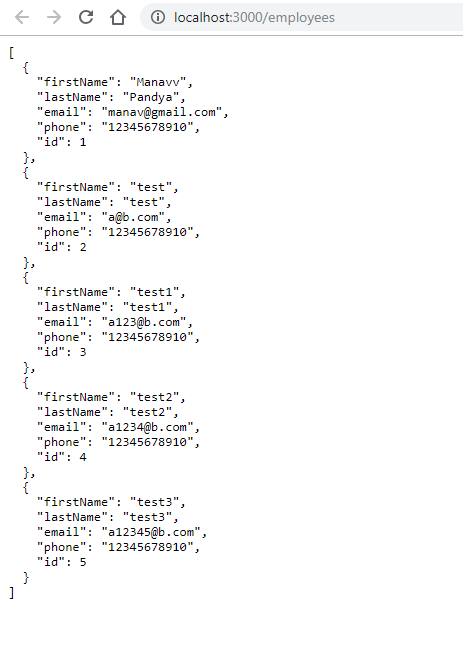
Now we have a working API that has a total of five number records of an employee, and by using it, let’s implement the redux part to get the list of the employee.
Step 4.
In this step, we are going to create a few important files regarding redux like action, action types, and reducer. Create a new folder inside the src directory named redux and create different sub-folders as given below.
Actions
Action types
reducers
 import { GET_EMPLOYEES, ADD_EMPLOYEE, DELETE_EMPLOYEE, EDIT_EMPLOYEE } from '../actiontypes/actiontypes';
 import axios from 'axios';

 export const getEmployees = () => {
 return dispatch => {
 return axios.get("http://localhost:3000/employees").then((response) => {
 console.log(response);
 dispatch({ type: GET_EMPLOYEES, payload: response.data });
 })
 }
 }
In the above file, we have called the API to get a list of employees from our json-server API that we have created previously, and the next step is to create the action constant so that each action can be identified differently across the app to avoid distraction or beach of application flow.
/src/redux/actiontypes/actiontypes.js export const GET_EMPLOYEES = "GET_EMPLOYEES";This file is used to create different action types that we are going to use inside the reducer to identify actions differently, and it's always recommended to follow such configuration which makes it easy to update and maintain across the app.
/src/redux/reducers/employeeReducer.js const employeeReducer = (state = [], action) => {
switch (action.type) {
case 'GET_EMPLOYEES':
return action.payload;
default:
return state;
}
}
export default employeeReducer;In the above file, we have created an employee reducer, which is used to maintain the state of an employee module and it will be located into a single reducer called a combined reducer. In order to create a combined reducer, create a new file inside the reducer folder as described below.
/src/redux/reducers/index.js import { combineReducers } from 'redux';
// Imported employee reducer
import employeeReducer from './employeeReducer';
const rootReducer = combineReducers({
employee: employeeReducer,
});
export default rootReducer;After doing all the above-given steps, now we are done with our primary configuration related to Redux implementation, and now we will create the component file which is used to list all the employees after getting the API data coming all over from the network call.
Step 5.
Create a new folder inside the /src folder named components and create a new file as described below. In which we are going to write a code snippet to list down the employee records using the card component of reactstrap.
/src/components/GetEmployees.js import React, { Component } from 'react';
import { connect } from 'react-redux';
import { Card, Button, CardTitle, CardText, Row, Col, Table } from 'reactstrap';
import { getEmployees } from '../redux/actions/actions';
class GetEmployees extends Component {
constructor(props) {
super(props);
this.state = {
emps: []
}
}
// To call get api of employee using actions file
componentDidMount() {
this.props.getEmployees();
}
// To render the list of employee
render() {
const employees = this.props.employee;
console.log(employees);
return (
<Card body>
<CardTitle>Employees</CardTitle>
<CardText>
<Table dark>
<thead>
<tr>
<th>#</th>
<th>Name</th>
<th>User Name</th>
<th>Email</th>
<th>Phone</th>
</tr>
</thead>
<tbody>
{/* Iterate over employee records */}
{employees.map((post) => (
<tr key={post.id}>
<th scope="row">{post.id}</th>
<td>{post.firstName}</td>
<td>{post.lastName}</td>
<td>{post.email}</td>
<td>{post.phone}</td>
</tr>
))}
</tbody>
</Table>
</CardText>
</Card>
);
}
}
// Mapping of state to props to use it locally in this file
const mapStateToProps = (state) => {
return { employee: state.employee }
}
// Connecting this file with redux
export default connect(mapStateToProps, { getEmployees })(GetEmployees);In this file, we have implemented a code snippet to serve the list of employees.
When the component is mounted, our API to get the list of employees will be triggered and it will fetch the results out of the fake API and all the records will be configured inside the employee reducer file according to the type of action.
After getting all the records, it will be configured with the current file’s props object and from where we can access a list of employees into the existing component wherever required.
Inside the render method, we have used the different reactstrap components such as table, card, button to make the user interface clean yet simple to represent the list of employees along with the independent employee details in the card.
And at last, we have connected our component to the redux global state object so that can use all the state properties whenever we want by subscribing to it.
Step 6.
So far, we have created and implemented all the necessary files, now it's time to list down the record, for that we need to modify our app component which is the main entry point of our application as given below.
/src/App.js import React, { Component } from 'react';
import './index.css';
// Bootstrap components
import { Card, Button, CardTitle, CardText, Row, Col, Table } from 'reactstrap'
// Importing GetEmployee file
import GetEmployees from './components/GetEmployees';
class App extends Component {
render() {
return (
<div className="App">
<div className="docs-example">
<h1 className="post_heading">Using Redux with React</h1>
<Row>
<Col sm="12">
{/* Includeing re-usable component */}
<GetEmployees />
</Col>
</Row>
</div>
</div>
);
}
}
export default App;We have used multiple import statements and added the "GetEmployee" component, so whenever our App.js is rendered with the selected page, at a time the GetEmployee component stars its action to render the list of records according to the defined actions.
Step 7
Probably the last and most important step, because in this step, we are going to configure our combined reducer so that our global state object will be accessible to the rest of the files across the app which are connected to the redux using redux-thunk middleware.
/src/index.js import React from 'react';
import ReactDOM from 'react-dom';
import { Provider } from 'react-redux';
import ReduxThunk from 'redux-thunk';
import { createStore, applyMiddleware } from 'redux';
import rootReducer from './redux/reducers/index';
import App from './App';
// To use bootstrap css
import 'bootstrap/dist/css/bootstrap.min.css';
// To apply middleware to the store
const createStoreWithMiddleware = applyMiddleware(ReduxThunk)(createStore);
// Providing root reducer to the app component
ReactDOM.render(
<Provider store={createStoreWithMiddleware(rootReducer)}>
<App />
</Provider>,
document.getElementById('root')
);Now we have completed almost all the configuration for the application using Redux, the last step is to execute the application, and let's see how it works.
Step 8
To run our application, we need to use the following npm command.
Npm startAnd the same time, open a new PowerShell window and change the directory to /public where we have created the data.json file.
Json-server data.jsonOpen both tabs for front-end project as well as json-server API URL.
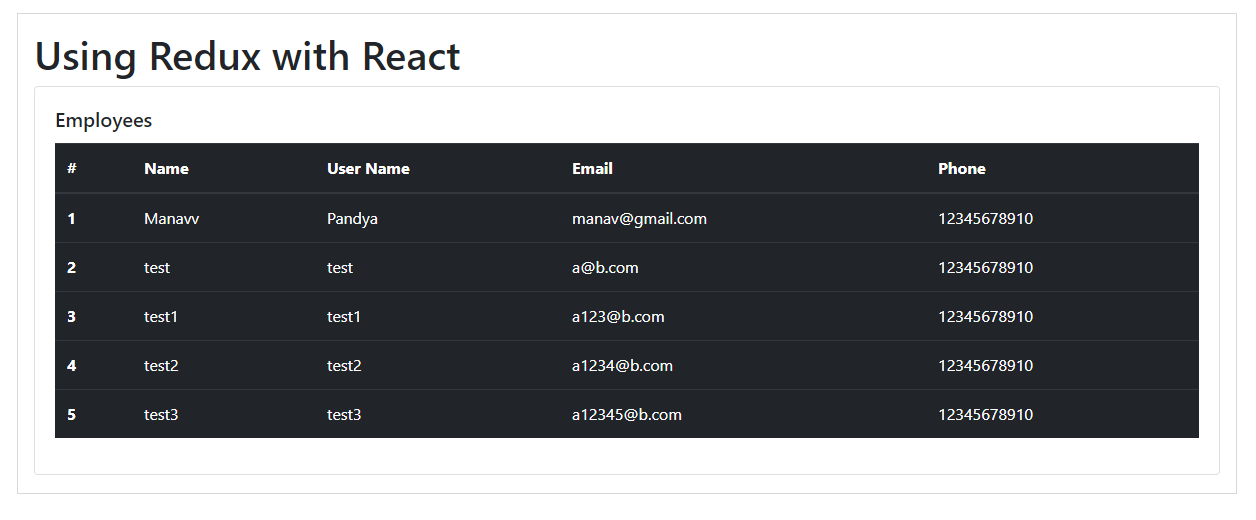
Output
And to check the API data of the fake API, we can open another browser window and can see the set of records as given below.

This is how we have developed a simple demo React application with Redux by following the robust app architect and recommended configuration.
Summary
In this two-part tutorial series named Using Redux with React, we have learned different things which are listed below.
What is Redux
Different concepts of Redux
Why we can use Redux with React and its Advantages
Using Redux with React with Example
I hope you get to something from this article, I would recommend you to go through the source code attached to this article and try to implement different examples using Redux, Happy Learning.
Take our free react skill challenge to evaluate your skill

In less than 5 minutes, with our skill challenge, you can identify your knowledge gaps and strengths in a given skill.